When you own a Mini Cooper, whether it’s a Cooper S or any other model, maintaining optimal performance is important. One aspect to consider is your fuel pump, which ensures that your car gets the necessary fuel to run efficiently. In some cases, you may need to reset the fuel pump to restore its functionality.
Resetting the Mini Cooper fuel pump is a simple task that involves locating the fuel pump inertia switch and pressing it to restore the pump’s operation. This switch is designed to cut off the fuel supply in case of a rollover or accident, and can be found between the brake master cylinder and the hood hinge, inside the engine compartment on the driver’s side of the vehicle. Following these steps should help you quickly and easily reset your fuel pump, so your Mini Cooper can continue running smoothly.
Where is the Fuel Pump Located in a Mini Cooper
Friendly reminder: always take safety precautions before working on your car. To locate and access the fuel pump on your Mini Cooper R56, you’ll need to follow these simple steps:
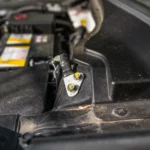
- Engine Compartment: Begin by opening the hood of your car to get access to the engine bay. The fuel pump is typically located in the engine compartment on the driver’s side of the vehicle. You’ll find an inertia switch that can be used to reset the fuel pump between the brake master cylinder and the hood hinge.
- Access Panels: Keep an eye out for any access panels or covers in the engine bay that may be protecting the fuel pump. Once identified, carefully remove them to get proper access to the pump.
- Rear Seat Cushion: If you can’t find the fuel pump in the engine compartment, it might be located under the rear seat cushion. Remove the cushion by pressing down on the front edge and lifting it up.
- Carpet: With the rear seat cushion removed, you will see the carpet below the seat. Carefully lift the carpet to reveal the fuel pump access panel in the floor.
Now that you have located and accessed the fuel pump in your Mini Cooper, you’re prepared to reset it. Remember to stay cautious and patient when working on your vehicle, and always ensure to follow any specific instructions from your car manual or seek professional assistance if needed.
How to Reset the Mini Cooper Fuel Pump
Resetting your Mini Cooper’s fuel pump is a straightforward process that involves locating the inertia switch and resetting it. The inertia switch is used to cut off the fuel pump in case of a rollover or other accidental tripping. Here’s a friendly guide on how to do this.
First, open the hood of your Mini Cooper, and locate the inertia switch. On older models, you can find the inertia switch between the brake master cylinder and the hood hinge, inside the engine compartment on the driver’s side of the vehicle. If you have trouble finding it, you can consult your vehicle owner’s manual for its exact location.
Once you locate the inertia switch, you will need to reset it. To do this, make sure you have the necessary tools, including a 10mm socket, brass punch, and rubber mallet. Before you start, ensure that your Mini Cooper’s battery is disconnected for safety purposes.
Now, use the 10mm socket to loosen the mounting bracket on the inertia switch. Gently tap on the brass punch with the rubber mallet to push the switch back into position, ensuring that it clicks into place. This should reset the fuel pump.
Finally, reconnect your Mini Cooper’s battery, and start the engine to ensure the fuel pump is functioning correctly. If the vehicle starts up without any issues, you have successfully reset the fuel pump. Remember that if you face any difficulties or doubts during the process, it’s always a good idea to consult a professional mechanic for assistance.
Tools and Materials Required
To reset the fuel pump on your Mini Cooper, you’ll need a few specific tools and materials to ensure a smooth and successful process. The following list will provide the necessary items to help you easily navigate through the fuel pump reset procedure.
- Talent tools: Having a dependable set of tools to work on your Mini Cooper is essential. A quality socket set, screwdrivers, and wrenches will come in handy when working with different size fasteners and reaching various components.
- Parts required: Before you begin, make sure you have access to a replacement fuel pump and an O-ring seal if necessary. It’s always best to use genuine Mini Cooper parts to ensure the best fit and performance.
- Wrenches: A set of wrenches, including an adjustable wrench, will be useful for removing and securing various size fasteners during the reset process. Make sure you have a range of wrench sizes to accommodate the various fasteners found in your Mini Cooper.
- Different size fasteners: When working on any vehicle, it’s crucial to have an assortment of fasteners available. This will help you quickly replace any lost or damaged fasteners during your fuel pump reset. Keep a selection of nuts, bolts, screws, and clips on hand to make the process smoother.
- Size fasteners: Familiarize yourself with the specific fastener sizes required for your Mini Cooper’s fuel pump reset. Having the correct size fasteners will ensure a secure fit and prevent any potential issues down the line.
By gathering these tools and materials ahead of time, you’ll be well-prepared to reset your Mini Cooper’s fuel pump with ease and confidence. Remember to work carefully and patiently, as a friendly reminder, to guarantee a successful outcome. Happy wrenching!