Ever had your Toyota suddenly shut down while driving? Dash lights gone dark, radio silent, and windows frozen? The culprit might be a tiny but mighty component called the AM1 fuse. This high-amperage fuse is the unsung hero protecting multiple electrical systems in your Toyota vehicle.
Let’s dive into everything you need to know about the AM1 fuse – what it does, why it fails, and how to fix it without breaking the bank or your sanity.
What Exactly Is the AM1 Fuse?
The AM1 fuse is essentially a guardian for your Toyota’s electrical system. This high-amperage fuse (typically ranging from 30 to 60 amps depending on your specific model) protects multiple critical electrical circuits simultaneously.
Think of it as the bouncer at an exclusive club – it decides which electrical currents get through and which ones are too dangerous to allow inside your vehicle’s systems.
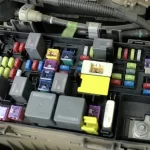
Where to Find This Elusive Component
Looking for the AM1 fuse? You’ll typically find it in one of two locations:
- In the engine compartment fuse box (also called the “engine room fuse box”)
- Under the dashboard on the driver’s side in some models
The amperage rating varies depending on what Toyota you drive:
- 30 amps in some models
- 40 amps in certain Corolla models
- 50 amps in some Land Cruiser variants
- 60 amps in other Toyota vehicles
What the AM1 Fuse Protects
This powerhouse fuse safeguards several critical systems in your Toyota, which is why so many things stop working when it blows:
- Starter system
- Cigarette lighter and accessory power outlets
- Power door lock systems
- Stop light circuits
- Various accessory systems
For example, in a 2010 Toyota Corolla, the AM1 fuse (rated at 7.5A in this specific model) protects the starting system, ACC, and CIG circuits. In Land Cruiser models, the AM1 fuse shields all components in the ST, CIG, and ACC fuses.
Warning Signs of a Blown AM1 Fuse
When your AM1 fuse gives up the ghost, you’ll know it. The symptoms are dramatic and often appear suddenly:
The Electrical Apocalypse
- Complete electrical system failure while driving
- Dashboard goes dark – gauges and warning lights vanish
- Power windows and accessories freeze
- Your vehicle may not start after turning off the ignition
- Radio and interior electrical components stop working
As one driver described on a forum: “While driving, everything went off. My radio doesn’t work, tach or speedo doesn’t work, windows don’t roll down.” Another reported: “My 86 Tercel suddenly died. All the dash lights went out, but the headlights stayed on.”
The Replacement Nightmare
Perhaps most frustrating is when you replace the fuse only to have it blow again immediately. Many Toyota owners report replacing their AM1 fuse only to watch it blow as soon as they turn the ignition. This indicates you’ve got deeper electrical issues that need addressing.
Why Does the AM1 Fuse Keep Blowing?
The AM1 fuse doesn’t blow without reason. Here are the most common culprits:
1. Exposed Wiring Creating Short Circuits
The number one cause is exposed wiring creating a short circuit. As Toyotas age, wire insulation becomes brittle and cracks, particularly in wire bundles near the engine block or other metal components.
One Toyota owner discovered: “There was a small area of bare copper wire that had been touching the block.” This tiny exposure was enough to cause repeated electrical failures.
2. Alternator Wiring Problems
Alternator connections can develop worn insulation or loose connections that create intermittent shorts. These issues are particularly tricky because they might only cause problems when the vehicle is moving or when specific components are activated.
3. Starter-Related Issues
Problems with the starter can trigger AM1 fuse failures. A Toyota 4Runner owner found that “The solenoid wire clip was loose, upon further inspection I found that it attaches to a two-prong wire inside the starter and one side had broke free and was grounding.” After fixing this connection, the fuse stopped blowing.
4. Age-Related Wire Degradation
Time is tough on electrical systems. As one experienced Toyota owner explained: “When these cars get so old, the plastic insulation on them gets stiff and brittle, even more where it gets hot around the engine. Eventually it cracks and breaks off the wire exposing it, and allows it to short out.”
How to Troubleshoot AM1 Fuse Problems Like a Pro
When your AM1 fuse keeps blowing, take a systematic approach to find the root cause:
Step 1: Identify Which Circuits Are Affected
Make a list of what’s not working when the fuse blows. This provides clues about which circuit might be causing the problem. If only certain systems fail, you can narrow down your search.
Step 2: Perform a Visual Inspection of Wiring
Get under the hood and carefully examine wiring bundles, especially those near:
- The engine block
- Alternator
- Starter
- Areas exposed to high heat
Look specifically for:
- Brittle or cracked insulation
- Wires touching metal components
- Areas where insulation has melted from engine heat
Step 3: Check Alternator Connections
A proven troubleshooting technique involves disconnecting the alternator wiring:
- Disconnect the wires from the alternator
- Replace the blown AM1 fuse
- Turn the ignition to “on” (don’t start the engine)
- If the fuse doesn’t blow, reconnect alternator wires one at a time
This process helps pinpoint which connection might be causing the short circuit.
Step 4: Inspect Starter Wiring
Check all starter wiring and connections for:
- Loose connections
- Damaged wires
- Broken terminals
- Signs of heat damage or melting
A Toyota 4Runner owner discovered that a broken connection inside the starter solenoid was causing recurring AM1 fuse failures.
Step 5: Field Repairs for Emergency Situations
In a pinch, these temporary fixes might get you back on the road:
- Separate wiring bundles from metal contact points
- Wrap exposed wires with high-quality electrical tape
- Reposition wiring away from potential ground points
Remember, these are only temporary solutions until proper repairs can be made!
Preventing Future AM1 Fuse Failures
Want to avoid future electrical nightmares? Here’s how to prevent AM1 fuse problems:
Replace Aging Wiring Harnesses
For older Toyotas, consider replacing entire wiring harnesses or sections showing deterioration. Yes, it’s an investment, but it’s cheaper than repeatedly fixing electrical failures or being stranded.
Use Protective Sleeving
Add high-temperature protective sleeving to wiring bundles in the engine compartment. This extra layer of protection can prevent future insulation failures, especially for wires near hot components.
Make Regular Inspections Part of Your Maintenance
Every few months, especially on older vehicles, check:
- Wire insulation for cracks or brittleness
- Connections for corrosion or looseness
- Wiring routes to ensure proper clearance from hot or moving parts
- Signs of rubbing or chafing on wire bundles
Real-World AM1 Fuse Success Stories
Toyota owners have shared their AM1 fuse victory stories online, proving these issues can be solved with persistence:
A Toyota Tercel owner tracked down his mysterious electrical problems by disconnecting the alternator wiring, replacing the fuse, turning the ignition to “on,” and then methodically reconnecting components until he identified the exact wire causing the short.
Another Toyota owner discovered that his recurring AM1 fuse problems stemmed from cracked insulation on a wire bundle that only contacted metal when the engine vibrated in a specific way – explaining why the problem seemed so intermittent.
The Expert’s AM1 Fuse Replacement Procedure
When replacing your AM1 fuse, follow these steps for best results:
- Disconnect the negative battery terminal first (safety first!)
- Locate the fuse box containing the AM1 fuse
- Remove the blown AM1 fuse carefully
- Inspect it – a blown fuse will have a broken metal strip inside
- Check the amperage rating and replace it with a fuse of the exact same rating
- Never use a higher-amperage fuse as this can cause electrical damage
- Reconnect the battery terminal
- Test the vehicle’s electrical systems
AM1 Fuse Specifications Across Toyota Models
Different Toyota models use different AM1 fuse ratings. Here’s a quick reference guide:
| Toyota Model | AM1 Fuse Rating | Location | Protected Systems |
|---|---|---|---|
| Corolla (2010) | 7.5A | Engine Room Fuse Box | Starting system, ACC, CIG |
| Land Cruiser | 30A-50A | Engine Compartment | All components in ST, CIG and ACC |
| 4Runner | 50A | Engine Room Relay Block | Dashboard, starter, accessories |
| Tercel | 30A | Under Dash Fuse Box | Electrical system, accessories |
| Tundra (2014) | 60A | Engine Compartment | Multiple accessory systems |
Common AM1 Fuse Replacement Mistakes to Avoid
Even experienced DIYers make these mistakes when fixing AM1 fuse issues:
Using the Wrong Amperage Fuse
Always replace the AM1 fuse with one of identical amperage. Using a higher-rated fuse might seem like a quick fix, but it can allow dangerous current levels to flow through your vehicle’s electrical system.
Ignoring the Root Cause
The biggest mistake is treating the blown fuse as the problem rather than a symptom. If you don’t fix what caused the fuse to blow, you’ll just keep replacing fuses.
Overlooking Intermittent Issues
Some shorts only occur when the vehicle is moving or when components heat up. Don’t assume everything’s fixed just because a new fuse works when the vehicle is stationary.
Skipping the Battery Disconnect
Always disconnect the battery before working on electrical components. This simple step prevents accidental shorts and potential injury.
Tools You’ll Need for AM1 Fuse Diagnosis
Ready to tackle your AM1 fuse issues? Gather these tools:
- Digital multimeter (for testing circuits)
- Fuse puller tool (many fuse boxes include one)
- Flashlight or headlamp (for seeing in dark corners)
- Assorted replacement fuses (including the correct AM1 rating)
- Electrical tape for temporary repairs
- Wire brush for cleaning corroded connections
- Basic hand tools for accessing components
Understanding Your Toyota’s Electrical System
The AM1 fuse is just one component in your Toyota’s complex electrical network. Modern vehicles contain miles of wiring and dozens of control modules, all working together to keep your car running smoothly.
When troubleshooting electrical problems, it helps to understand that your vehicle has multiple circuits, each protected by specific fuses. The AM1 fuse protects several important circuits, which is why its failure causes such widespread problems.
Modern Toyotas also incorporate sophisticated safety features that may shut down certain systems to prevent damage during electrical irregularities. This protective behavior can sometimes make diagnosis more challenging.
When DIY Isn’t Enough: Getting Professional Help
While many AM1 fuse issues can be resolved with DIY troubleshooting, some electrical problems require specialized knowledge and tools. Consider seeking professional help if:
- You’ve replaced the AM1 fuse multiple times and can’t locate the short
- The electrical problems are intermittent and difficult to reproduce
- You’ve identified damage to complex components like the ECU or other control modules
- The vehicle has aftermarket modifications that might complicate diagnosis
Automotive electricians specialize in tracking down these elusive electrical gremlins and can save you time and frustration in complex cases.
AM1 Fuse Problems in Newer Toyota Models
While older Toyotas tend to have more insulation breakdown issues, newer models aren’t immune to AM1 fuse problems. In fact, modern vehicles with their complex electronics can present different challenges.
Newer Toyota owners have reported AM1 fuse failures related to:
- Aftermarket accessory installations (especially audio equipment)
- Water intrusion into electronic modules
- Software issues in control modules
- Factory wiring harness routing problems
This highlights the importance of proper installation when adding accessories to newer vehicles and being cautious about water exposure to electronic components.
By understanding the critical role the AM1 fuse plays in your Toyota’s electrical system and following these troubleshooting steps, you can resolve most electrical issues and keep your vehicle running reliably for years to come.