Ever installed a new cabin air filter only to wonder if you put it in the right way? You’re dealing with a common dilemma. Getting the airflow direction correct is crucial for your vehicle’s air quality and HVAC system performance. This guide will walk you through everything you need to know about cabin air filter orientation to ensure you’re breathing clean air and keeping your system running efficiently.
Why Cabin Air Filter Direction Matters
Installing your cabin air filter in the correct direction isn’t just about following instructions—it significantly impacts performance. When installed correctly, your filter can trap up to 98.7% of PM2.5 particles compared to only 84.2% when reversed.
A properly oriented filter:
- Maximizes filtration efficiency
- Ensures optimal airflow (up to 20% more airflow than reversed filters)
- Extends the filter’s lifespan by 6-9 months
- Prevents excess strain on your HVAC system
This informative video demonstrates the impact of correct versus incorrect installation on airflow performance.
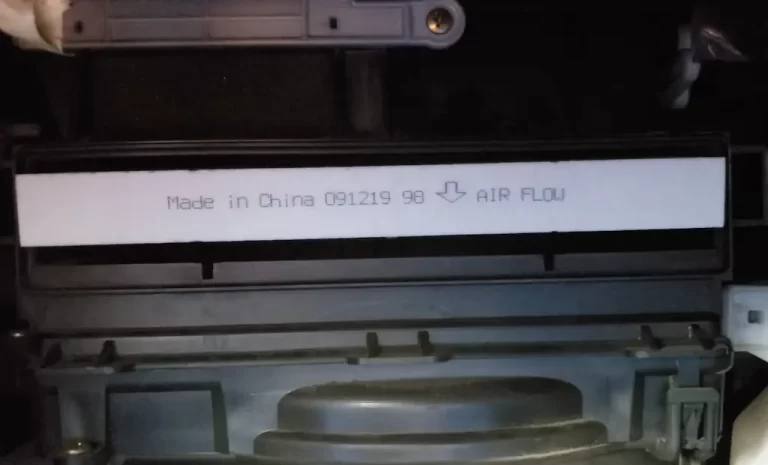
Understanding Filter Directional Markings
One of the most confusing aspects of cabin air filters is deciphering the directional markings. Here’s what different indicators mean:
Arrow Types and Their Meanings
- “UP” Arrows
- Found commonly on Toyota, Honda, and Subaru OEM filters
- Indicates gravitational orientation (which side should face up)
- Doesn’t necessarily indicate airflow direction
- Airflow Direction Arrows
- Common on aftermarket brands like FRAM, Bosch, and K&N
- Explicitly shows which way air should flow through the filter
- Must align with your vehicle’s actual airflow path
- Hybrid Systems
- Some manufacturers use both types of indicators
- Tesla, for example, has arrows that face rearward in the vehicle
How Vehicle Design Affects Airflow Direction
The direction your cabin air flows depends entirely on your vehicle’s HVAC design. Here’s a breakdown by common vehicle origins:
Asian Vehicles (Toyota, Honda, Hyundai)
Most Asian vehicles pull air from the outside through the cowl (base of windshield) and direct it downward through the filter. For these vehicles:
- OEM filters typically have “UP” arrows that should point vertically upward
- Aftermarket replacements often have airflow arrows that should point downward
American Vehicles (Ford, GM, Tesla)
American manufacturers often design systems with top-to-bottom airflow:
- Ford F-150: Air flows from windshield toward floor (arrow down)
- Chevrolet Corvette: Features top-to-bottom flow (arrow down)
- Tesla Model 3: Has a unique orientation with arrows facing rearward
European Vehicles (BMW, Mercedes, VW)
European vehicles frequently use:
- Airflow direction arrows rather than “UP” indicators
- Often have bottom-to-top airflow (arrows point upward)
- Exception: Mini Cooper uses horizontal airflow
How to Determine the Correct Direction
Not sure which way your filter should go? Here are foolproof methods to determine the correct orientation:
Method 1: Check the Old Filter
Before removing your old filter completely:
- Note which side has accumulated dirt and debris
- This dirty side faces the incoming air
- Install the new filter with its airflow arrow pointing away from this side
Method 2: The Leaf Test
This simple test reveals your system’s airflow direction:
- Remove the filter
- Place a lightweight material (tissue paper or plastic film) over the filter housing
- Turn on the HVAC fan to maximum
- Observe which way the material moves
This practical demonstration shows you exactly how to perform the leaf test.
Method 3: Consult Documentation
Check these resources:
- Your vehicle’s owner manual
- The filter manufacturer’s website
- Vehicle-specific forums
Filter Media Structure and Directionality
Understanding how cabin air filters are constructed helps explain why direction matters:
Multilayer Construction
Cabin filters typically have:
- Pre-filter layer (catches larger particles)
- Electrostatic media layer (traps fine particles)
- Activated carbon layer (absorbs odors and gases)
This graded density structure works efficiently only when air flows in the intended direction. Reversing it means:
- Smaller particles clog the pre-filter (designed for larger debris)
- The filter becomes less effective and clogs faster
- Mold can grow more easily on the wrong side
Air Filter Direction Comparison Table
| Vehicle Make | Typical Airflow Direction | Arrow Direction | Special Notes |
|---|---|---|---|
| Toyota/Honda | Top to bottom | “UP” arrow faces up | Follow gravitational marking |
| Ford/Chevy | Top to bottom | Arrow points down | Follow airflow marking |
| BMW/Mercedes | Bottom to top | Arrow points up | European designs often reverse flow |
| Tesla | Front to back | Arrows face rearward | Unique horizontal flow |
| Subaru | Top to bottom | “UP” arrow faces up | Similar to other Asian manufacturers |
Common Installation Mistakes to Avoid
These errors can compromise your filter’s performance:
1. Confusing “UP” with Airflow Direction
“UP” indicates the filter’s gravitational orientation, not necessarily the direction of airflow. As demonstrated in this video, these can sometimes be contradictory.
2. Ignoring Filter Housing Clues
Look for:
- Molded arrows in the plastic housing
- Debris accumulation patterns
- Filter frame design constraints
3. Forcing the Filter
If installation feels difficult, you’re likely inserting it incorrectly. Properly oriented filters should slide in relatively easily.
The Impact of Incorrect Installation on HVAC Performance
Getting the direction wrong leads to more than just poor air quality:
System Performance Issues
- Reduced airflow (up to 25% decrease)
- Blower motor strain (can lead to premature failure)
- Uneven cooling or heating
- Increased fan noise
Filter Life Reduction
A comprehensive analysis of filter performance shows incorrectly installed filters typically last only 12-15 months versus 18-24 months for properly installed ones.
New Developments in Cabin Air Filter Technology
The industry is evolving to make installation foolproof:
Smart Filters
Newer technologies include:
- RFID tags that communicate with vehicle computers
- Asymmetric frames that physically prevent reverse installation
- Color-changing media that visually indicates flow direction
Standardization Efforts
The Automotive Filter Manufacturers Council is working on universal labeling standards:
- Standardized airflow direction symbols
- QR codes linking to vehicle-specific installation videos
- 3D arrow projections that align with housing markers
Maintaining Your Cabin Air Filter
Beyond correct installation, proper maintenance ensures peak performance:
Optimal Replacement Schedule
- Standard filters: Every 15,000-30,000 miles or once yearly
- High-performance or HEPA filters: Every 10,000-15,000 miles
- Driving in heavily polluted areas: Check every 6 months
Between Replacements
- Vacuum the filter surface (without removing) to extend life
- Keep cowl area clear of leaves and debris
- Run A/C occasionally in winter to prevent mold growth
Making the Final Decision
When in doubt about your cabin air filter direction:
- Trust the debris pattern on your old filter
- Follow the manufacturer’s airflow direction (not necessarily “UP” indicators)
- Use the leaf test for confirmation
- Consider that most systems flow from the outside inward
Remember that proper installation means:
- Better air quality in your vehicle
- Extended filter life
- Improved HVAC system performance
- Potential fuel savings from reduced system strain
Getting your cabin air filter’s direction right isn’t just about following rules—it’s about ensuring you and your passengers breathe cleaner air while extending the life of your vehicle’s ventilation system. Next time you change your filter, you’ll know exactly which way it should go.