Dealing with oil pressure problems in your Cummins ISX engine? You’ve likely got a faulty oil pressure sensor. This small but crucial component tells your engine’s computer exactly how much oil pressure is flowing through the system. When it fails, it can trigger warning lights, cause engine performance issues, or even lead to serious damage if ignored.
Where Is the Cummins ISX Oil Pressure Sensor Located?
The oil pressure sensor on a Cummins ISX engine can be tricky to find if you don’t know where to look. It’s positioned in a somewhat hidden spot:
- On the driver’s side of the engine
- Near the fuel filter
- At the rear portion of the engine block
- Between the ECU connectors
This awkward positioning explains why many mechanics and truck owners struggle to locate it at first. The sensor is directly connected to the engine block and typically secured with two bolts.
According to technical documentation, some configurations place the sensor “on the rear of the engine, inside the transmission case,” which makes access even more challenging without the right approach.
Multiple Sensors: Don’t Get Confused
It’s worth noting that your Cummins ISX engine might have multiple oil pressure monitoring components, which can cause confusion during diagnostics. Some ISX engines feature:
- A main oil pressure sending unit connected to the main harness
- A secondary oil pressure sending unit with a two-wire connection that runs across the top of the motor and into the firewall
This dual-sensor setup means you need to identify which one is causing problems before starting your replacement job.
How to Tell If Your Oil Pressure Sensor Is Failing
Several symptoms can indicate your Cummins ISX oil pressure sensor needs replacement:
- Erratic oil pressure gauge readings (fluctuating wildly or showing zero)
- Oil warning light illuminated on your dashboard
- Engine misfires and irregular performance
- Noticeable drop in fuel economy
- Reduced engine power when accelerating
- Engine stalling unexpectedly
- Oil leaks around the sensor housing
In one documented case from an owner’s forum, a driver noticed “a bad leak under pressure” that was eventually traced to an oil pressure sensor “blowing out the back, top side of block, drivers side.” This type of failure can create significant oil loss and potential engine damage if not addressed quickly.
Tools You’ll Need for Replacement
Before starting the job, gather these specific tools:
- 1 and 1/16-inch socket (this exact size is critical)
- Universal joint or “wobbly” socket attachment
- Socket extension (ideally 6-8 inches)
- Half-inch ratchet
- Basic hand tools for removing any obstructing components
- Shop towels for cleanup
The specialized 1-1/16″ socket size is particularly important. Using the wrong size could damage the sensor housing or make removal impossible, as highlighted in several instructional videos.
Step-by-Step Replacement Procedure
1. Engine Preparation
Before beginning:
- Make sure the engine is cool to avoid burns
- Disconnect the battery to prevent electrical issues
- Have a container ready to catch any oil that might leak out
2. Accessing the Sensor
The sensor’s location makes this step challenging:
- Position yourself on the driver’s side of the engine
- Look for the sensor near the fuel filter assembly
- You may need to remove or relocate certain components for better access
- A flashlight will help you see the sensor in this dark, cramped area
3. Disconnecting the Electrical Connector
Many mechanics consider this the trickiest part:
- Locate the electrical connector attached to the sensor
- Find the small red locking clip that secures the connector
- Carefully pull out this clip (a small flat screwdriver can help)
- Once the clip is removed, press down on the connector’s tab and pull it away from the sensor
According to experienced mechanics, this connection can be stubborn, especially if it hasn’t been removed in years.
4. Removing the Old Sensor
With the electrical connection free:
- Position your 1-1/16″ socket with the universal joint and extension over the sensor
- Carefully loosen by turning counterclockwise
- Remove the sensor completely, watching for oil that might drain out
- Inspect the removed sensor for damage or excessive wear
5. Installing the New Sensor
When putting in the replacement:
- Verify you have the correct OEM part for your specific engine model
- Check that the new sensor has an intact O-ring seal
- No additional sealant or Teflon tape is required
- Thread the new sensor in by hand first to prevent cross-threading
- Once hand-tight, use your socket to tighten until it bottoms out
- Don’t over-torque, as this could damage the new sensor
As demonstration videos show, proper installation requires a gentle touch despite the tight working conditions.
6. Reconnecting and Testing
To complete the job:
- Reconnect the electrical connector to the new sensor
- Slide the red locking tab back into place to secure the connection
- Tug gently on the connection to verify it’s properly seated
- Reconnect the battery and start the engine
- Check for proper oil pressure readings on your gauge
- Monitor for any leaks around the new sensor
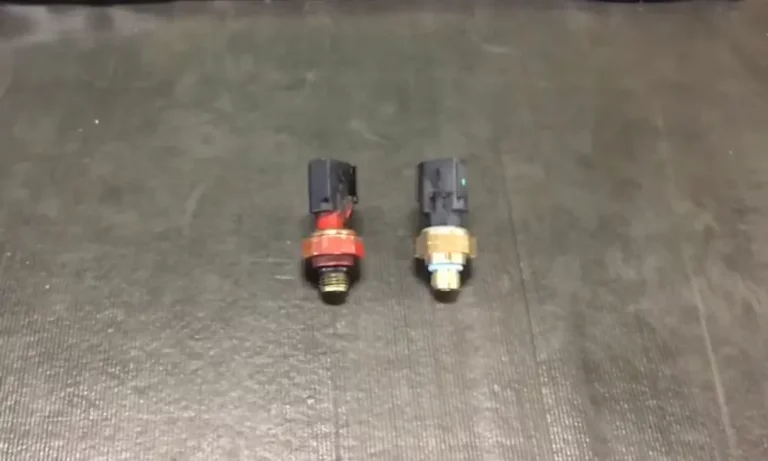
OEM vs. Aftermarket: A Critical Warning
Multiple sources, including professional mechanics, strongly advise against using aftermarket oil pressure sensors for the Cummins ISX engine. The risks include:
- Incompatible electrical connectors despite similar appearance
- Different internal specifications leading to inaccurate readings
- Significantly shorter operational lifespan compared to OEM parts
- Potential for catastrophic engine damage due to false readings
One mechanic demonstrated that while aftermarket sensors might initially function correctly, they often fail within weeks, causing dangerous false readings such as showing zero oil pressure when adequate pressure is present.
Connector Compatibility Issues to Watch For
The electrical connector on the oil pressure sensor requires special attention:
- Genuine Cummins sensors typically have a two-prong connector with relatively large prongs
- Some aftermarket sensors come with three-wire connections that won’t fit the factory harness
- Even sensors marketed with “exact same part numbers” for Cummins ISX may actually be designed for lighter-duty engines like the 5.9 or 6.7 liter models
This compatibility issue has been highlighted in several technical demonstrations and is a common cause of failed repairs.
Common Obstacles During Replacement
Several challenges might arise during the replacement process:
Limited Access Space
The sensor’s position makes it difficult to reach with standard tools. The universal joint attachment for your socket is essential, not optional.
Stubborn Electrical Connectors
Years of engine heat and vibration can make the electrical connector extremely tight. Patience and proper technique are critical to avoid breaking the plastic connector.
Oil Leakage During Removal
Be prepared for some oil to drain out when removing the old sensor. Have absorbent materials ready to prevent a mess and environmental contamination.
Cross-Threading Risk
The new sensor must be started by hand to avoid cross-threading. The limited visibility and awkward angle make this challenging but necessary.
The Cost Factor: OEM vs. Aftermarket
While genuine Cummins sensors cost significantly more than aftermarket alternatives, the price difference is justified:
| Part Type | Average Cost | Expected Lifespan | Reliability Rating |
|---|---|---|---|
| OEM Cummins | $75-120 | 3-5 years | Excellent |
| Premium Aftermarket | $40-60 | 1-2 years | Fair |
| Budget Aftermarket | $15-30 | 3-6 months | Poor |
As experienced technicians have shown, the cost of repeated repairs and potential engine damage from failed aftermarket sensors far outweighs the initial savings.
Diagnostic Codes Related to Oil Pressure Sensor Issues
When your oil pressure sensor fails, it may trigger specific diagnostic trouble codes:
| Code | Description | Common Cause |
|---|---|---|
| SPN 100 | Engine Oil Pressure Data Invalid | Sensor failure or wiring issue |
| SPN 100/FMI 4 | Oil Pressure Sensor Circuit Low Voltage | Short circuit or sensor failure |
| SPN 100/FMI 3 | Oil Pressure Sensor Circuit High Voltage | Open circuit or damaged wiring |
| SPN 100/FMI 1 | Oil Pressure Too Low | Actual low oil pressure or sensor failure |
Using a proper diagnostic scanner can help determine if you’re dealing with an actual oil pressure problem or just a sensor issue.
Preventing Future Sensor Failures
To extend the life of your new oil pressure sensor:
- Maintain regular oil change intervals with the correct oil grade
- Keep your engine cooling system in good condition (overheating accelerates sensor failure)
- Check and clean electrical connections during routine maintenance
- Address any oil leaks promptly to prevent contamination of electrical components
- Consider having your oil pressure tested with mechanical gauges annually
With proper maintenance and using quality parts, your Cummins ISX oil pressure sensor should provide years of reliable service, keeping your engine running safely and efficiently.