Your Toyota’s interior lights are dead, your key fob stopped working, and the clock resets every time you turn the car off. Before you panic, check the DCC fuse. This one small component controls more systems than most people realize — and replacing it (or reinstalling it) takes about two minutes. Here’s everything you need to know.
What Is a DCC Fuse?
The DCC fuse — short for Direct Current Control — is Toyota’s built-in “master switch” for a group of systems that need constant battery power. You’ll also see it called the D/C Cut fuse in some Toyota technical documents.
It protects and controls:
- Interior dome and map lights
- Radio memory and clock
- Remote keyless entry
- Body ECU and Smart Key systems
- Climate control memory settings
Think of it as the gatekeeper for every system in your Toyota that stays “on” even when the ignition is off.
Why Does Toyota Remove It From New Cars?
Here’s something most people don’t know: Toyota intentionally removes the DCC fuse before shipping new vehicles to dealerships.
Why? It’s all about battery drain during transport.
Even when your car is off, electronics keep drawing power. This is called parasitic draw, and a healthy modern vehicle pulls between 20mA to 85mA continuously. That might sound tiny, but do the math on a 60-day ocean voyage:
50mA × 24 hours × 60 days = 72 Amp-hours consumed
Most Toyota batteries are only 60Ah. Without the DCC cut, the car would arrive at the dealership with a completely dead — and possibly damaged — battery.
By pulling the fuse at the factory, Toyota drops the parasitic draw low enough that the battery survives months of storage and shipping without any external charging. Smart engineering.
DCC Fuse Specs: Amperage and Color Codes
The DCC fuse has evolved alongside Toyota’s increasingly complex electronics. Older models used 20A fuses. Newer platforms need more power, so they’ve moved to 30A.
| Amperage | Color | Common Application | Fuse Style |
|---|---|---|---|
| 5A | Tan/Orange | ECU-DCC Logic (C-HR) | Micro Blade |
| 10A | Red | ECU-DCC No. 2 (C-HR/Hybrid) | Micro Blade |
| 20A | Yellow | Legacy DCC/DOME Systems | Mini Blade |
| 30A | Green | Modern D/C Cut Systems | Low-Profile Mini |
You can confirm fuse color codes using this automotive fuse color chart before you buy a replacement. Getting the wrong amperage won’t just fail to fix the problem — it can damage downstream electronics.
What Happens When the DCC Fuse Is Missing or Blown?
The effects spread across multiple systems at once. If you’re troubleshooting a Toyota and several unrelated things seem broken simultaneously, the DCC fuse is your first stop.
| Affected System | What You’ll Notice |
|---|---|
| Interior Lighting | Dome, map, and trunk lights won’t work |
| Infotainment | Clock resets; radio presets disappear |
| Remote Entry | Key fob does nothing |
| ABS/VSC | Warning lights appear on the dash |
| Climate Control | Settings reset to factory defaults |
The Body ECU needs constant power to “listen” for your key fob. Cut that power, and the remote entry dies immediately.
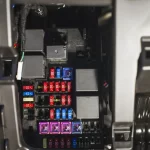
Where to Find the DCC Fuse on Your Toyota
Location varies by model. Here’s a quick breakdown:
Toyota Camry (2002–Present) The DCC fuse sits in the engine compartment relay block on the driver’s side fender, near the battery. On XV40 models (2007–2011), there’s also an interior fuse box under the dashboard, but the master DCC protection lives under the hood.
Toyota Corolla (2009–Present) On 2009–2013 Corollas, the DCC/DOME fuse is a 20A yellow mini-blade in the engine bay. The 2019–2024 Corolla moves the engine bay fuse box directly to the right of the battery. The interior panel sits high under the dash and is notoriously hard to reach — start under the hood.
Toyota RAV4 (XA30, XA40, XA50) On the hybrid XA50, the 12V auxiliary battery is in the cargo area. Despite that, the primary DCC/Short Pin still lives in the engine bay relay block. On older XA30 models (2006–2012), a failed DCC fuse kills the audio amplifier — so you’ll hear nothing even though the head unit appears to work.
Toyota Tacoma (2016–2023) The engine compartment fuse box is on the driver’s side fender with a clearly labeled diagram on the lid. Tacoma owners who install aftermarket accessories like winches or off-road lights frequently blow this fuse by overloading the B+ distribution rail.
How to Test a DCC Fuse With a Multimeter
Don’t trust a visual inspection alone. A fuse can look fine but still have a hairline fracture inside the element. Use a Digital Multimeter (DMM) instead.
Voltage Drop Test (fuse installed):
- Set your DMM to DC voltage
- Probe the two exposed metal test points on top of the fuse
- A reading of 0V = fuse is good
- A reading of ~12.6V = fuse is blown
Continuity Test (fuse removed):
- Set DMM to resistance (Ω) mode
- Touch probes to each end of the fuse
- Under 1.0Ω = healthy fuse
- “OL” or infinite resistance = blown fuse, replace it
DCC Fuse vs. Short Pin vs. ECU-DCC: What’s the Difference?
Toyota’s terminology gets confusing fast. Here’s a clear breakdown:
| Component | Has Overload Protection? | Primary Use | Failure Symptom |
|---|---|---|---|
| DCC Fuse | ✅ Yes (sacrificial element) | Circuit protection + logistics | No dome lights; clock resets |
| Short Pin | ❌ No (solid metal bridge) | Storage/shipping only | Total B+ rail interruption |
| ECU-DCC | ✅ Yes (high precision) | Module logic power | VSC/Pre-Collision warnings |
The Short Pin was used in older hybrids like the 2004–2006 Prius. Toyota explicitly warns never to use a Short Pin as a fuse replacement — it has zero overload protection and can cause a wiring harness fire.
Newer TNGA platform vehicles like the C-HR split the load between two ECU-DCC fuses (5A and 10A). This keeps safety systems like ABS and brake hold running even while cutting power to convenience features during storage.
Pre-Delivery Service: What Dealers Must Do With the DCC Fuse
When a new Toyota arrives at the dealership, installing the DCC fuse is a mandatory step in the Pre-Delivery Service (PDS) process. According to official Toyota service bulletins for models like the 2023 Prius Prime and the 2025 Toyota 86, the fuse ships in a “blank” slot in the engine bay relay block — a slot that’s physically shaped like a live terminal but electrically disconnected. The technician moves it to the active position.
After installation, several systems need manual initialization:
- Power windows: Hold the switch up after the window closes for a few seconds to restore one-touch function
- Power tailgate (RAV4): Run a specific calibration sequence
- Steering angle sensor: Turn the wheel lock-to-lock on some hybrid models
- Infotainment: A “Welcome Screen” prompts language and time zone selection
Technicians also need to clear any stored Diagnostic Trouble Codes (DTCs) using Global Techstream (GTS+) software. Common codes after transport include B1200, B1207, and B1271 — communication faults from when the ECUs powered on without the fuse installed.
Aftermarket Electronics and DCC Fuse Failures
The DCC and DOME circuits are the most popular tap points for aftermarket accessories because they provide constant 12V power. That’s exactly why they fail more often on modified vehicles.
Dash cam parking mode: Hardwired dash cams pull power from the DCC circuit to record while parked. If the dash cam’s voltage regulator fails, it drains the battery below starting threshold — defeating the whole point of the DCC cut logic. A cheap dash cam power supply can also short internally, blowing your 20A or 30A DCC fuse and killing interior lights and remote entry at the same time.
Add-a-Circuit fuse taps: Fuse taps inserted into the DCC slot can exceed the terminal’s load capacity. They can also prevent the fuse box cover from sealing properly. Moisture gets in, corrosion spreads, and you end up with intermittent failures across the entire B+ bus — a much bigger problem than a blown fuse.
How to Trace a Parasitic Draw Through the DCC Circuit
If the fuse keeps blowing or your battery keeps dying, you’ve got a parasitic draw problem downstream of the DCC circuit. Here’s how to find it:
- Disconnect the negative battery cable
- Place an ammeter in series between the cable and terminal
- Wait 15 to 60 minutes for the MPX network to enter sleep mode — don’t skip this
- Check the draw. Anything over 50–85mA points to a fault
- Pull the DCC fuse. If draw drops dramatically (say, from 500mA to 30mA), the fault is in a DCC-controlled circuit
- Reinstall the DCC fuse, then pull downstream fuses individually (DOME, ECU-B, RAD) to isolate the exact component
Common culprits: stuck relay, faulty aftermarket dash cam, or an improperly wired remote start system.
The Future of the DCC Fuse
Toyota’s moving toward software-defined vehicles where a gateway computer controls parasitic draw digitally. High-side power switches and Smart FETs can perform the same cut function as a physical fuse — but with software control instead of a piece of metal. A vehicle in transport mode would reduce its draw through a software command, no fuse removal required.
For now, on every ICE and hybrid Toyota on the road, the DCC fuse remains one of the most elegant and cost-effective solutions in modern automotive engineering. It’s a tiny component doing a surprisingly big job — and knowing how it works keeps you ahead of half the electrical problems you’ll ever face on a Toyota.