Your car’s AC is blowing warm air, and you’ve got a can of refrigerant ready to go — but you can’t find where to connect it. That’s a frustrating spot to be in, especially on a hot day. This guide walks you through exactly how to find your low side AC port, what it looks like, and what happens if you connect to the wrong one.
What Is the Low Side AC Port, Exactly?
Every AC system — whether in your car or home — splits into two pressure zones. The high-pressure side pushes hot refrigerant out. The low-pressure side pulls cool refrigerant back in.
The low side AC port sits on the suction side of the system. That’s the section that carries cold, low-pressure refrigerant vapor from your evaporator back to the compressor. It’s the only safe place to add refrigerant while the system is running. Adding refrigerant through the high side port while the compressor is active can cause the pressurized gas to violently blow back into your equipment — and possibly your face.
Think of the low side port as the system’s designated intake. Everything goes in through here. Nothing shortcuts through the high side.
How to Find the Low Side AC Port in Your Car
Start at the Compressor
The most reliable method starts at a known reference point: your AC compressor. It’s typically bolted to the front or lower section of the engine block and driven by your serpentine belt. You’ll recognize it by the magnetic clutch and pulley on its face.
When AC is off, the center clutch plate stays still while the outer pulley spins. Turn the AC on, and the whole assembly locks together and spins as one unit.
Once you’ve spotted the compressor, look at the two metal tubes connecting to its back or top housing. Those tubes will be noticeably different sizes.
Follow the Bigger Tube
The larger diameter tube is your low side suction line. The smaller one is the high-pressure discharge line headed toward the condenser at the front of the car.
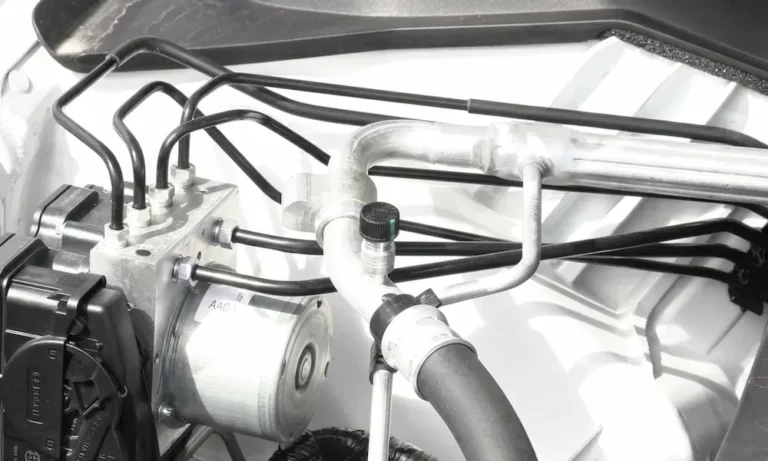
Trace the big tube away from the compressor toward the firewall — the metal wall dividing your engine bay from the cabin. Somewhere along that large tube, you’ll find a small cylindrical fitting sticking out perpendicular to the line. That’s your low side AC port.
Visual Clues to Confirm the Right Port
Once you’ve found it, here’s how to confirm you’ve got the right one:
- Black or blue dust cap — Industry convention colors the low side cap black or blue and the high side cap red
- Letter marking — The cap may show an “L” stamped or printed on top
- Smaller outer diameter than the high side port — This isn’t just visual; it’s a built-in mechanical safety feature (more on this below)
- Located on the thicker tubing — Always on the larger suction line, never the slim liquid line
Hidden Low Side Port Locations by Vehicle Type
Most cars follow the standard layout. But some designs bury the port somewhere you’d never expect.
Ford Focus (Early 2000s Models)
On certain Ford Focus models, the low side port is completely invisible from the engine bay. It hides behind the inner fender liner in the front passenger-side wheel well.
To reach it, you’ll need to:
- Turn your steering wheel hard to the right
- Remove the plastic retaining clips on the splash shield
- Pull the liner back to expose the port
This isn’t a design flaw so much as a space compromise — the transverse engine layout leaves no room for a standard service hose from above.
Lincoln LS (Early 2000s)
The Lincoln LS places the low side port directly on the compressor manifold, which sits at the very bottom of the driver’s side engine compartment. You can’t reach it by just popping the hood.
You’ll need to:
- Raise the vehicle on ramps or a lift
- Remove the underbody splash shield
- Connect your gauge from underneath
When the port is this close to the compressor, charge refrigerant extremely slowly. Liquid refrigerant entering the compressor directly before it has time to vaporize causes immediate mechanical damage — a failure mode known as liquid slugging.
Use a Port Locator Tool
When tracing the line doesn’t work, AC Pro’s port finder tool lets you enter your year, make, and model to get diagrams and exact instructions for your specific vehicle.
Port Sizes: Why They’re Not All the Same
The physical size of the low side AC port isn’t random. It’s a deliberate safety mechanism tied directly to what refrigerant your system uses.
If your service coupler doesn’t physically fit onto a port, that’s intentional. The industry engineered it that way to prevent cross-contamination between incompatible refrigerants and their different lubricating oils.
| Refrigerant Era | Low-Side Port Coupler Size | High-Side Port Coupler Size | Visual Identifier |
|---|---|---|---|
| Legacy Standard (R-134a) | 13 mm quick-connect | 16 mm quick-connect | Thicker suction line; Blue/Black cap |
| Modern Standard (R-1234yf) | 14 mm quick-connect | 17 mm quick-connect | Thicker suction line; Blue/Black cap |
A low side coupler physically cannot snap onto the high side port, and vice versa. That dimensional difference is your last line of defense if everything else goes wrong.
Reading the Pressure at Your Low Side Port
Connecting a gauge to the low side AC port gives you a direct window into system health. The pressure reading at this port corresponds to the temperature of refrigerant boiling inside your evaporator coil.
Here’s what standard automotive low-side pressures look like relative to outdoor temperature, using R-134a as the reference:
| Ambient Temperature (°F) | Expected Low-Side Pressure (PSI) | Expected High-Side Pressure (PSI) |
|---|---|---|
| 65°F | 25 – 35 | 135 – 155 |
| 70°F | 35 – 40 | 145 – 160 |
| 75°F | 35 – 45 | 150 – 170 |
| 80°F | 40 – 50 | 175 – 210 |
| 85°F | 45 – 55 | 225 – 250 |
| 90°F | 45 – 55 | 250 – 270 |
| 95°F | 50 – 55 | 275 – 300 |
Don’t try to diagnose below 55°F. The thermal load is too low for accurate readings.
What Your Readings Actually Tell You
| Low-Side Reading | High-Side Reading | What It Likely Means |
|---|---|---|
| Below normal | Below normal | Refrigerant leak — system is undercharged |
| Below normal | Above normal | Clogged expansion valve or orifice tube |
| Above normal | Above normal | System is overcharged |
| Above normal | Below normal | Compressor internal failure |
Low suction pressure combined with poor cooling almost always means a refrigerant leak. If pressure drops low enough, the evaporator freezes solid — blocking airflow entirely and making your AC perform even worse than if it were simply low on refrigerant.
Adding Refrigerant Through the Low Side Port
Vapor vs. Liquid Charging
Refrigerant sits in your service can or cylinder as a liquid. How you introduce it through the low side port matters enormously.
Vapor charging — Hold the can upright. Only gas leaves the top of the can and enters the port. It’s the safest method, especially for pure refrigerants like R-134a. No liquid enters the compressor. The downside: it’s slow.
Liquid charging — Invert the can. Pure, unfractionated liquid exits the bottom. This method is required for blended refrigerants like R-410A and R-1234yf. Blended refrigerants contain multiple compounds with different boiling points. If you vapor charge them, the compounds separate — a process called fractionation — and you destroy the chemical balance the system needs.
How to Meter Liquid Safely Through the Low Side Port
Dumping liquid refrigerant rapidly into a running compressor destroys it. The process requires careful throttling:
- Barely crack open the low side manifold valve
- The liquid passes through a tiny restriction and flash-boils into vapor
- Only vapor enters the port and travels to the compressor
- Pulse the valve open and closed slowly — never hold it fully open
- Watch your pressure gauge between pulses and let the system stabilize
Rushing this step is the fastest way to turn a $40 recharge into a $1,200 compressor replacement.
Low Side Ports on Residential and Mini-Split Systems
Central Split Systems
In a home AC setup, the low side port lives on the outdoor condenser unit — specifically on the heavy brass service valve attached to the large, insulated suction line. The suction line is always the bigger copper pipe wrapped in black foam insulation.
The smaller, uninsulated copper pipe next to it is the liquid line (high side). Never mix these up. Unlike automotive systems, residential ports use threaded connections — not mechanical quick-couplers — so there’s no physical size barrier stopping you from connecting the wrong hose.
Inside each brass service valve is a replaceable Schrader valve core. When you thread a manifold hose onto the port, a depressor pin inside the hose pushes the core open and lets pressure flow through.
Mini-Split Systems: One Port, Different Size
Ductless mini-splits simplify their plumbing. Most only have a single service port, and it’s on the low side suction valve. No high-side port access during diagnostics — technicians work from ambient temperature calculations and low-side pressure alone.
The bigger difference is port size. Standard residential systems use 1/4-inch SAE flare connections. Mini-splits use 5/16-inch SAE flare — a deliberate change driven by the higher operating pressures of modern refrigerants like R-410A.
Your standard manifold gauge hoses won’t thread onto a mini-split port. You’ll need either:
- A 5/16″ to 1/4″ brass adapter that screws onto the unit’s port and accepts your standard hose
- Or a dedicated mini-split gauge set with 5/16-inch hoses already attached
| System Type | Low-Side Line Identifier | Port Thread Size | Number of Service Ports |
|---|---|---|---|
| Central Split System | Large, black foam insulation | 1/4″ SAE Flare | Two (suction + liquid) |
| Ductless Mini-Split | Large, heavily insulated | 5/16″ SAE Flare | Typically one (suction only) |
Safety Rules You Can’t Skip
Low side pressure sounds manageable — and compared to the high side, it is. But even the suction side can hold close to 100 PSI when the system is off.
When you connect or disconnect a coupler, a small amount of refrigerant escapes. These refrigerants boil at temperatures far below freezing. Contact with skin or eyes causes instantaneous frostbite and potential permanent damage.
Before you touch any service port:
- Put on wrap-around safety glasses — not regular sunglasses
- Wear heavy, impermeable gloves
- Never work on a port with your face directly above it
On the legal side: US federal law makes it illegal to vent refrigerant intentionally into the atmosphere — regardless of quantity. Technicians must use EPA-certified recovery machines to capture refrigerant before any major system repair. Violations carry serious financial penalties and loss of certification. Even when just attaching gauges, low-loss fittings and quick-couplers are designed to minimize the small burst of refrigerant that escapes during connection.
The Low Side Port Matters More Than You Think
Finding your low side AC port is the first step toward diagnosing or recharging your AC correctly. It’s not just a convenient entry point — it’s a carefully engineered, pressure-specific, dimensionally controlled interface that protects your compressor, your equipment, and you.
Whether you’re tracing the thick suction line in a standard engine bay, pulling back a fender liner on a Ford Focus, lifting a Lincoln LS to reach an undercarriage port, or threading a 5/16-inch adapter onto a mini-split, the process always comes back to the same principle: find the low side first, connect safely, and charge slowly.