
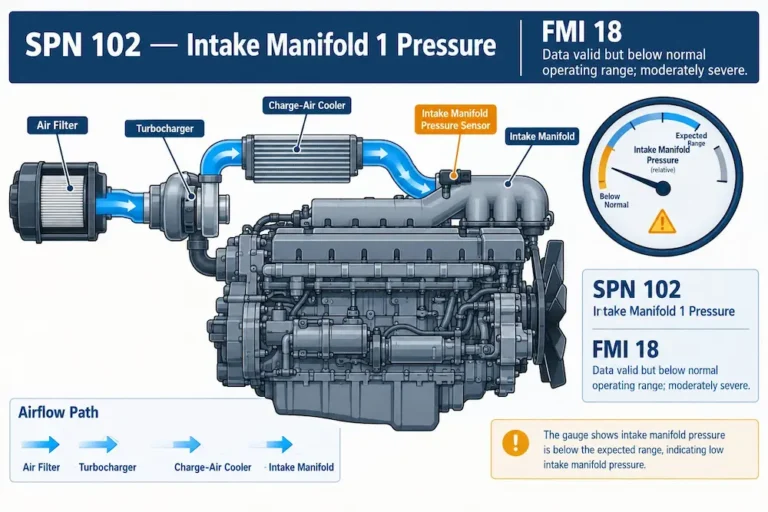
If your scan tool just threw spn 102 fmi 18, your truck is telling you it can’t build enough turbo boost. That’s it in a nutshell. But the “why” behind this code gets messy fast — it could be a $15 hose clamp or a $2,000 turbocharger.
This guide breaks down what’s really going on, walks you through how techs diagnose it, and shows you what happens if you just clear the code and keep driving (spoiler: it’s not good). By the end, you’ll know exactly where to start looking.
What SPN 102 FMI 18 Actually Means
SPN 102 stands for “Engine Intake Manifold Pressure.” Most drivers just call it boost pressure. FMI 18 means the sensor is working fine electrically, but the pressure reading is lower than what the engine control module expects for that speed and load according to NHTSA’s own service bulletin on this exact code.
In plain English: your engine’s computer isn’t getting the air pressure it asked for. The sensor itself is telling the truth. Something upstream is failing to deliver.
This is different from a dead sensor or a shorted wire. Those throw different codes entirely (FMI 3 or FMI 4). FMI 18 specifically points to a real, physical shortage of air pressure — a moderately severe underboost condition.
How Boost Pressure Actually Gets Built
Quick refresher on how this system works, because it helps when you’re chasing the fault.
Exhaust gas spins the turbo’s turbine wheel. That wheel is connected to a compressor wheel on the other side, which sucks in fresh air and squeezes it. The hot, compressed air then runs through the charge air cooler (basically a radiator for air) to cool down and get denser. From there, it heads into the intake manifold, where a sensor measures the final pressure right before it hits the cylinders.
Every part of that chain has to be sealed and working right. Break one link — a torn hose, a stuck turbo vane, a clogged filter — and pressure drops. The engine control module notices the shortfall and logs SPN 102 FMI 18.
SPN 102 FMI 18 vs. Other Boost Codes
FMI numbers change the whole meaning of the fault. Here’s how they stack up:
| FMI | What It Means | Typical Cause |
|---|---|---|
| 0 | Pressure way too high | Turbo vanes stuck closed |
| 1 | Pressure way too low | Major leak or broken turbo shaft |
| 2 | Erratic reading | Loose wiring, vibration damage |
| 3 | Voltage too high | Wire shorted to power |
| 4 | Voltage too low | Wire shorted to ground or unplugged sensor |
| 16 | Slightly too high | Sticking actuator, restricted exhaust |
| 18 | Slightly too low | Boost leak, worn turbo, sensor drift |
Knowing this table matters because a lot of the fixes for FMI 0 or FMI 1 won’t touch an FMI 18 problem, and vice versa.
The Real Causes Behind This Code
Since FMI 18 means the sensor’s electrical signal checks out, most of the time the problem is mechanical, not electrical. Here’s where to look, in rough order of how often each one shows up.
Boost Leaks in the Charge Air System
This is the most common cause, hands down. Silicone boots, metal pipes, and clamps connecting the turbo to the intake manifold see huge pressure swings — sometimes over 40 psi under hard pulling. Heat and vibration eventually crack a boot or loosen a clamp.
Here’s the tricky part: a small leak might seal fine at idle but blow open under load. If you hear hissing or a loud rushing sound from the engine bay, that’s usually your answer.
The charge air cooler itself can also crack at the tube-to-header joints over time, bleeding pressure without any obvious external sign.
A Turbocharger That Can’t Keep Up
Most modern diesels use a variable geometry turbocharger (VGT). It’s got a ring of movable vanes that open and close to control exhaust flow across the turbine. Soot loves to pack into these vanes and the actuator linkage.
If the vanes get stuck open, or the actuator motor burns out, the turbo simply can’t spool up enough to hit its boost target. This is a well-documented issue on ISX15 and X15 platforms tied to failed turbocharger diagnostics after high-mileage carbon buildup.
EGR Valve Stuck Open
The EGR (exhaust gas recirculation) system routes some exhaust back into the intake to cool combustion temps. If the valve sticks open when it should be closed, exhaust floods into the intake and steals drive pressure away from the turbine at the same time. Result: lower boost, more soot, and this exact code showing up alongside airflow problems.
Clogged DPF or Restricted Exhaust
Your engine is basically a big air pump. If it can’t push exhaust out, it can’t pull fresh air in either. A heavily soot-loaded diesel particulate filter or a plugged diesel oxidation catalyst chokes the exhaust flow enough to drag down boost pressure on the intake side.
A Dirty or Drifting Pressure Sensor
The sensor sits right in the intake manifold, exposed to soot and oily crankcase vapor. Over time this gunk packs into the sensor’s tiny port and throws off the reading. The sensor might report low pressure even though the turbo and piping are working perfectly. This is a classic case in Freightliner Cascadias running Cummins engines, where a quick sensor cleaning solves what looked like a major mechanical fault.
Corroded Wiring or Bad Connections
Water and salt sneak into connector pins and add resistance to the circuit. That extra resistance drops the voltage signal, which the module reads as lower pressure — even when actual boost is fine. Chafed wires rubbing against brackets cause the same intermittent symptom, especially on higher-mileage trucks.
How Technicians Actually Diagnose This Code
Skipping steps here is how shops end up replacing turbos that didn’t need replacing. Here’s the proper order of operations, outlined in detail for troubleshooting this specific code:
- Pull freeze frame data. Check engine speed, load, and commanded vs. actual boost at the moment the fault triggered. High-load triggers point to leaks or exhaust restriction. Low-load triggers point to sensor or actuator issues.
- Run a plausibility check. With the key on and engine off, compare the intake pressure sensor reading to the barometric pressure sensor. They should match closely. A big gap means the sensor’s lying.
- Test the wiring. Check the 5-volt reference signal and ground resistance with a multimeter if the sensor looks suspect.
- Pressure test the charge air system. Cap off the turbo inlet and intake manifold, then pump in shop air — never more than 30 psi. Spray soapy water on every joint and watch for bubbles. This step alone catches most boost leaks.
- Run a bi-directional actuator sweep. Command the VGT actuator through its full range while watching manifold pressure respond. If the actuator moves but pressure doesn’t follow, the vanes are likely carbon-bound.
Skip step 4 and jump straight to replacing parts, and you risk buying a turbo for a problem that was a $40 hose all along.
What Happens If You Ignore This Code
The engine’s computer doesn’t let this slide for long. Low boost means less oxygen for the fuel you’re burning, which creates a rich, hot-running condition. That drives up exhaust temps and dumps extra soot into your particulate filter.
Your DPF fills up faster than normal, triggering more frequent regenerations that may not even finish properly since the engine’s still starved for air. Left long enough, this leads to a face-plugged filter that needs an expensive bake-out or full replacement.
On top of that, expect a torque derate — usually around 25% — kicking in to protect the engine. Ignore that too, and the truck can get limited to 5 mph, which basically means you’re calling a tow truck once the system escalates to its worst-case protection mode.
The Cost of Guessing Wrong
Here’s where fleets bleed money. Because turbochargers generate boost, a lot of techs assume a bad turbo the second they see this code. But that assumption is expensive when it’s wrong.
| Repair Path | Typical Cost | Fixes the Actual Problem? |
|---|---|---|
| Replace boost hose/clamp | $50–$200 | Yes, if that’s the leak |
| Clean/replace pressure sensor | $100–$300 | Yes, if sensor drifted |
| Repair wiring harness | $150–$400 | Yes, if corrosion/chafing is the cause |
| Replace VGT turbocharger | $2,000–$3,000+ | Only if turbo vanes are actually stuck |
| Skip diagnosis, replace turbo anyway | $2,000–$3,000+ wasted | No — code returns on next load |
That last row happens more than anyone likes to admit. A new turbo won’t fix a leaking boot. Pressure testing first saves real money.
How Different Engine Brands Handle This Code
The SAE code is universal, but each manufacturer has its own quirks worth knowing.
- Cummins (ISX15, X15, L9, B6.7): This maps to proprietary Fault Code 125. Cummins techs specifically check the EGR crossover pipe for cracks, a known failure point listed in Cummins fault documentation.
- Detroit Diesel (DD8, DD13, DD15, DD16): Look at the small impulse tube feeding the sensor — it clogs easily with soot. Also worth checking the DPF for backpressure issues detailed in Detroit’s fault code data.
- PACCAR (MX-13, PX-7, PX-9): Actuator calibration mismatches are a common culprit here, along with subtle leaks at the charge air cooler’s upper header corners.
- Volvo/Mack (D13, MP8): Check the electronic intake throttle valve. If it sticks partially closed, it acts like a restrictor plate and tanks manifold pressure even with a healthy turbo.
- Navistar/International (A26, MaxxForce): Wiring harness chafing near the fuel rail is a documented issue that can mimic a sensor fault.
Keeping This Code From Coming Back
A little routine maintenance goes a long way here:
- Inspect boots and clamps regularly. Don’t wait for them to blow. Replace them on a schedule, not just when they fail.
- Clean the pressure sensor during major service intervals, especially on engines with heavy EGR flow.
- Watch your air filter closely if you run in dusty or off-road conditions — don’t rely only on the dash gauge.
- Avoid excessive stop-and-go driving when possible. It prevents the engine from reaching the exhaust temps needed for clean regeneration, which speeds up soot buildup in the EGR valve and turbo vanes.
Final Thoughts
SPN 102 FMI 18 isn’t a mystery code once you know what it’s actually asking you to check. It’s your engine saying “I’m not getting the air pressure I need,” and the reason is almost always mechanical — a leak, a stuck valve, a gunked-up sensor, or a tired turbo.
Skip the guesswork. Pull the freeze frame data, check the sensor’s plausibility, pressure test the charge air system at 30 psi, and run an actuator sweep before you replace anything expensive. That order of operations saves time, saves money, and gets your truck back on the road without a repeat visit next week.

