
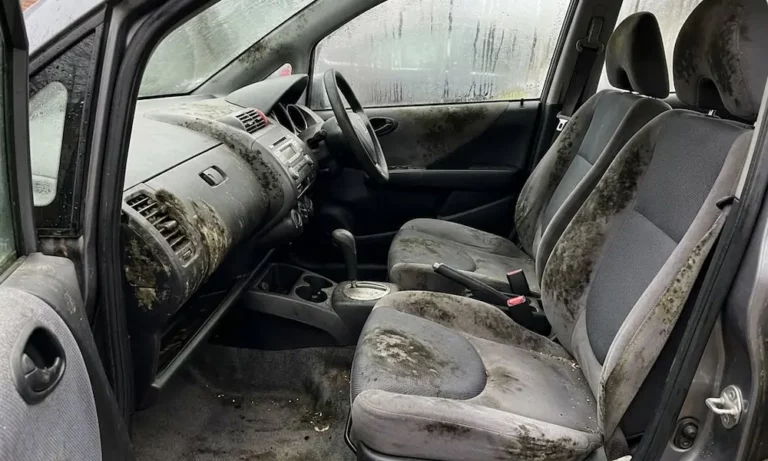
Discovered fuzzy spots on your seats or caught a sour, musty smell every time you start the engine? That’s mold — and it won’t go away on its own. This guide covers exactly how to get mold out of car interiors, fix the source of the problem, and stop it from coming back. Stick around, because skipping any step here almost guarantees it returns.
Why Mold Grows in Your Car in the First Place
Mold only needs three things: oxygen, moisture, and something organic to feed on. Your car’s interior provides all three in abundance — carpet fibers, seat foam, and leather all make excellent food sources.
The EPA notes that mold can start colonizing porous surfaces like carpet padding in as little as 24 to 48 hours under the right conditions. A leaky sunroof, a forgotten spill, or a damp gym bag left overnight is all it takes.
Here are the most common car mold culprits:
- Clogged sunroof drains — overflow soaks headliners and floorboards
- Blocked AC condensate lines — floods the passenger-side carpet
- Cracked door or window seals — lets rain seep into door sills
- Spills and wet items — damp clothes, umbrellas, and food mess
Different mold types show up differently too. Here’s what you might be dealing with:
| Mold Species | What It Looks Like | Where It Hides | Health Risks |
|---|---|---|---|
| Aspergillus | Green, yellow, or white powdery spots | AC vents, carpets, seat padding | Asthma flare-ups, allergies |
| Cladosporium | Black, brown, or olive-green clusters | Trunk, under floor mats, rubber seals | Respiratory irritation |
| Fusarium | Pink or reddish spreading patches | Wet carpet, food spill areas | Skin and respiratory issues |
| White Mold | Powdery white residue | Leather seats, dashboard, door panels | Mild allergic reactions |
Gear Up First: Safety Equipment You Actually Need
Before you touch anything, get your protective equipment sorted. Mold spores become airborne the moment you disturb them, and a car’s tight cabin concentrates them fast.
Here’s what to wear, based on how bad the infestation is:
| Remediation Level | Contamination Size | Respirator Needed | Other Protection |
|---|---|---|---|
| Minimum | Under 10 sq ft | N-95 mask | Nitrile gloves, safety goggles |
| Limited | 10–100 sq ft | Half-face respirator with particulate filters | Gloves, disposable coveralls, goggles |
| Full | Over 100 sq ft or HVAC involved | Full-face powered air-purifying respirator | Full-body suit, double gloves, booties |
Most car interiors fall into the minimum or limited category. That said, don’t skip the N-95 mask — it filters 95% of airborne particles and is the bare minimum you should wear. Use non-vented goggles (not standard safety glasses), and go with nitrile gloves. When you’re done, remove your gloves first, then carefully peel off any coveralls so spores don’t scatter onto your clothes.
Step 1: Find and Fix the Moisture Source
Here’s the rule that professional detailers and restoration experts follow: moisture control equals mold control. If you clean the mold without stopping the water, it’s back in days.
Clogged Sunroof Drains
Sunroof seals aren’t waterproof by design. Water is supposed to collect in a tray at the sunroof’s edges and drain down tubes through the car’s pillars. When those tubes clog with leaves and debris, water overflows directly into the headliner and floors.
To check: open the sunroof and slowly pour a cup of water into each corner of the tray. It should drain in seconds. If it pools, there’s a blockage. Clear it with a flexible drain brush or soft trimmer line — never compressed air. High-pressure air can blow the drain tube off its fitting inside the pillar, turning a 10-minute fix into an expensive panel-removal job.
Blocked AC Condensate Line
Your AC system pulls moisture from cabin air as it cools. That moisture drips into a pan and drains out through a rubber tube on the firewall, usually on the passenger side. When that tube clogs, the pan overflows and soaks the passenger floorboard.
Classic signs: sloshing sounds behind the dashboard on corners, damp passenger carpet, or a musty smell from the vents. Fix it by locating the drain tube under the car and clearing it with a pipe cleaner or wet vacuum. Once it’s clear, flush the line with distilled white vinegar to kill any lingering mildew.
Seals, Weather Strips, and Other Entry Points
Check the rubber weatherstripping around all doors, windows, and the trunk. UV exposure makes it brittle and cracked over time. A failed seal lets rain drip steadily onto floor sills every time it rains.
| Water Source | What You’ll Notice | How to Check |
|---|---|---|
| Sunroof drains | Wet headliner, damp pillars and footwells | Pour water into sunroof tray; check for fast drainage |
| AC condensate line | Soaked passenger floor, musty vents, sloshing sound | Check firewall drain tube while AC runs |
| Door and window seals | Wet door sill edges, damp seat sides | Look for cracking or shrinkage in rubber seals |
| Trunk seals or taillight gaskets | Water in spare tire well, wet trunk carpet | Check lowest trunk areas after heavy rain |
Step 2: Choose the Right Cleaning Products
This is where most people go wrong. Grabbing a bottle of bleach seems logical — it kills mold on bathroom tiles, right? Not on car interiors.
Why Bleach Will Make Things Worse
Bleach only works on hard, non-porous surfaces. Its molecules can’t penetrate fabric, carpet, or foam. It kills surface mold, leaves the root structures alive, and then adds moisture to the mix — which feeds those roots. It also bleaches dye from fabric, burns leather, and degrades synthetic threads. The EPA explicitly advises against bleach on porous materials.
What Actually Works
Distilled white vinegar is the go-to choice for most car detailers. Its mild acidity penetrates porous fabrics and kills around 80% of mold species. Mix equal parts vinegar and warm water for standard mold. For heavy infestations, use it undiluted. Yes, it smells, but the odor disappears completely as it dries.
Enzyme-based cleaners work exceptionally well on mold fed by organic spills — spoiled food, milk, or beverages. These cleaners break down the proteins and organic matter that mold feeds on, starving the organism while dissolving the visible stains.

- Eliminates Stains, Odors, & Residue: If it’s gross, it’s gone; from blowouts, urine, vomit, and other organic spills; Rocco & Roxie stain & odor eliminator has a subtle Meyer lemon scent that quickly dissipates, leaving your space feeling fresher
Hydrogen peroxide (3%) mixed with water at a 1:5 ratio acts as a color-safe oxidizer. It kills mold by breaking down cell walls without the harsh bleaching effect. Always spot-test first on an inconspicuous area.
Concrobium Mold Control is a professional-grade option. It dries into an invisible antimicrobial polymer shield that physically crushes mold spores at the root, then leaves a protective barrier against future growth. It contains no bleach, ammonia, or volatile organic compounds — safe for continuous use in an enclosed cabin.

- Eliminates & Helps Prevent Mold: Targets existing mold at the source and leaves behind an invisible barrier that helps prevent future growth.

OdoBan works well on hard, non-porous interior surfaces. Mix 5 oz of concentrate per gallon of water for mold control, apply thoroughly, and let it air dry completely.

- Multi-Purpose: Our cleaning spray is ready to use; it cleans, disinfects, freshens, and eliminates unpleasant stenches.
- Multi-Surface: Our Ready-to-Use formula can be used on non-porous household surfaces as well as upholstery, carpets, bedding, showers, walls, and floors.
- Multi-Use Spray: Not only is our versatile cleaning and disinfecting spray effective, but it can double as an air freshener or even as a fabric refresher.
- Where to Use: Our sanitizing spray can be used in any settings including locker rooms or gyms, dressing rooms, shower areas, and more. It can be used in day cares, hospitals, healthcare facilities, cafeterias, restaurants, and public transportation.
- Directions: Use as directed on label. Spray 6-8 inches away from the surface. Clean with a sponge, brush, or cloth (do not breathe spray).
| Product | How It Works | Best Used On |
|---|---|---|
| Distilled white vinegar | Acetic acid penetrates porous materials, alters pH | Fabric seats, carpet, hard plastics |
| Concrobium Mold Control | Polymer shield crushes spores and prevents regrowth | Long-term protection on carpet and upholstery |
| Enzyme cleaners | Breaks down organic proteins mold feeds on | Set-in stains in seat cushions and thick carpet |
| OdoBan disinfectant | Eliminates bacteria and fungi on contact | Hard plastics, trim, and odor control |
Step 3: Prep the Car and Vacuum First
Move the car outside into open air. This prevents spore buildup inside a closed garage and gives you ventilation while you work.
Pull out everything removable: floor mats, child seats, gym bags, trunk liners. Treat each item separately in fresh air before putting anything back.
Now vacuum — but only with a wet/dry vacuum fitted with a HEPA filter. A standard vacuum will blow spores right back into the cabin. Using a non-HEPA vacuum actually spreads mold to previously clean surfaces. Work from top to bottom: headliner first, then pillars, dashboard, seats, and finally carpets. Use a brush attachment in crevices, seat seams, and cup holders.
Step 4: Clean Each Surface the Right Way
Carpets and Padding
Car carpet isn’t just one layer. Beneath the visible fiber sits dense acoustic foam padding that absorbs water like a sponge. The carpet can feel dry on top while the padding stays soaked for weeks — quietly feeding mold the whole time.
For surface-level spots:
- Mist heavily with your vinegar solution
- Let it dwell for 10–15 minutes
- Scrub with a stiff brush in circular strokes
- Extract with a wet/dry vacuum or hot water carpet extractor
If the carpet squelches when you press it, the padding is saturated. Surface cleaning won’t cut it here. You’ll need to remove the seats, pull back the carpet, and extract standing water directly from the floor pan. Heavily colonized jute padding — especially if it smells sour or shows black mold — needs to be cut out and replaced.
Finish by sprinkling baking soda generously over completely dry carpet and leaving it overnight. It absorbs residual moisture and neutralizes odors. Vacuum it away in the morning.
Fabric Seats and Headliners
Treat fabric seats similarly to carpet, but with a gentler touch to avoid fraying. Spray, dwell, agitate, extract. A hot water extractor flushes debris from deep within seat foam far more effectively than surface wiping alone.
The headliner needs extra care. Its fabric glues directly to a foam backing board. Soak it and the adhesive dissolves, causing the roof liner to sag permanently. Lightly dampen a microfiber cloth with your cleaning solution and gently blot — don’t scrub, don’t saturate.
Leather Seats
Leather is semi-porous, so mold usually stays on the surface layer. Don’t spray solution directly on the seat — it pools in seams. Instead, mix equal parts isopropyl alcohol and water, mist it onto a microfiber cloth, and wipe gently. Use a soft-bristled detailing brush or toothbrush to work spores out of seams and stitching.
Critically: always follow up with a leather conditioner. The cleaning strips natural oils from the hide. Without conditioning, leather dries out, stiffens, and cracks.
Hard Plastics and Trim
Dashboard, door panels, center console — these are non-porous and the easiest to clean. Spray your vinegar solution or an interior all-purpose cleaner onto a microfiber cloth and wipe everything down. Use a detailing brush to get inside AC vent slats, button gaps, and switch panels. Finish with an interior protectant that includes UV blocking to repel future moisture and dust.
Step 5: Kill Mold in Your HVAC System
The AC system is one of the sneakiest places mold hides. The evaporator coil naturally stays wet, the ductwork is permanently dark, and the blower fan shoots spores directly at your face when you run the heat or AC.
Replace the cabin air filter first. It’s typically behind the glove box or under the cowl. A damp, clogged filter is a mold incubator. Seal the old one in a plastic bag before removing it to avoid dropping spores on the carpet.
Clean the ducts by running the heater on max fan speed with the AC compressor off. Find the fresh air intake vents at the base of your windshield (exterior) and spray an aerosolized antimicrobial cleaner directly into the intake. The blower pulls it through the entire duct system. Run the car for several minutes with the doors open to purge the system.
For stubborn evaporator odors, use a dedicated evaporator foam cleaner like Lubegard Kool-It, nextzett Klima Cleaner, or DWD2. Insert the flexible hose upward through the AC condensate drain tube until it reaches the evaporator housing. Discharge the foam, let it dwell for 15 minutes, then let it drain. Start the car and run the fan on low for 5 minutes to dry the core completely.
Step 6: Eliminate Lingering Odors with Gas Treatments
If a musty smell still lingers after cleaning every surface, mold spores are hiding somewhere liquids can’t reach — deep in seat foam, behind panels, or inside ductwork.
Ozone generators flood the sealed car with ozone gas, which oxidizes and destroys biological matter on contact. Set the AC to recirculate so the ozone flows through the vents. Important caveats: ozone is toxic to humans and animals — the car must be empty during treatment, and you need to air it out thoroughly afterward. Prolonged ozone exposure also degrades rubber seals and dries out leather, so don’t overdo it.
Chlorine dioxide gas treatments are the preferred professional alternative for most detailers. Products like Star brite NosGUARD or Safrax use a simple tablet-and-water reaction to generate the gas. Drop the tablet into the water container, place it on a flat surface inside the sealed car, and leave for 4–24 hours in a shaded spot (sunlight breaks down the gas too quickly). Open the doors afterward and ventilate for 30 minutes. The faint pool-like scent dissipates completely.
Step 7: Dry Everything Completely
Here’s where most DIY attempts fail. Inadequate drying is the number one reason mold comes back. Any moisture left in the padding will restart the whole cycle.
Set up high-velocity fans blowing directly across damp carpets and seats with the doors open. Keep airflow running for at least 6–8 hours. Heavily saturated vehicles need 24–48 hours of continuous airflow.
In a closed space, pair the fans with a portable dehumidifier to pull moisture out of the air. You can also run your car’s engine with the heater on full blast and the AC compressor on simultaneously — the AC acts as a mechanical dehumidifier while the heater blasts dry air into the footwells.
For the final drying stage, place DampRid or silica gel containers in the footwells to absorb the last traces of ambient humidity. Budget alternative: spread clay cat litter in a pan on the carpet overnight and vacuum it up in the morning.
To confirm everything is truly dry, press your palm firmly into the deepest section of carpet with your full body weight. If you feel any coolness or dampness, the padding is still wet. Keep drying.
Keep Mold From Coming Back
Getting rid of mold is a lot of work. Preventing it is much easier.
- Don’t leave wet items in the car overnight. Damp jackets, towels, and gym bags create humidity fast. Remove them every time.
- Blot spills immediately. Don’t let liquid sit and soak into padding.
- Switch your AC off a few minutes before you park. Leave the fan running on high. This dries out the evaporator coil before shutdown so moisture doesn’t sit overnight.
- Don’t use recirculate mode all the time. Switching to fresh air periodically flushes stale, humid air from the cabin.
- Clean sunroof drains every spring and fall. A quick water test twice a year takes five minutes and prevents weeks of remediation work.
- Replace your cabin air filter annually or every 12,000–15,000 miles to maintain clean, unobstructed airflow.
- Vacuum regularly. Removing dirt, crumbs, and dust eliminates the organic food source mold needs to survive.


