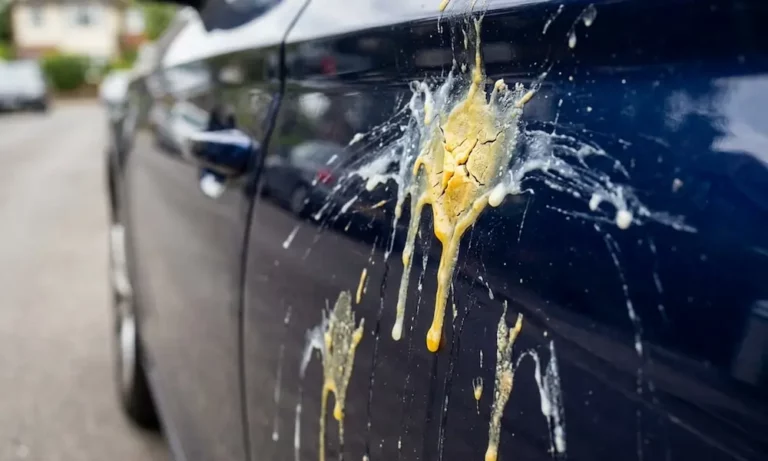
Someone egged your car. Whether it happened last night or two days ago, the clock is ticking. Egg isn’t just messy — it actively eats through your paint. This guide walks you through exactly how to remove egg from car surfaces safely, what to do if it’s already dried, and how to fix any damage left behind. Read to the end — the order of steps matters.
Why Egg Is So Dangerous to Car Paint
Most people treat egg like bird poop — annoying but harmless. It’s not.
A raw egg hits your car in three ways simultaneously:
- The egg white (albumen) dries into a waterproof cement that bonds directly to your clear coat
- The yolk contains sulfur-rich amino acids that chemically etch into the urethane polymer, causing spider-web cracks called “crazing”
- The shell shatters into razor-sharp calcium carbonate shards that gouge the paint on impact
The yolk’s sulfur compounds break molecular bonds in your clear coat by flooding it with excess hydrogen. Once crazing starts, the damage isn’t just on the surface — the paint’s chemical structure has actually changed.
| Egg Component | What It Does to Paint | Result |
|---|---|---|
| Albumen (egg white) | Cross-links into a waterproof adhesive; strips wax | Hardened cement layer on clear coat |
| Yolk | Sulfur acids break urethane bonds | Chemical etching and crazing |
| Shell | High-velocity impact from brittle shards | Deep “imprint chips” in paint |
Heat Makes Everything Worse
Here’s the part most people miss. On a hot summer day, dark paint can reach 150°F or higher. At that temperature, the egg white flashes off almost instantly — baking the protein layer into a rubberized shell in minutes rather than hours.
An egg that might take days to cause permanent damage in a cool garage can destroy your clear coat in under 30 minutes in direct midday sun. If you find egg on your car, move it into shade immediately. Don’t grab a cloth yet — move the car first.
Step 1 — Remove Shell Fragments First (Don’t Skip This)
Before you spray anything, carefully pick off the larger shell pieces straight up with your fingers. No wiping, no rubbing, no twisting.
Dragging even a microscopic shell shard sideways across your paint will gouge long scratches through your clear coat. That’s secondary damage that’s entirely avoidable.
Once the visible pieces are gone, a gentle rinse with a garden hose will flush away loose residue.
Step 2 — Wash with Hot Soapy Water (Fresh Egg)
If the egg is still wet, you’re in luck. Hot water and a pH-balanced car shampoo will handle most of it.
Here’s how to do it properly:
- Soak a clean microfiber wash mitt in hot water mixed with car shampoo
- Wash the panel gently — don’t scrub hard
- Rinse the mitt in a separate clean water bucket every few passes
- Keep rinsing and repeating until the egg lifts off
Hot water softens the lipid fats in the yolk and the surfactants in the shampoo do the rest.
On dish soap: You can use heavily diluted dish soap in an emergency, but it strips your wax. Use a proper automotive shampoo whenever possible.
Step 3 — Removing Dried Egg (The Rehydration Method)
Dried egg is a different problem. The proteins have cured. Scrubbing a dry egg stain with anything abrasive will scratch your paint badly. You need to rehydrate before you touch it.
Hot water poultice method:
- Soak a heavy microfiber towel in hot, soapy water
- Lay it flat directly over the dried egg stain
- Let it sit for 10–15 minutes — spray more hot water on the towel to keep it warm
- Lift the towel and gently blot away the softened residue
The heat softens the lipids while the surfactants break the surface tension. No scrubbing needed.
White vinegar method:
If hot water isn’t shifting it, distilled white vinegar (diluted 50/50 with water) works well. The acetic acid dissolves the hardened albumen’s protein structure. Spray it on, lay a soaked microfiber over it, wait 10–15 minutes, then wipe gently.
Critical: Rinse the area thoroughly with clean water afterward. Leaving acid on the paint is just trading one problem for another.
Step 4 — Enzymatic Cleaners for Severely Baked-On Egg
When the egg has been cooking in the sun for a day or more, you’ll need something stronger. Enzymatic cleaners contain protease enzymes — biological catalysts that literally digest protein-based stains.
Products like PRO Cyclone Enzyme Cleaner and Malco Enzyme Cleaner are safe for clear coats and highly effective on baked organic matter.
How to use them:
- Spray directly onto the stained area
- Let it dwell for about 5 minutes
- Wipe away cleanly — no acid residue, no harsh chemicals
These products are a go-to in professional detailing precisely because they’re aggressive on the stain but gentle on the paint.
Step 5 — Bug & Tar Remover for Stubborn Residue
Still seeing residue? A commercial bug and tar remover is your next tool. Brands like Chemical Guys, Turtle Wax, and Goo Gone Automotive make dedicated sprays that combine citrus oils with specialized polymers to dissolve proteins and lipids.
Goo Gone Automotive Spray Gel is designed with high viscosity so it clings to vertical panels instead of running off. Spray it on, wait 1–3 minutes, then lift the residue off gently with a microfiber. Follow up with a wash to remove the solvent film.
What NOT to Use on Egg-Stained Paint
This section could save your clear coat.
🚫 Brake cleaner — This gets recommended in forums occasionally. It’s a disaster on automotive paint. Brake cleaner dissolves the urethane clear coat. You’ll end up needing a full panel respray.
🚫 Scouring pads or dish scrubbers — These leave deep scratches that can’t be polished out.
🚫 Dry wiping the egg — Always wet the surface first. Wiping dry egg moves shell shards across your paint like sandpaper.
Clay Bar Decontamination (The Step Most People Skip)
After you’ve washed everything off, run your bare hand across the clean panel. Feel gritty? That’s microscopic shell fragments and baked protein still embedded in the clear coat.
Washing alone doesn’t pull these out. You need a clay bar.
An automotive clay bar is a pliable resin that grabs and lifts embedded particles straight out of the clear coat. Use it with a dedicated clay lubricant:
- Flatten the clay into a palm-sized disc
- Spray the panel generously with clay lubricant
- Glide the clay gently back and forth — no pressure needed
- Fold the clay regularly to expose fresh resin
- Stop when the clay glides silently with zero resistance
If you drop the clay bar, throw it away immediately. It picks up grit from the ground that will scratch your paint badly. Synthetic clay mitts are washable and reusable — a decent upgrade for clumsy days.
Fixing Chemical Etching (Crazing) After Egg Damage
If the egg sat on your paint for hours — especially in the sun — you’ll likely see a cloudy ghost stain or fine spider-web cracking even after cleaning. That’s crazing, and it means the clear coat is chemically damaged.
Here’s how detailers approach it by severity:
| Damage Level | What You See | Fix |
|---|---|---|
| Mild | Dull haze or ghost stain | Finishing polish with a dual-action orbital polisher |
| Moderate | Visible etching, slight texture | Cutting compound followed by finishing polish |
| Severe | Deep cracks, texture you can feel with a fingernail | Wet sanding (1,000–3,000 grit) then compound + polish |
Always start with the least aggressive method. A finishing polish removes the minimum amount of clear coat. Cutting compound removes more and always needs a follow-up polish to remove the haze it creates.
Wet sanding is serious work. Automotive clear coats are thinner than a Post-It note. Sand through the clear coat and you’ll be looking at a body shop bill.
Dealing with Paint Chips from the Shell
If the shell hit hard enough, you may have circular “imprint chips” — clusters of small chips where the shell shattered on impact. Polishing won’t fix these because there’s no paint left to level.
For minor chips, touch-up systems like Dr. ColorChip let you fill in color-matched paint and blend it flat with a finishing solution. It’s fiddly work but it gets results on small chips.
If the damage is extensive — wide chip clusters or places where the base coat has lifted off — a professional body shop is your only real option. They’ll strip, prime, repaint, and blend the panel back to factory spec.
How to Protect Your Car From Egg Damage in the Future
You can’t stop vandalism. But you can make your paint much harder to damage.
Vehicles with unprotected, oxidized clear coats suffer the deepest and fastest chemical etching during an egg attack. A protective coating gives the acid something to eat through before it hits your factory paint.
Your options ranked from weakest to strongest:
- Carnauba wax — Warm gloss, decent water beading. The egg’s alkaline albumen strips it quickly, but it’s better than nothing.
- Polymer sealant — Harder, lab-engineered protection. Acrylic and polyethylene-based sealants resist acidic and alkaline contaminants far better than natural wax.
- Ceramic or graphene coating — The best chemical resistance available. These cure into a glass-like layer that dramatically slows crazing, buying you far more time to wash the egg off before permanent damage sets in.
One practical habit that actually works: keep a microfiber towel and a bottle of quick detail spray in your car. If you find fresh egg, you can safely blot (not rub) the bulk of it away immediately — before the sun turns a cleaning job into a paint correction job.