
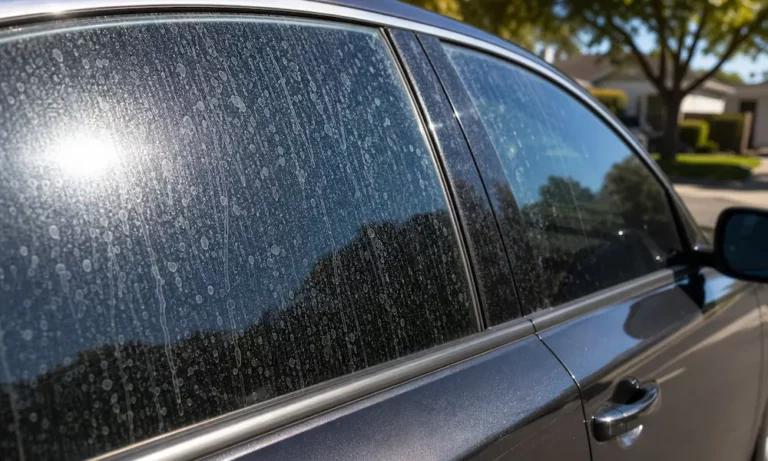
Got white rings or chalky spots on your freshly washed car? Water marks are frustrating, but they’re fixable — if you know what you’re dealing with. This guide walks you through every removal method, from a simple vinegar spray to machine polishing, so you can pick the right fix without wrecking your paint.
What Actually Causes Water Marks on Cars?
Water marks aren’t just dried water. Tap water, rainwater, and sprinkler runoff all carry dissolved minerals — mainly calcium and magnesium. When the water evaporates, those minerals stay behind and bond to your paint.
Dark panels can hit 150°F in direct sunlight, which causes the clear coat’s pores to open up. Minerals sink in deeper, and flash evaporation locks them in place before you can wipe them off.
There are two very different types of water marks you need to know:
- Hard water marks — alkaline mineral deposits that build up above the surface. They look chalky and white.
- Acid rain marks — caused by industrial pollution mixing with rainwater, these eat into the paint and leave a concave crater. No crusty buildup — just a sunken ring.
Why does this matter? Because the fix for alkaline deposits is an acid-based cleaner. But if you put acid on an already acid-etched surface, you make it worse.
The 4 Levels of Water Mark Damage
Detailing experts classify water spots into four progressive stages, and knowing your level saves you from using the wrong fix.
| Type | What It Looks Like | What It Means | Fix |
|---|---|---|---|
| Type I | Chalky white outline, surface feels smooth | Loose minerals resting on paint | Wash or light acid spray |
| Type II | Rough or gritty texture you can feel | Minerals bonded into clear coat pores | Vinegar solution or commercial remover |
| Type III | Smooth but visible ring, catches fingernail | Clear coat is physically etched | Machine polishing required |
| Type IV | Deep crater exposing color coat | Clear coat completely gone | Repaint — beyond DIY |
Run a clean fingertip across the spot. If it feels gritty or raised, you’ve got mineral buildup. If it feels smooth but looks like a ghost ring, the damage is already inside the paint.
Step 1: The Decontamination Wash (For Fresh Spots)
Before you grab any chemicals, try a proper wash first. Type I spots often come off with nothing more than a quality car shampoo — if you act fast.
Here’s what to do:
- Move the car into the shade. Hot panels cause your wash solution to evaporate before you rinse it. That creates new water marks.
- Use the two-bucket method. One bucket holds your soapy water. The other holds clean water for rinsing your mitt between passes. This stops grit from scratching the paint.
- Pick a chelating shampoo. Shampoos with chelating agents bind to mineral ions in the water and neutralize them during the wash. Great for hard water areas.
- Wash top to bottom. Roof first, sills last. Dirty runoff won’t re-contaminate panels you’ve already cleaned.
If the marks are still visible after washing and drying, they’ve bonded into the paint. Move to Step 2.
Step 2: Vinegar Solution for Bonded Mineral Deposits
Hard water minerals are alkaline. A mild acid dissolves them. The cheapest, safest option is white distilled vinegar, which contains acetic acid.
Mix one part white vinegar with one part distilled water. Don’t use tap water — it carries the exact minerals you’re trying to remove, which defeats the whole point.
How to apply it:
- Saturate a clean microfiber pad with the solution.
- Press it gently against the affected area. Don’t scrub.
- Leave it for 60–120 seconds to let the acid react.
- Flush immediately with water and follow with an alkaline car shampoo to neutralize the acid.
The flush step is critical. Leaving acid on paint — even diluted vinegar — can dull the finish if it sits too long or dries out. Never let the solution dry on the paint.
Step 3: Commercial Water Spot Removers for Stubborn Marks
If the vinegar trick doesn’t cut it, you need a stronger product. Commercial water spot removers use concentrated proprietary acids designed to break down baked-on mineral scale fast.
Many of the best commercial removers come as thickened gels, not thin liquids. The gel clings to vertical surfaces — doors, fenders — so the active ingredients stay in contact with the spot instead of running off.
| Product Format | Best For | How to Use |
|---|---|---|
| Acidic wash shampoo | Routine maintenance on ceramic-coated cars | Via foam cannon or wash bucket |
| Liquid acidic spray | Moderate Type II spots on paint, glass, and chrome | Spray on cool panel, wipe gently, rinse |
| Thickened acidic gel | Severe baked-on scale, vertical panels | Apply with foam applicator, cross-hatch pattern, neutralize |
Key rules when using commercial removers:
- The panel must be cool, clean, and completely dry. Water dilutes the formula instantly.
- Work in small sections — about a 2×2 foot area at a time.
- Dwell time is usually 30–60 seconds maximum. Don’t push it.
- Wipe off residue, then flush the area with water and a neutralizing wash immediately.
Step 4: Clay Bar for Remaining Roughness
After chemical treatment, if the surface still feels rough or gritty, mineral fragments are still bonded in the clear coat. A clay bar physically shears those stubborn deposits away.
Clay bars are made from synthetic polybutene resin loaded with fine abrasives. The key to using them safely is lubrication.
- Spray a dedicated clay lubricant or detailing spray heavily across the panel first.
- Glide the clay bar gently back and forth using almost zero pressure.
- If the clay drags or sticks, add more lubricant immediately.
- The clay will grab the mineral fragments and pull them free without scratching the paint.
Once the surface feels completely smooth, wipe the remaining lubricant with a clean microfiber towel.
Step 5: Machine Polishing for Etched Marks (Type III)
If you’ve done everything above and a ring is still visible, the paint is physically etched. The clear coat has a crater that no cleaner can fill. The only fix is mechanical levelling — polishing down the surrounding paint to match the depth of the crater.
Use a Dual Action (DA) polisher, not a rotary. A DA machine oscillates randomly while spinning, which distributes heat and friction evenly and makes it much harder to burn through the clear coat.
Start with the least aggressive combo:
- Soft foam pad + fine polish — Work in overlapping cross-hatch passes at moderate speed.
- Wipe away residue and inspect under a bright light.
- If the crater remains, step up to a microfiber cutting pad + heavier compound.
- Once the mark is gone, step back down to fine polish and a soft pad to remove the compounding haze and restore gloss.
Important: your car’s clear coat is thinner than a sheet of paper. Repeated heavy compounding will eventually destroy it. If the etching is too deep to safely level, the panel needs professional repainting.
How to Remove Water Marks from Car Glass
Glass is much harder than paint, which means minerals bond to it even more stubbornly. But glass has its own rules.
For fresh spots: Standard glass cleaner, high-concentration isopropyl alcohol, or a lemon juice and baking soda paste often work fine.
For stubborn bonded scale: Use commercial removers designed for glass, but watch the dwell time. Acid left on hot glass can permanently etch the silica, creating permanent cloudiness that blocks your view.
For severe scale: You need cerium oxide, a rare-earth abrasive designed specifically to grind away mineral buildup from silica surfaces. Use it with a dense rayon glass pad and a DA polisher, keeping the surface wet throughout.
The steel wool trick: Ultra-fine grade 0000 steel wool, generously lubricated with glass cleaner, can shear away tough spots from windows using light pressure. But tape off every surrounding painted surface first — one accidental swipe across paint leaves deep scratches instantly.
Water Marks on Matte Paint and Paint Protection Film
Matte finishes need completely different treatment. Their flat look comes from a micro-textured surface that scatters light. Polish that texture flat, even slightly, and you’ll create a permanent glossy patch that can’t be reversed without repainting.
Rules for matte and satin finishes:
- No clay bars, no compounds, no polishes — ever.
- Use only matte-specific shampoos. Standard wash-and-wax soaps leave gloss agents in the texture.
- Apply a matte-safe acidic water spot remover, let it dwell briefly, and wipe away with minimal pressure using an ultra-soft microfiber towel.
- If a spot has etched the matte clear coat, the panel requires repainting. There’s no patch fix.
Paint Protection Film (PPF) has a slight edge — mild etchings sometimes self-heal when you apply gentle heat, since the thermoplastic film flows and levels itself.
Water Marks on Chrome and Plastic Trim
Most modern “chrome” is actually vacuum-metallized plastic with a thin clear sealant on top. Use heavy abrasives here and you’ll strip the metallic layer and expose bare black plastic.
For plastic chrome and synthetic trim:
- Use a non-abrasive trim cleanser or ultra-fine liquid cleaner, applied gently by hand with a microfiber pad.
- For stubborn mineral stains, lightly mist a water-displacing spray (like WD-40) onto a microfiber cloth and wipe gently. The aliphatic hydrocarbons dissolve mineral bonds without scratching. Spray the cloth, never directly on the car, to avoid overspray on rubber seals or paint.
- For robust metal trim, stainless steel appliance spray provides non-abrasive solvent action and leaves a protective sheen.
How to Stop Water Marks Forming in the First Place
Fixing water marks beats having them at all. Here’s what actually works:
Dry properly after every wash:
- Use a 400–500 GSM microfiber drying towel. The split-fiber construction creates powerful capillary action that pulls water off the paint fast.
- Blot, don’t wipe. Lay the towel flat, pat it down, lift vertically. Zero friction, zero risk of swirl marks.
- Before towelling, mist a drying aid spray onto wet panels to lubricate the surface and help water sheet off.
Blow out hidden water:
Door jambs, mirror housings, and grilles trap water that streams out once you drive off — and dries into long mineral streaks. Use a dedicated car dryer or a clean electric leaf blower to flush these areas before they become a problem.
Never wash in direct sunlight or on hot panels. Wash in shade during cooler parts of the day — early morning or late afternoon.
Upgrade your rinse water:
If you’re in a hard water area, an inline deionization filter strips minerals from your hose water completely. Water at zero parts per million leaves zero residue, even if a drop misses your towel.
Apply a Protective Barrier That Actually Fights Back
Protection doesn’t prevent water marks entirely, but it changes how serious they get.
| Barrier Type | Durability | Mineral Resistance |
|---|---|---|
| Natural carnauba wax | 4–8 weeks | Low — melts in heat |
| Synthetic polymer sealant | 3–6 months | Moderate |
| Ceramic coating (SiO₂/SiC) | 2–5 years | High |
| Paint Protection Film (PPF) | 5–10 years | Ultimate |
Here’s the thing about ceramic coatings — they don’t make your car immune to water spots. Minerals still deposit on top. But because the coating cures into a dense, non-porous layer, minerals can’t penetrate into the vulnerable clear coat beneath. When you do clean them off, a quick wipe with a mild acidic wash usually does the job — and your factory paint stays untouched.
Maintain your ceramic coating with silica-infused detail sprays between washes to keep the sacrificial layer reinforced and your water beading tight.


