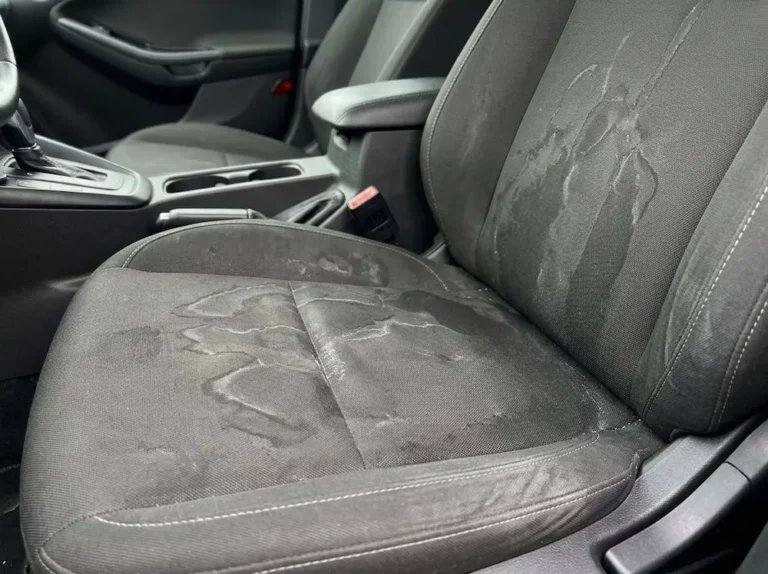
Got a mysterious dark ring on your car seat after what should’ve been a harmless water spill? You’re dealing with a water stain — and it’s more common than you think. This guide breaks down exactly how to remove water stains from car seats, covering every seat material, every stain type, and a few safety warnings most people completely overlook. Read to the end — the last section could save your seats for good.
Why Water Leaves Stains on Car Seats
This part surprises most people. Water stains aren’t actually caused by the water itself. Here’s what’s really happening.
The “Tideline” Effect
Your car seat fabric acts like a sponge. Over time, it collects dust, skin oils, old soap residue, and airborne grime. When water soaks in, it dissolves all that hidden dirt and carries it outward. As the water evaporates, it deposits that concentrated grime at the edge of the wet area — creating the dark ring you see. Detailers call this a tideline or wick-back stain.
Hard Water Makes It Worse
Tap water contains dissolved minerals — mainly calcium and magnesium. When the water evaporates, those minerals stay behind and bond directly to fabric fibers, leaving a crusty white ring. Trying to clean that ring with more tap water just spreads the minerals further and creates a bigger stain. That’s why you must use distilled water for all cleaning steps.
Before You Clean Anything: Identify Your Seat Material
The wrong cleaning method can permanently damage your seats. Always confirm what material you’re working with first.
| Material | Moisture Tolerance | Key Risk |
|---|---|---|
| Woven Cloth | High | Deep tidelines if not cleaned seam-to-seam |
| Natural Leather | Low–Moderate | Stiffening, cracking, color loss |
| Vinyl/Leatherette | High | None — stains stay on the surface |
| Alcantara (Synthetic Suede) | Moderate | Fiber matting if scrubbed aggressively |
| Natural Suede | Very Low | Permanent water marks — avoid all moisture |
Step One: Always Vacuum First
Skipping the vacuum is one of the most common detailing mistakes. If you spray a cleaner onto a dusty seat, you’re just pushing wet dirt deeper into the fabric. Use a wet/dry vacuum with a crevice tool to pull out loose debris from the surface, seams, and seat creases before any liquid touches the seat.
How to Remove Water Stains from Cloth Car Seats
Cloth seats are the trickiest. They absorb liquid deeply, and spot-treating them almost always backfires.
The Seam-to-Seam Rule
Never spot-clean a cloth seat. If you only treat the stained area, the cleaner will dissolve the ring and push it outward — creating a new, larger ring when it dries. Clean the entire seat panel from seam to seam, so there’s no dry edge for a new tideline to form.
What You Need
- Distilled water (not tap water)
- Upholstery foaming shampoo or enzyme-based cleaner
- Soft-bristled upholstery brush or drill brush (white/gray — extra soft)
- Clean microfiber towels
- Wet/dry shop vacuum or hot water extractor
The Cleaning Process
- Lightly mist the entire seat panel with distilled water to relax the existing stain
- Apply the foaming cleaner to your brush, not directly to the seat — this prevents over-saturation
- Agitate using overlapping cross-hatch passes — move vertically across the panel, then horizontally
- Blot firmly with dry microfiber towels, flipping to a dry side each time
- Extract with a shop vacuum to pull moisture out of the foam cushioning
- Feather the edges by lightly misting the border of the cleaned panel with distilled water and wiping outward — this prevents any new tideline from forming as it dries
Using a Drill Brush Safely
A drill-mounted brush delivers far more scrubbing power than doing it by hand. But the wrong brush will shred your seat fabric. Follow this guide:
| Brush Color | Stiffness | Use On Car Seats? |
|---|---|---|
| White / Gray | Extra Soft | ✅ Yes — safest option for all cloth seats |
| Yellow | Medium | ⚠️ Test first — can fray older or delicate fabrics |
| Black / Red | Stiff–Ultra Stiff | ❌ Never — will tear and shave the fabric |
Keep the drill on a low-to-moderate speed setting. Never hold it stationary — keep it moving in overlapping passes to prevent friction heat buildup.
What to Avoid
- Harsh alkaline degreasers — they strip fabric dye and are nearly impossible to rinse out completely
- Tap water — it adds more minerals and worsens the stain
- Spot-cleaning — it always creates new rings
How to Remove Water Stains from Leather Seats
Leather needs a much gentler approach. Natural leather relies on internal oils to stay supple — strip those away and the hide cracks. Water stains on leather are usually surface-level mineral deposits, so you don’t need heavy-duty cleaners.
What Works on Leather Water Stains
- pH-neutral leather cleaner — the safest choice for breaking down mineral deposits
- Mild dish soap + damp cloth — effective for light stains
- White vinegar (diluted) — its mild acidity dissolves calcium deposits without stripping the finish
- Baking soda paste — apply over the wet stain, let it sit 15–20 minutes, then vacuum away
Application Tips
- Apply your cleaner to a microfiber pad, not directly onto the seat — this stops liquid from pooling in seams or perforation holes
- Use gentle circular motions — the deposits sit on the surface, so you don’t need hard scrubbing
- Wipe completely dry with a clean microfiber towel immediately after cleaning
- Always apply a leather conditioner after cleaning — any cleaning agent, even a mild one, depletes the hide’s moisture barrier. Conditioning restores the oils and evens out the tone
How to Remove Water Stains from Vinyl and Leatherette
Vinyl is the easiest material to clean. It’s non-porous, so water stains sit entirely on the surface. The whole process takes five minutes.
- Mix a few drops of dish soap with warm water, or use a diluted interior-safe cleaner
- Apply with a damp microfiber cloth and agitate lightly
- Wipe completely dry
- Do a final wipe with a plain water-dampened cloth to remove any soap residue
- Finish with a vinyl protectant to restore the surface sheen
How to Remove Water Stains from Alcantara (Synthetic Suede)
Most modern luxury vehicles use Alcantara — a synthetic microfiber material that’s completely water-safe. Don’t confuse it with real natural suede, which water destroys permanently.
How to tell the difference: Most automotive “suede” interiors are Alcantara. Natural suede is extremely rare in production cars due to cost and fragility.
Cleaning Alcantara Step by Step
- Brush gently with a soft-bristled brush to break up stiffened fibers, then vacuum
- Dampen a microfiber cloth with warm water and a few drops of mild soap — wring it out until it’s barely damp
- Wipe in the direction of the fabric’s natural nap — no harsh scrubbing
- Wipe away residue with a second cloth dampened with plain water only
- As the Alcantara dries, brush gently in one direction to restore the velvety texture
| Stain Type | Alcantara Treatment |
|---|---|
| Water Marks | Damp wipe, then brush the nap as it dries |
| Food & Drinks | Blot first, then wipe with mild soapy water |
| Grease / Body Oils | Mild soap and water, repeat if needed |
| Ink | Dab carefully with surgical spirit — test in hidden area first |
| Dried Mud | Let it dry fully, vacuum first, then soapy wipe |
Do not use high-heat steam on Alcantara. Excessive heat permanently alters the polymer structure and creates deep, irreversible halos.
Critical Warning: Heated and Ventilated Seats
This section matters more than most people realize.
Heated Seats and Water: A Real Hazard
Heated seats use resistive wire elements embedded under the upholstery. If moisture reaches those wires and the insulation is compromised, it causes an electrical short. The NHTSA has received numerous complaints about seat heaters generating surface temperatures exceeding 150°F — hot enough to cause severe burns through clothing in minutes.
People with diabetes-related neuropathy, spinal cord injuries, or advanced age are especially vulnerable because they may not feel the heat building until serious tissue damage has already occurred.
The rule is simple: keep heated seats turned off until the seat is completely dry. Don’t use the heating function to speed up drying — that combination of electrical current and trapped moisture is exactly what causes system failures.
Ventilated Seats: Don’t Pour Liquid Into the Perforations
Ventilated seats pull air through thousands of tiny holes in the seat surface. If you spray cleaner directly onto a perforated seat, liquid drains through the perforations and soaks the internal blower motors. Soap residue then coats the internal ducting and blocks airflow permanently.
The fix: Apply foaming cleaner to a brush or cloth first, never directly to the seat. The foam stays on the surface instead of draining through.
Drying Your Seats Properly (Don’t Skip This)
A damp seat left to air-dry slowly in a closed cabin will grow mold. A closed car cabin is warm, dark, and sealed — ideal conditions for mold and mildew. The musty smell that results is extremely difficult to eliminate.
A cloth car seat can take four to six hours to dry naturally under normal conditions. You need to accelerate that.
Best Drying Methods
- High-velocity air mover (blower fan): Position it inside the cabin pointing directly at the seat, with windows or doors open to let humid air escape. Run it for at least 45–60 minutes
- Summer sun: Park in direct sunlight with windows slightly cracked — the radiant heat speeds evaporation. Avoid this for leather seats, as UV combined with moisture loss causes cracking
- Air conditioning: Running your car’s A/C removes moisture from cabin air, pulling dampness out of the upholstery naturally
- Dehumidifier: In humid climates, place a portable dehumidifier inside the closed cabin — it forces moisture out of the seat foam rapidly
- DIY desiccants: Place mesh bags of baking soda or rice on the seats to absorb ambient moisture for minor dampness
Protect Your Seats So This Doesn’t Happen Again
Once your seats are clean and bone dry, apply a fabric protectant. These products deposit microscopic hydrophobic polymers onto the fibers. Liquids bead up on the surface instead of soaking in — giving you time to blot the spill before it ever becomes a stain.
| Protectant | Basis | Strengths | Watch Out For |
|---|---|---|---|
| Scotchgard Auto Fabric & Carpet Shield | Fluoropolymer | Excellent repellency, fast cure | Very strong odor — needs heavy ventilation |
| 303 Fabric Guard | Petroleum distillate | Long-lasting, doesn’t stiffen fabric | Needs 12–24 hours to cure; apply above 70°F |
| Chemical Guys HydroThread | Ceramic / SiO2 | Extreme hydrophobic performance, molecular bonding | Premium cost; seat must be perfectly clean and dry |
How to Apply Fabric Protectant Correctly
- The seat must be completely clean and dry — protectant won’t bond to dirty fibers, and will seal the contamination in permanently
- Work in a ventilated space with all doors and windows open
- Hold the spray 6 inches from the fabric surface
- Apply two to three light coats instead of one heavy coat — heavy application causes uneven drying and stiffens the fabric
- Let it cure fully before using the vehicle (a few hours to a full day depending on the product)