Clunking over every pothole? Steering wheel pulling sideways when you brake? Your control arm bushings are probably shot. This guide walks you through exactly how to replace control arm bushings yourself — from spotting the early warning signs to pressing in the new parts correctly. Stick around for the torque tip at the end. Skip it, and you’ll destroy your brand-new bushings before you even leave the driveway.
What Does a Control Arm Bushing Actually Do?
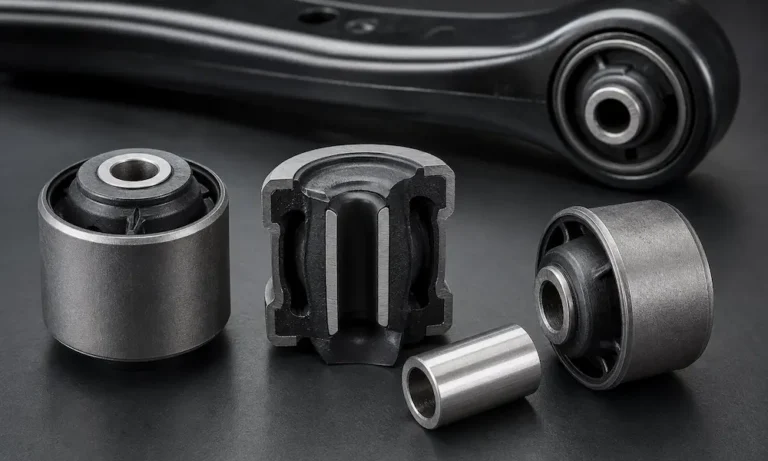
Your control arm connects the wheel hub to the car’s frame. The bushing sits at that connection point — it’s a rubber-and-steel cylinder that lets the suspension move up and down while keeping everything else locked in place.
Think of it like a pivot cushion. It absorbs road shock, reduces vibration, and keeps your wheels pointed exactly where they should be. Bushings are specifically engineered to permit controlled vertical movement while rigidly resisting lateral and longitudinal forces.
When the rubber wears out, the wheel starts shifting around uncontrolled. That’s when things get expensive fast.
How Long Do Control Arm Bushings Last?
Under normal conditions, standard OEM rubber bushings last between 60,000 and 100,000 miles. But several factors shorten that lifespan dramatically:
- Heavy city driving with constant potholes
- Off-road use or lifted suspensions
- Winter road salt (big issue in Rust Belt states)
- Aggressive driving and hard braking
- Oversized tires adding extra stress to pivot points
Signs You Need to Replace Control Arm Bushings
Bushing failure doesn’t happen overnight. It creeps up on you in stages.
Early Warning Signs
- Clunking or popping noise over speed bumps or potholes — the rubber isn’t cushioning the metal anymore
- Slight steering vibration at highway speed
- Wandering steering — you keep making tiny corrections to drive straight
More Serious Symptoms
- Steering wheel jerks sideways when braking — the wheel is physically shifting backward under braking force
- Uneven tire wear on the inner or outer edge only
- Cupped tire tread — a scalloped pattern caused by wheel hop
Severe Failure Stage
At this point, you’ve got complete bushing separation and risk of arm detachment. The wheel may hop under acceleration. The vehicle could dart aggressively during hard braking. This is a safety emergency, not a “schedule it next month” situation.
| Failure Stage | Timeline | Key Symptoms | What’s Happening |
|---|---|---|---|
| Stage 1: Early | 0–6 months | Occasional clunks, vibration | Mild rubber degradation |
| Stage 2: Moderate | 6–18 months | Visible arm movement, heavy clunking | Alignment shifts 5–7 degrees |
| Stage 3: Severe | 18+ months | Wheel hop, violent braking pull | Full separation risk |
How Worn Bushings Destroy Your Alignment
Here’s what most people don’t realize: worn bushings don’t just feel bad — they physically change your wheel angles.
Just 2–5mm of play at the inner pivot point creates massive angle shifts at the wheel hub.
Camber goes wrong: The tire tilts inward or outward under cornering loads. The result? Rapid wear on one tire edge. You can destroy a brand-new set of tires in a few months.
Caster shifts: Your steering loses its self-centering ability. The car wanders at speed. You fight the wheel the entire highway drive.
Bump steer kicks in: This is the dangerous one. As you hit a bump, the worn bushing lets the control arm shift — and the wheel physically steers itself without any input from you. The vehicle tries to change lanes every time you hit uneven pavement. At highway speed, that’s terrifying.
Bushing Only vs. Complete Control Arm: Which Makes More Sense?
This is the big money question. Here’s the honest breakdown:
| Repair Option | Parts Cost | Labor Time | Total Cost | Notes |
|---|---|---|---|---|
| Bushing only (shop) | $40–$120 | 3–5 hours | Highest | Aging ball joint stays |
| Complete arm (shop) | $200–$600 | 1–2 hours | Most cost-effective at a shop | Includes new ball joint |
| Bushing only (DIY) | $40–$120 | Your time | Cheapest overall | Keeps original quality arm |
| Complete arm (DIY) | $200–$600 | Less time | Fast, zero press tools needed | Easiest DIY path |
US labor rates run $110–$160 per hour. Pressing out old bushings and installing new ones adds 1–3 extra labor hours at a shop. That extra time often costs more than just buying the complete pre-assembled arm.
For DIY mechanics, pressing individual bushings saves the most money. You keep the original factory arm (usually superior to cheap aftermarket replacements) and only pay $40–$120 in parts.
Tools You’ll Need
Don’t start this job without the right equipment. Here’s what you need:
Safety gear:
- Hydraulic floor jack
- Heavy-duty jack stands (rated for your vehicle’s weight)
- Wheel chocks
Disassembly tools:
- Breaker bar and socket set
- Penetrating oil (apply 24 hours before if you’re in a rust-heavy climate)
- Ball joint separator — choose carefully:
- Pickle fork — fast and aggressive, but it destroys the ball joint boot. Only use it if you’re scrapping the ball joint.
- Scissor-style separator — threads against the knuckle smoothly, pops the taper without touching the boot. Use this if you’re keeping the ball joint.
Bushing press tools:
- C-clamp style bushing press kit with receiver cups and driver discs
- Or a hydraulic shop press if you have access to one
Pro tip on tools: Major US auto parts stores offer Loan-A-Tool programs. You pay a deposit equal to the full retail price, borrow the press kit, finish the job, return it within 90 days, and get a full refund. Essentially free professional-grade equipment.
How to Replace Control Arm Bushings: Step-by-Step
Step 1: Lift and Secure the Vehicle
Jack up the vehicle and place jack stands under solid frame rails or designated subframe pickup points. Never work under a car supported only by a floor jack. Give the chassis a firm shake before getting underneath — if it moves, reposition the stands.
Remove the wheel to expose the suspension.
Step 2: Apply Penetrating Oil Early
If you’re in a Rust Belt state, seized bolts are your biggest enemy here. Spray penetrating oil on all bushing bolt threads and the outer sleeve of each bushing. Let it soak overnight if possible. This single step can save you hours of frustration.
Step 3: Disconnect the Sway Bar and Related Components
Unbolt the sway bar end links and any brackets connecting to the control arm. This frees the arm to drop later.
Step 4: Separate the Ball Joint
Loosen the ball joint nut — but leave it threaded loosely on the end of the stud. This safety step keeps the spring-loaded arm from crashing down violently when the taper breaks free.
Use your chosen separator tool to pop the ball joint out of the steering knuckle. Alternatively, striking the side of the cast-iron knuckle with a dead-blow hammer sends a shockwave through the metal that often pops the taper free without tools.
Step 5: Remove the Control Arm Mounting Bolts
In ideal conditions, the bolts slide right out and the arm lifts free. In the real world — especially on older vehicles — the bolt may have rust-welded itself to the inner bushing sleeve.
If that happens, a wrench won’t help. The bolt just spins and tears the rubber out while staying stuck. Your options at that point:
- Reciprocating saw with metal-cutting blades — cut the bolt on both sides of the bushing
- Angle grinder with a cutoff wheel — same approach
Cut the bolt in half, drop the arm free, and source new factory-spec bolts for reassembly.
Step 6: Extract the Old Bushing
With the control arm on a workbench, set up your C-clamp press. Place a hollow receiver cup (larger than the bushing) on one side. Place a driver disc (slightly smaller than the bore) on the other side, directly against the outer bushing sleeve.
Apply steady pressure. The bushing presses out into the receiver cup.
Grease the press threads before applying heavy load — this prevents them from stripping under pressure.
Apply heat from a propane torch to the control arm housing if it’s being stubborn. The metal expands slightly and releases its grip.
Step 7: Dealing With a Completely Seized Bushing
Sometimes the outer steel shell rust-bonds so severely that pressing it out would bend the control arm. In that case, go destructive:
- Drill or burn out the rubber core — drill several holes through the rubber, or use a torch to melt it away entirely
- Saw a vertical slit through the outer metal shell — use a hacksaw blade or reciprocating saw passed through the empty center. Stop before you cut into the arm itself
- Collapse the shell inward — use an air chisel or hammer and punch to fold the weakened shell away from the bore walls. It drops right out
After any destructive removal, clean the bore thoroughly with a wire brush and brake cleaner to remove all rust and burrs.
Step 8: Install the New Bushing
The freezer trick: Place the new bushing in your freezer for 12–24 hours before installation. Cold makes the metal contract slightly, reducing the interference fit. The bushing presses in with far less force and far less risk of binding.
Apply a light coat of anti-seize to the outer shell and the bore before pressing. This helps during installation and prevents future rust bonding.
If you’re installing polyurethane bushings, skip the anti-seize and use the silicone or lithium grease that came with the kit. Petroleum-based grease chemically degrades polyurethane and causes rapid failure.
Check for directional markings on the new bushing. Some bushings have orientation arrows — align them according to the service manual before pressing.
Press slowly and apply force only to the outer metal lip. Never press on the inner sleeve or rubber core — you’ll destroy the bushing instantly.
Drive the bushing in until it’s centered and flush per manufacturer specifications.
Step 9: Reinstall the Control Arm
Reverse the disassembly steps. Maneuver the arm back into the subframe brackets, push the mounting bolts through, reconnect the ball joint and torque it to spec, reattach the sway bar links.
Thread the mounting bolts by hand only. Do not torque them yet.
The Ride-Height Torque Rule — Don’t Skip This
This is the most critical step in the entire job. Get this wrong and you’ll destroy your new bushings within a few thousand miles.
Here’s the problem: if you fully torque the control arm bolts while the car is on jack stands, the bushing’s inner sleeve locks at full droop — the position where the wheel hangs down at its lowest point.
When you lower the car and its weight presses down on the suspension, the arm swings upward to its normal resting position. But the locked inner sleeve can’t follow — so the rubber twists violently just to reach normal ride height.
The rubber now spends its entire life under heavy torsional strain. The ride feels harsh, the car sits too high, and the rubber tears apart within months.
The correct procedure:
- Thread all mounting bolts loosely — the arm should pivot freely
- Bolt the wheels back on
- Lower the vehicle fully off the jack stands
- Bounce the front end up and down several times to let the suspension settle
- Crawl underneath and torque the bushing bolts to manufacturer spec with a calibrated torque wrench
Now the rubber is locked in its natural neutral position. It lasts as long as it should.
Note: This rule applies to bonded rubber bushings. Polyurethane bushings use a free-rotating inner sleeve, so they don’t suffer from torsional preload — but following this protocol is still best practice.
Get a Wheel Alignment Immediately After
This isn’t optional. After replacing control arm bushings, your camber, caster, and toe angles have all shifted. The old alignment settings were likely compensating for worn bushings — those compensations are now wrong.
Skipping the alignment means:
- Rapid, uneven tire wear
- Crooked steering wheel
- Dangerous handling at highway speeds
Drive straight from the repair to a four-wheel alignment rack.
FAQ: How to Replace Control Arm Bushings
Can I drive with bad control arm bushings?
Short distances in an emergency only. Advanced bushing failure causes erratic braking, unpredictable steering, and accelerated tire destruction. Complete collapse can result in the suspension arm detaching entirely. Don’t ignore it.
Do I need special tools to replace control arm bushings?
You need a bushing press kit — either a C-clamp style kit or a hydraulic shop press. If you don’t want to buy one, use a Loan-A-Tool program at AutoZone or O’Reilly for essentially free access to the equipment.
Should I replace bushings on both sides at once?
Yes. If one side has worn out, the other is at a similar mileage and condition. Replacing both at once saves you from doing this job again in a few months.
Why does my car feel harsh after replacing the bushings?
Almost certainly a torque-at-droop error. The bushing bolts were tightened while the suspension was hanging down, pre-loading the rubber. Loosen the bolts, let the car settle at ride height on the ground, and re-torque them correctly.
Can I replace bushings without removing the control arm?
On some vehicles with accessible bushing locations, specialized in-vehicle press tools exist. But in most cases, removing the arm gives you the access and control needed for a clean installation. Trying to press bushings in-situ often results in misalignment.
How do I know if my car has hydro-bushings?
Look for a brown or black oily residue weeping from the rubber housing. Fluid-filled bushings are common on luxury vehicles, and once they leak, the structural integrity is completely gone. Replacement is immediate.
What happens if I use the wrong grease on polyurethane bushings?
Petroleum-based products chemically break down the polyurethane matrix. The bushing deteriorates rapidly and will start squeaking loudly. Always use silicone-based or lithium-based grease — check the manufacturer’s instructions for the exact spec.