Your headlights look like frosted glass, and someone online swears toothpaste fixes it. Spoiler: it kind of does — but there’s a catch nobody mentions. Read on to find out what toothpaste actually does to your headlights, how to do it right, and what happens if you skip one critical step.
Why Your Headlights Turn Yellow and Cloudy
Your headlights aren’t made of glass. Since the late 1980s, automakers switched to polycarbonate plastic lenses — lighter, impact-resistant, and easy to mold into sleek shapes. The trade-off? Polycarbonate yellows over time.
Here’s what’s attacking your lenses right now:
- UV radiation breaks down the plastic at a molecular level, turning it yellow
- Heat cycles from your bulbs cause the plastic to expand and contract, creating micro-cracks
- Road debris scratches away the factory protective coating
- Chemical contaminants like road salt and harsh car wash soap speed up oxidation
The factory applies a UV-resistant clear coat to protect the lens. Once that coating fails, the polycarbonate oxidizes fast. The cloudy result isn’t just ugly — it’s dangerous. Oxidized lenses can cut your headlight output by up to 80%, drastically reducing how far you can see at night.
The NHTSA takes headlight visibility seriously for exactly this reason. Dim or scattered headlights increase crash risk, especially on unlit roads.
What Toothpaste Actually Does to Your Headlights
Toothpaste works as a mild abrasive. The same particles that scrub plaque off your teeth physically scrape the oxidized layer off your plastic lens.
The key ingredients doing the work are:
| Ingredient | What It Does to Headlights |
|---|---|
| Calcium carbonate | Acts like fine sandpaper, shearing off oxidized plastic |
| Hydrated silica | Smooths micro-scratches and surface irregularities |
| Glycerol / sorbitol | Lubricates the paste so it glides without dry-scratching |
| Sodium lauryl sulfate | Creates foam that lifts abraded plastic away from the lens |
| Fluoride / flavoring | Does absolutely nothing — completely inert here |
When you scrub toothpaste onto a cloudy lens, you’re physically removing the yellowed, degraded outer layer of plastic. Underneath that dead crust sits cleaner, clearer polycarbonate. The paste lifts the gunk away, and the lens looks noticeably better.
It genuinely works — to a point.
Pick the Right Toothpaste
Not all toothpastes cut equally. Gel-based toothpastes won’t do much — they lack the abrasive concentration to remove real oxidation. You want:
- White paste with baking soda or tartar-control formula
- Whitening toothpaste — higher abrasive content, more effective cutting
- DIY boost: Mix equal parts toothpaste and raw baking soda for extra grit on heavily oxidized lenses
How to Clean Headlights With Toothpaste: Step-by-Step
Step 1: Wash the Lens First
Rinse the headlight with car shampoo and water. Dry it completely with a microfiber towel. Any loose grit left on the surface will drag across the plastic and create deep scratches during polishing.
Step 2: Tape Off the Surrounding Paint
This step isn’t optional. Toothpaste abrasives will mar your car’s clear coat if they contact painted panels. Apply painter’s tape or automotive masking tape around the entire perimeter of the headlamp housing. Every edge.
One slip without tape can mean an expensive paint correction job.
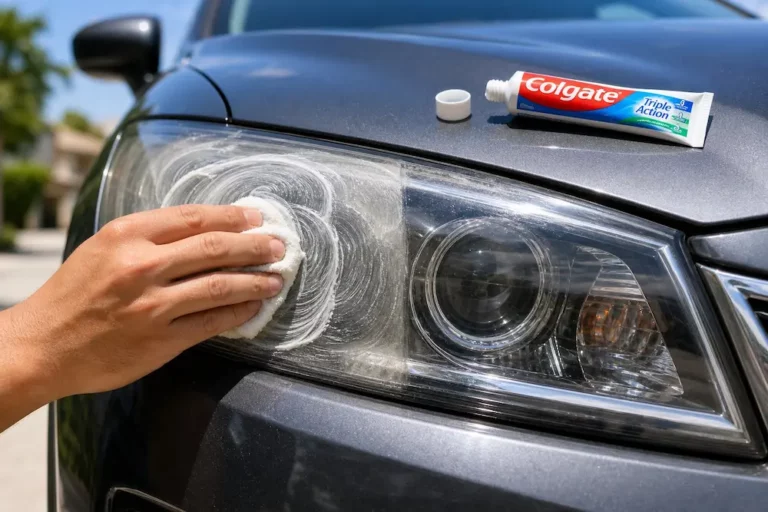
Step 3: Apply and Scrub
Put a generous dollop of toothpaste on a clean microfiber cloth or foam applicator pad. For heavily oxidized lenses, a soft-bristled toothbrush gives you better mechanical bite on the first pass.
Scrub using firm, consistent pressure. Use straight overlapping passes rather than circular motions to avoid swirl marks. Keep going for two to three minutes per lens. The paste will turn yellow or brown — that’s the oxidation coming off. That’s what you want to see.
If the paste dries and clumps, mist the surface lightly with water to reactivate it and keep scrubbing.
Step 4: Rinse and Check
Wipe everything clean with a fresh microfiber cloth and water. Make sure no toothpaste is lodged in the gaps between the lens and body panels — it hardens like cement when it dries.
Let the lens dry completely and evaluate. Still hazy? Run another application cycle. Deep oxidation sometimes needs two passes.
Step 5: Apply a UV Protectant — This Is Non-Negotiable
Here’s the part most tutorials skip. And it’s the most important part.
Toothpaste strips away whatever remains of the factory UV clear coat alongside the oxidation. That leaves the lens as bare, unprotected polycarbonate. Without a UV sealant applied immediately after, the yellowing returns within weeks.
You’ve done the work — don’t waste it.
Best UV Sealants to Use After Cleaning With Toothpaste
These products replace the destroyed factory coating and give your restoration actual staying power.
| Product | Type | Protection Level |
|---|---|---|
| Meguiar’s Keep Clear Headlight Coating | Aerosol spray | Up to 1 year, easy application |
| Cerakote Ceramic Headlight Kit | Pre-saturated wipes | Maximum durability, ceramic bonding |
| 3M Quick Headlight Clear Coat | Pre-saturated wipes | Fills micro-scratches, cures hard |
| Sylvania UV Block Clear Coat | Liquid with surface activator | Strong UV inhibitors, bonds well |
| Turtle Wax Headlight Cleaner & Sealant | Liquid cream | Entry-level, one-step convenience |
Aerosol clear coats like Meguiar’s are straightforward — spray on medium wet coats, overlap passes by 50%, let it flash for a few minutes, add a second coat, and let it cure for 24 hours. Ceramic wipes are even simpler and deliver tougher protection.
Any of these options work far better than leaving the lens bare.
The Real Limitations of the Toothpaste Method
It Only Fixes Surface Oxidation
Toothpaste removes the yellowed outer crust. It can’t fix deep pitting, internal crazing, or cracks from years of thermal stress. If your lens looks like cracked ice or has deep gouges from road debris, toothpaste won’t touch those.
The Abrasives Aren’t Calibrated
Professional polishing compounds use precisely engineered abrasive particles that diminish as they work, leaving an optically smooth finish. Toothpaste abrasives are random and non-uniform. They remove oxidation but leave microscopic scratches behind. Under a magnifying glass, a toothpaste-polished lens looks jagged compared to one finished with a proper compound. Those micro-scratches give UV damage more surface area to attack going forward.
It Won’t Last Without That Sealant
Skipping the UV protectant doesn’t just reduce the lifespan of your restoration — it accelerates the next round of oxidation. Repeated toothpaste treatments without sealing gradually thin out the plastic itself. That’s not a direction you want to go.
Watch Out for Collateral Damage
Painted Panels
Toothpaste abrasives can dull your car’s clear coat paint on contact. Always tape off the surrounding bodywork before you start. If you accidentally scuff the paint, you’ll need a machine polisher and automotive compound to correct it — not a fun afternoon.
Black Plastic Trim and Rubber Seals
This one catches people off guard. Textured black trim and rubber weatherstripping are porous. If toothpaste gets on them, the abrasive particles dry inside the tiny surface pores and leave a stark white chalky stain. Wiping with a wet cloth won’t fully fix it — the stain comes back when it dries.
To remove embedded toothpaste residue from trim:
- Apply an automotive all-purpose cleaner to the affected area
- Scrub with a stiff detailing brush or toothbrush to dislodge the particles
- Wipe clean with a microfiber cloth and rinse
- Finish with a plastic and rubber conditioner to restore the black color and protect against UV fading
Tape thoroughly, and you won’t need to deal with this.
Household Alternatives Worth Knowing
Toothpaste isn’t the only DIY option. A few others actually work:
- Baking soda + white vinegar paste: The fizzing reaction loosens grime while the baking soda abrades. Works similarly to toothpaste, though without the stabilizing humectants
- Petroleum jelly or olive oil: These temporarily fill micro-scratches by matching the refractive index of the plastic. Looks great until the first rainstorm washes it off
What to avoid completely:
- Bug spray with DEET: Clears the lens by chemically melting the polycarbonate surface. Destroys lens integrity over time
- Acetone or industrial solvents: Will permanently damage both your plastic lens and any painted panels they touch
- Standard household clear coat paint: Not formulated for the heat cycles automotive lenses go through — it’ll crack and peel
When Toothpaste Isn’t Enough
For severely oxidized lenses with deep pitting, professional headlight restoration uses a multi-step wet sanding progression — typically 400 grit down to 3,000 grit — followed by machine polishing with diminishing abrasive compounds. The result is optically flawless clarity and a professional-grade clear coat that can last several years.
That level of work costs more, but it outperforms the toothpaste method in every measurable way: defect removal, surface quality, and longevity.
If your lenses are moderately hazy — not cracked, not deeply pitted — toothpaste with a quality UV sealant gets you solid results for a few dollars. For anything worse, the professional route is the smarter investment.
Use the right toothpaste, tape everything off, scrub thoroughly, and seal the lens immediately after. Do all four steps, and you’ll drive away with noticeably clearer headlights tonight.