
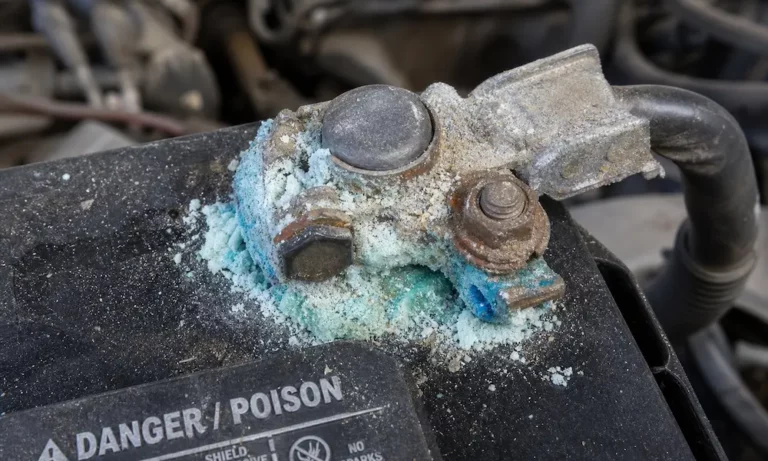
Got a car that’s slow to start, flickering lights, or just acting weird? Dirty battery terminals might be the culprit. The good news? You can fix this yourself in under 30 minutes with tools you probably already own. Stick around — this guide walks you through everything, from spotting the problem to making sure it doesn’t come back.
What Is Battery Terminal Corrosion (And Why Should You Care)?
That white, blue, or greenish crusty stuff on your battery terminals isn’t just ugly — it’s a serious electrical insulator. According to AAA, this buildup creates resistance in your starting and charging circuits, which forces your alternator to work harder and starves your starter motor of the power it needs.
Left alone, corroded terminals can kill your battery, fry your alternator, and cause bizarre behavior from your car’s electronics. The fix is straightforward once you know what you’re dealing with.
What the Color of the Corrosion Is Telling You
Before you grab a brush, take a close look at the buildup. The color tells you a lot about what’s going wrong under the hood.
| Corrosion Color | What It Means |
|---|---|
| White or Light Gray | Normal acid venting reacting with lead posts — most common type |
| Blue or Blue-Green | Sulfuric acid has breached the clamp and is eating into the copper wiring |
| Pale Green | Deep oxidation inside the cable — may need full cable replacement |
| Brown or Dark Gray | Heat damage from a loose terminal causing electrical arcing |
Blue-green or pale green corrosion is a red flag. It means the damage has moved beyond the post and into your wiring. Clean it, but also inspect the cables carefully.
Why Corrosion Keeps Coming Back
Cleaning terminals without understanding why they corrode is like mopping a floor with a leaky pipe overhead. There are three main culprits:
Overcharging: A faulty alternator pumping too much voltage (over 14.5V) causes the battery’s electrolyte to boil and vent acid vapor aggressively. You’ll see heavy buildup mostly on the positive terminal.
Undercharging: Short trips that never let the battery fully recharge cause sulfation. This shows up as heavy buildup on the negative terminal.
Cracked casing: Physical cracks at the base of the post let raw liquid acid pool constantly at the terminal. If you see this, no amount of cleaning fixes it — you need a new battery.
What You’ll Need Before You Start
Gather these before popping the hood:
- Nitrile, rubber, or neoprene gloves (not thin latex — they tear too easily)
- Chemical splash goggles or face shield
- Baking soda and warm water (1–3 tablespoons per cup) or a commercial aerosol battery cleaner
- Battery terminal wire brush (the two-sided kind — one end fits over the post, one goes inside the clamp)
- Stiff nylon brush or old toothbrush for tight spots
- 10mm wrench (most modern cars) or 5/16-inch wrench for GM side-post batteries
- Microfiber towels or shop rags
- Spray bottle with clean water for rinsing
- Memory saver device (more on this below)
- Anti-corrosion terminal spray or dielectric grease for prevention
Save Your Car’s Memory Before You Disconnect Anything
Here’s something most DIY guides skip: disconnecting your battery wipes your car’s computer memory. You’ll lose radio presets, clock settings, window auto-up limits, and — more importantly — your engine control module loses its learned fuel trim and idle data. Some anti-theft systems lock out entirely until you enter a manufacturer code.
The fix is a memory saver device that plugs into your OBD-II port (under the driver’s side dash) and feeds a trickle of backup power to your electronics while the battery is disconnected.
Important: Don’t use lighter-socket memory savers on modern vehicles. Most cars cut power to those ports the second the ignition turns off, making them useless. The OBD-II port stays live — that’s the one you want.
Power source matters too. Skip the 9-volt battery adapters. If a door swings open or the job takes longer than expected, a 9-volt dies fast and you lose everything anyway. Use a fully charged jump pack or auxiliary 12V battery instead.
One more thing: With the memory saver active, your positive cable stays electrically “hot” after removal. Wrap it immediately in a rubber glove or electrical tape. If it touches the chassis, it’ll blow the fuse protecting the OBD-II port and kill your backup power instantly.
How to Clean Car Battery Terminals: Step-by-Step
Step 1 — Safety First, Every Time
Work outdoors or in a well-ventilated garage. Hydrogen gas vents from batteries during charging and is highly flammable. No open flames, no cigarettes, no sparking tools nearby.
Remove all metal jewelry — rings, watches, bracelets. A metal ring bridging the positive terminal to the car’s chassis creates an arc that can cause severe burns instantly.
Put on your gloves and goggles before touching anything.
Step 2 — Disconnect the Negative Cable First
This rule is non-negotiable. Here’s why it matters:
Your car’s entire metal chassis connects directly to the negative terminal, making every metal surface a potential ground. If you loosen the positive cable first and your wrench slips and touches the fender or engine block, you’ve created a direct short circuit — think welding-level heat, melted tools, and a possible battery explosion.
Disconnect negative first, and the chassis loses its ground connection. Your wrench can touch anything metal in the engine bay without causing a short.
- Find the negative terminal — it’s marked with a minus (-) symbol and usually has a black cable
- Loosen the retaining nut with your 10mm wrench
- Wiggle the clamp back and forth to break the corrosion seal, then lift it straight off
- Tuck the cable away so it can’t spring back and touch the post
- Repeat for the positive cable (marked with a plus (+) symbol, usually red)
Seized terminal? Don’t pry with a screwdriver against the battery case — you can crack it and release liquid acid. Use a battery terminal puller tool instead. It threads down onto the post and lifts the clamp out evenly without stressing the casing.
Step 3 — Apply Your Cleaning Solution
Baking soda method: Mix 1–3 tablespoons of baking soda into a cup of warm water. For heavy buildup, use less water to make a thick paste.
Pour or brush it generously onto the battery posts, the base of the casing, and both cable clamps. Watch it bubble — that fizzing means the alkaline baking soda is neutralizing the acidic sulfates. Wait until the bubbling fully stops before scrubbing.
Commercial spray method: Aerosol battery cleaners foam up and often contain a color-indicator dye — if the foam turns pink or red, that means active acid is still present. These are especially useful when you want to avoid introducing bulk water near sensitive electronics.
What NOT to use: Skip vinegar, lemon juice, and cola. Vinegar and lemon juice are acidic — they don’t neutralize the problem. Cola has phosphoric acid that can eat some corrosion, but the sugar it leaves behind creates a sticky residue that attracts dirt and can slowly drain your battery.
Critical warning: Keep the cleaning solution out of the battery cells. If baking soda gets inside a flooded battery, it neutralizes the internal sulfuric acid and permanently destroys the battery’s chemistry.
Step 4 — Scrub Both the Posts and the Clamps
This is where most DIYers make a mistake — they clean the posts but ignore the inside of the clamps. Both surfaces need to be bare, shiny metal for a proper connection.
Use the two-sided battery terminal brush:
- Post side: Fit the fluted internal section over the cylindrical post and rotate it back and forth. Keep scrubbing until the lead looks bright and clean.
- Clamp side: Insert the protruding brush inside the cable clamp and ream out the interior walls.
For tight spots around the base of the battery, switch to a stiff nylon brush or toothbrush with a little more cleaning solution.
Step 5 — Rinse and Dry Completely
Use a spray bottle with clean or distilled water — don’t dump a hose over the battery. A gentle mist is all you need to flush away the spent solution and debris.
Then dry everything thoroughly with shop rags or microfiber towels. Don’t skip this part. Water left between the terminals creates a micro-short circuit that slowly drains your battery overnight. Moisture trapped under the clamp during reconnection also kickstarts a fresh corrosion cycle immediately.
Let everything air-dry for 15–20 minutes after toweling off.
Step 6 — Reconnect Positive First
Reconnection is the reverse of disconnection — positive cable goes on first this time.
Because the negative is still isolated, the chassis isn’t grounded. That means even if your wrench slips onto the engine block, nothing happens. Install the positive clamp, press it fully down to the base of the post, and tighten the nut until it’s snug and the clamp won’t twist or lift by hand.
Then connect the negative. You’ll likely hear or see a small spark — that’s completely normal. It’s just the car’s computers waking up and drawing an initial surge of current. Press the clamp fully down and tighten.
Don’t overtighten. Lead is soft. Excessive force can crush the post, strip the bolt, or crack the plastic seal at the base of the terminal — which creates a permanent leak point that causes rapid corrosion no matter how often you clean it.
Give both cables a firm wiggle. If they don’t budge, you’re good.
How to Prevent Corrosion from Coming Back
Cleaning is great. Not having to clean is better. Here’s how to protect your terminals long-term:
Anti-corrosion felt washers: Before you install the cable clamps, slip one of these chemically impregnated felt pads over each post. They sit flat against the battery casing and neutralize acid vapors before they reach the metal clamp above. They’re inexpensive and last the life of most batteries.
Terminal protector spray: After the cables are fully tightened, spray a commercial terminal protector over the entire assembly. It dries into a flexible polymer film that blocks oxygen, moisture, and acid fumes. These sprays are usually tinted so you can see exactly where you’ve covered.
Dielectric or silicone grease: Works well too. Coat the entire outside of the assembled terminal after tightening. Silicone grease handles engine bay heat better than petroleum jelly, which can melt and run off in hot summers.
Apply sealants AFTER tightening, never before. These products are electrical insulators. Put them between the post and clamp before connecting, and you’ve introduced resistance into the circuit — defeating the whole point.
Special Considerations for Hybrid and Electric Vehicles
Hybrids and EVs still use a standard 12-volt battery for accessories, computers, and safety systems. So yes, you still need to clean car battery terminals on these vehicles. But the presence of high-voltage systems nearby demands extra caution.
Before touching anything:
- Turn the vehicle completely off and confirm the “READY” light is out
- Remove the key fob from the vehicle entirely — or put it in a signal-blocking bag — to prevent the car from waking up autonomously
- Wait the manufacturer-specified time (often 2–15 minutes) for capacitors to discharge and software to shut down safely. Ford, for example, specifies exact waiting periods to protect computer memory.
Orange cable rule: Any thick orange cable in the engine bay or undercarriage carries high-voltage power — potentially 300–800 volts DC. That voltage is lethal. Don’t touch it, lean on it, or spray anything near it.
Never ground to the negative post directly on EVs or hybrids. Most of these vehicles have a current sensor mounted on the negative cable. Bypassing it blinds the battery management system and causes charging faults and inaccurate battery readings.
If you see damage to orange cables or the high-voltage battery casing, stop the job and get a certified high-voltage technician involved.
Proper Disposal of Cleaning Waste
The sludge you rinse off contains dissolved lead and copper — both regulated hazardous materials. Don’t wash it down a storm drain or onto your lawn.
Use a catch pan or absorbent shop mats under the vehicle during rinsing. Collect the contaminated rags and runoff and bring them to a certified automotive recycling facility or EPA-authorized hazardous waste disposal center. Most auto parts stores also accept old batteries for proper recycling.


