Your car’s AC is blowing warm air, or you just replaced a failed compressor. Either way, you’re in the right place. This guide walks you through exactly how to flush a car AC system the right way — so your new parts don’t die a slow, expensive death. Stick around to the end, because skipping even one step here costs you big.
Why Flushing Your Car AC System Actually Matters
Here’s the ugly truth about compressor failure: when a compressor dies, it doesn’t go quietly.
It shoots metallic shavings, carbonized oil, rubber debris, and abrasive sludge through your entire AC loop at high pressure. That contaminated slurry settles inside your condenser, evaporator, and hoses — clogging narrow passages and restricting refrigerant flow.
Install a shiny new compressor without flushing first? That debris migrates straight into the new unit’s cylinders and valves. Game over. Warranty voided. Money wasted.
Flushing removes the contamination before it kills your replacement parts.
What You Need Before You Start
You can borrow most of this equipment through a program like AutoZone’s Loan-A-Tool:
| Tool | Part Number | What It Does |
|---|---|---|
| AC Flush Tool Kit | Part 57377 | Pressurizes and blasts solvent through lines |
| Fast-Drying Flush Solution | Part 210157 | Dissolves sludge and carbonized debris |
| Single-Stage Vacuum Pump | Part 57376 | Pulls deep vacuum to remove moisture |
| Manifold Gauge Set | Part 57375 | Monitors high and low-side pressures |
| Dry Nitrogen Cylinder | Standard supply | Purges lines and dries chemical residue |
You’ll also need safety goggles, chemical-resistant gloves, new O-rings, a clean bucket, and two feet of heater hose.
Safety First — Don’t Skip This
Before you touch anything, run through this checklist:
- Work in a ventilated area. An open garage works. Chemical vapors and refrigerant fumes build up fast in enclosed spaces.
- Let the engine cool completely. Flushing solvents are highly flammable. Hot exhaust components can ignite them instantly.
- Disconnect the battery. Cover both terminals. Sparks near aerosolized flushing agent are a very bad combination.
- Never vent refrigerant to the air. Under Section 608 of the Clean Air Act, intentionally releasing refrigerants like R-134a or R-1234yf is federally prohibited. Connect an approved recovery machine to your service ports before disconnecting any lines.
Which Components Can You Actually Flush?
This is where most DIYers go wrong. Not every component survives a chemical flush — some require full replacement instead. Here’s the breakdown:
| Component | Flushable? | What to Do |
|---|---|---|
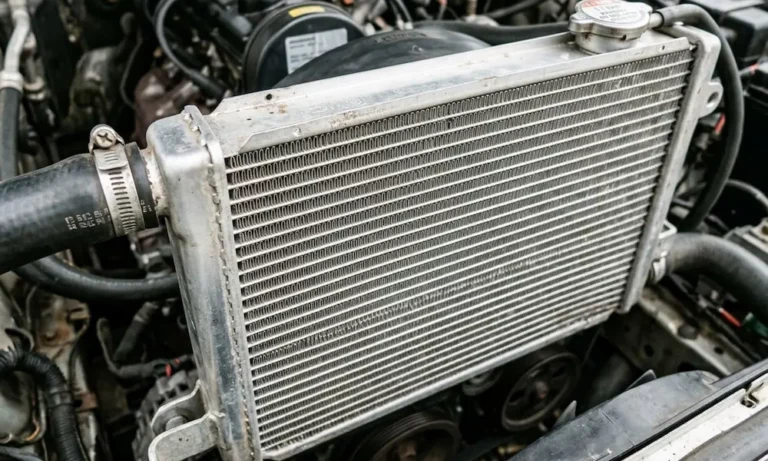
| Serpentine (tube-and-fin) condenser | ✅ Yes | Flush thoroughly in both directions |
| Parallel flow (micro-tube) condenser | ❌ No | Replace entirely |
| Evaporator core | ✅ Yes | Flush in place; back-flush mandatory |
| Standard hoses and lines | ✅ Yes | Disconnect and flush individually |
| Hoses with integrated mufflers | ❌ No | Replace the hose assembly |
| Expansion valve / orifice tube | ❌ No | Remove and replace with new part |
| Receiver-drier / accumulator | ❌ No | Always replace after flushing |
| Compressor | ❌ No | Isolate and replace |
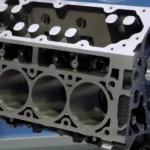
Why Parallel Flow Condensers Can’t Be Flushed
Parallel flow condensers split refrigerant into multiple tiny parallel passes. Their micro-tubes are roughly the size of a pinhead. When a compressor fails, metallic swarf jams tight inside those tubes. Forcing solvent through doesn’t clear the blockage — it packs the debris tighter, permanently restricting flow and spiking your high-side pressures dangerously. Replace it. Don’t argue with physics.
Why the Drier Must Go
The receiver-drier and accumulator use porous desiccant material to pull moisture from the refrigerant loop. Chemical solvents destroy that desiccant structure entirely, releasing harmful particles back into a freshly cleaned system. Always bypass them during the flush and install new units at reassembly.
Step-by-Step: How to Flush Your Car AC System
Step 1: Recover the Refrigerant
Connect your EPA-certified recovery machine to the system’s high and low-side service ports. Extract every bit of refrigerant before disconnecting anything.
Step 2: Disconnect and Isolate Non-Flushable Components
- Remove the compressor from the loop entirely.
- Bypass the expansion valve or orifice tube using a dedicated metal bypass adapter block. Alternatively, drill out an old valve to create a temporary dummy passage so solvent can flow through the evaporator circuit.
- Remove and set aside the receiver-drier or accumulator.
Step 3: Set Up Your Flush Tool
Attach a two-foot section of heater hose to the exit port of the component you’re flushing. Route the other end into an empty bucket — this catches the contaminated solvent draining out.
Fill the flush cylinder with fast-drying chemical solvent. Pressurize it with regulated compressed air to between 70 and 125 psi, then connect it to the inlet of the component.
Step 4: Back-Flush First
Always back-flush before forward-flushing. Inject solvent from outlet to inlet first. This dislodges wedged particles that have packed in the direction of flow. Then flush forward.
Work in short, powerful bursts until the fluid draining into the bucket runs completely clear.
For heavily contaminated systems, you can filter the solvent during early passes to remove large particles. But your final pass must always use fresh, clean solvent.
Step 5: Dry the Lines Completely
Any residual flushing chemical left inside contaminates your new oil and kills your replacement compressor. Standard shop air is too moisture-laden for this step unless you run it through a dry inline air dryer.
The reliable method is dry nitrogen. Nitrogen is inert and actively sweeps moisture and solvent vapors out of the lines. Blow dry nitrogen through each flushed component continuously for at least 30 minutes.
Compressor Oil Balancing: The Step Most People Miss
Skipping oil balancing is one of the most common — and expensive — mistakes in AC service. Here’s why it matters.
Replacement compressors typically arrive pre-filled with around 8 ounces of oil. But a standard vehicle AC system only holds about 4 ounces total, distributed like this:
| Component | Oil Capacity |
|---|---|
| Compressor | 1.4 oz |
| Evaporator | 1.5 oz |
| Condenser | 1.0 oz |
| Accumulator / Drier | 1.0 oz |
| Hoses and Lines | 1.0 oz |
| Total System | ~4.0 oz |
Here’s the math: drain and measure the oil from your old, failed compressor. Calculate the difference between that volume and the oil pre-charged in the new compressor. Drain exactly that difference from the new unit before installation.
This ensures the oil in your new compressor, plus the new oil added to replaced components, perfectly matches factory spec.
Oil Type Matters More Than You Think
Standard passenger vehicles using R-134a refrigerant need PAG oil (Polyalkylene Glycol) in the correct viscosity grade (PAG 46, PAG 100, or PAG 150). These are not interchangeable — always match your compressor spec.
Hybrid and electric vehicles with high-voltage electric compressors need non-conductive POE oil (Polyol Ester) instead. Putting conductive PAG oil into an electric compressor causes insulation breakdown, chassis short circuits, and diagnostic trouble codes. It also creates a genuine shock hazard for anyone working on it.
Keep all oil containers sealed until the exact moment of use. PAG oil is highly hygroscopic — it absorbs atmospheric moisture rapidly, which leads to acid formation and internal corrosion.
Rotate the Compressor By Hand
Before starting the engine, manually rotate the compressor clutch at least four full turns using a spanner wrench. This distributes oil across internal bearings and chambers before startup, preventing dry-start damage. Never use a socket on the central shaft nut — it throws off the clutch air gap and destroys the engagement assembly.
Pulling Vacuum and Recharging
Once everything is reassembled with new components (new drier, new expansion valve, new O-rings), connect your manifold gauge set and vacuum pump to the service ports.
Run the vacuum pump until pressure drops to a minimum of 710 mmHg (28 inches of mercury). This low pressure causes any remaining water to boil off at room temperature. Let it run for 20 to 30 minutes minimum.
Close the manifold valves, switch off the pump, and perform a vacuum decay test. Watch the gauges for at least 20 minutes. If pressure rises by more than 75 mmHg (3 inches of mercury), you have a leak. Find it, fix it, and pull vacuum again until it holds.
Use the Vacuum to Add Oil
The vacuum injection method makes adding oil clean and precise:
- Pull vacuum on the system through the manifold gauges.
- Close both manifold valves to trap the vacuum inside.
- Remove the yellow center hose from the pump and submerge it in a graduated container holding the exact oil volume you need.
- Crack open the low-side valve. The internal vacuum draws oil straight into the system.
- Close the valve, reconnect the service line, and pull a final vacuum.
After vacuum holds, charge the system with refrigerant by mass using a digital scale. The exact amount is in your vehicle’s service specs. Overcharging kills efficiency and spikes pressures. Undercharging starves the compressor of oil return.
Know Your Legal Obligations Around Refrigerants
If you’re doing this for pay, you need Section 609 EPA certification. That’s federal law. Certified or not, intentional venting of R-134a or R-1234yf is prohibited under Section 608 of the Clean Air Act.
As a DIY vehicle owner, you can legally buy small cans of R-134a under 2 pounds without certification — but only if the cans have self-sealing valves and non-interchangeable fittings as required by the EPA refrigerant sales restrictions.
One important state-level heads up: Washington State bans retail sales of small R-134a cans entirely because R-134a carries a global warming potential of 1,400 — well above the state’s 150 GWP threshold. R-1234yf cans with a GWP of just 4 are still permitted there. Check your state laws before you buy.
Final System Check
Start the engine. Set the AC to maximum cooling and highest fan speed. Let it run and check your manifold gauge pressures against ambient temperature specs. Then run an electronic leak detector along every O-ring, joint, and fitting you touched.
Every disconnected fitting got a fresh vehicle-specific nitrile O-ring, right? Lightly coat each one with compatible refrigerant oil before assembly — it stops the rubber from twisting and tearing under torque, which is the number one cause of post-service leaks.
Get clean readings on both sides of the gauge set, zero leaks on the detector, and ice-cold air at the vents — that’s your confirmation the flush worked.