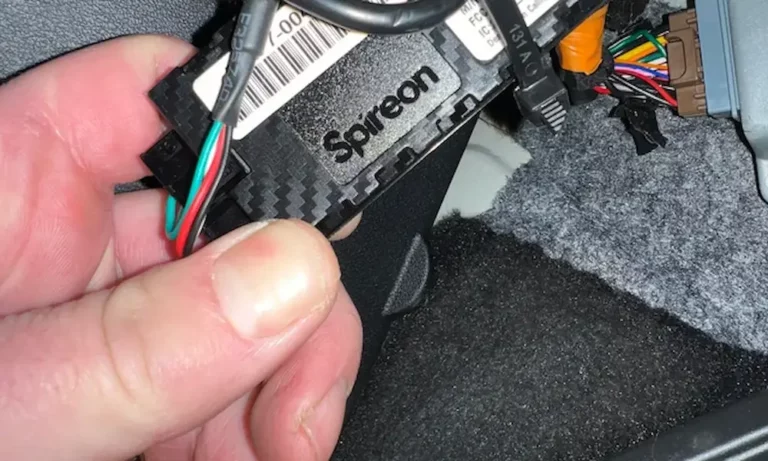
Wondering if there’s a hidden GPS tracker on your financed car? You’re probably right. Most subprime dealerships install them before you drive off the lot. This guide breaks down exactly what these devices look like, where they hide, and how to remove a car dealer GPS tracking device safely and legally.
Read this before you touch a single wire.
Is It Even Legal to Remove It?
This is the first question you need to answer — before anything else.
The short answer: it depends entirely on whether you still owe money on the car.
If your loan is paid off and the title is fully in your name, you have every right to remove the device. In fact, continued tracking after payoff can violate state and federal privacy laws — it legally amounts to stalking.
If you’re still making payments, removing the tracker is almost certainly a material breach of your finance contract. Most Buy Here, Pay Here agreements contain explicit clauses prohibiting tampering with telematics equipment. Violating those clauses gives the lender the right to demand your full balance immediately — or repossess the car on the spot.
What Your State Says About This
Laws vary significantly. Here’s a quick breakdown:
| State | Key Rule |
|---|---|
| California | Dealers must give written notice and explicit consent before installing a tracker. Starter interrupt systems must allow a 24-hour emergency start window after disablement. (CA Civil Code § 2983.37) |
| Oklahoma | Written consent required before installation. Tracking without it is a criminal stalking misdemeanor. (HB 3260) |
| Nevada | Covert installation without the driver’s knowledge is explicitly criminalized. |
| Other States | Falls into either “all-consent” or “owner-exception” categories. Lenders with a title interest are often exempt from requiring consent — but disclosure is still required. |
At the federal level, the Consumer Financial Protection Bureau hit DriveTime with an $8 million penalty for aggressive debt collection tied to vehicle repossessions. Federal regulators also require full disclosure of tracker fees under the Truth in Lending Act.
Bottom line: If your loan is active, consult a lawyer before you remove anything.
The 3 Types of Dealership GPS Trackers
Understanding what you’re dealing with changes everything. Dealerships use three main tracker architectures depending on how risky your loan is.
| Tracker Type | Power Source | Removal Difficulty | Common Use |
|---|---|---|---|
| Diagnostic port (OBD-II plug-in) | Vehicle OBD-II port | Low | Franchise lots, short-term tracking |
| Hardwired (with or without immobilizer) | Vehicle wiring harness | Very High | Subprime lending, payment enforcement |
| Battery-powered magnetic | Internal battery | Low | Repossession operations |
OBD-II Plug-In Trackers
These plug directly into the diagnostic port under your steering column. They draw power from the vehicle and often tap into your car’s data bus to monitor speed, fuel, and engine codes.
Here’s the sneaky part: dealerships often use a passthrough extension harness to hide the actual device. The visible port looks factory-standard. The real tracker sits tucked deep inside the dashboard, completely out of sight.
Hardwired Trackers with Starter Interrupt
These are the most serious devices. They’re spliced directly into your vehicle’s electrical system and include a relay that cuts your starter circuit if you miss a payment.
Missing a payment triggers a remote command through the cellular network. The relay physically opens, breaking the circuit to your starter motor. Your engine won’t crank. These systems cannot shut off a moving vehicle — that would be a safety nightmare — but they’ll stop it from starting next time.
Battery-Powered Magnetic Trackers
Repossession agents love these. They attach to your undercarriage with industrial magnets in seconds — no interior access needed. They run on internal batteries and can last months in standby mode. Wheel wells and inner bumper cavities are common spots.
Where Dealerships Hide GPS Trackers
Installers have roughly 15–30 minutes during your vehicle’s pre-delivery inspection to hide these devices. They’ve narrowed it down to a handful of high-efficiency hiding spots.
| Location | Tracker Type | Detection Difficulty |
|---|---|---|
| Lower dashboard / steering column | Hardwired | Moderate |
| Behind glove box bin | Hardwired | Moderate |
| Center console tunnel | Hardwired | High |
| Front/rear bumper interior | Magnetic/battery | Moderate |
| Wheel well liners | Magnetic/battery | High |
| Engine bay fuse box area | Hardwired | High |
| Undercarriage frame rails | Magnetic/battery | Moderate |
| Beneath seat cushion frame | Hardwired | High |
The driver-side lower dashboard is the most common spot for hardwired units. It’s close to the main wiring harness, easy to access during installation, and the tracker can face upward toward the windshield glass for a clear satellite signal.
How to Find a Hidden GPS Tracker
You’ve got two reliable methods: physical inspection and electronic detection.
Physical Inspection
Factory wiring is organized, color-coded, and neatly loomed. Aftermarket installations aren’t. Look for:
- Loose wires not bundled in the factory harness
- Non-factory zip ties or electrical tape
- T-tap connectors or butt splices on existing wires
- Wires that don’t match the surrounding harness thickness
Start at the OBD-II port under the steering column. If it looks factory but you suspect a passthrough harness, reach behind the bracket and trace where the wires go.
Electronic Detection
GPS trackers emit cellular signals when they ping the network. A radio frequency bug detector can pick up those transmission bursts. Here’s how to do it properly:
- Park the car away from other wireless interference
- Power down all smartphones, Bluetooth devices, and nearby routers
- Slowly sweep the perimeter and interior with the RF scanner
- Signal spikes indicate where the device is transmitting from
You can also run a parasitic draw test with a digital multimeter. Pull fuses one at a time while monitoring current draw. An unexplained drain — even with the car off — often points directly to a hidden tracker circuit.
How to Remove a Car Dealer GPS Tracking Device
Important warning: Car electrical systems carry high amperages. One wrong cut can deploy your airbags, fry your ECU, or start a fire. If you’re not mechanically confident, have a certified automotive technician do this.
This section covers the electrical principles involved in removal — not an invitation to tamper with a financed vehicle.
Step 1: Safety First
Before touching anything:
- Park on level ground with the parking brake set
- Turn the ignition fully off and remove the key
- Put on safety glasses and insulated gloves
- Disconnect the negative battery terminal first, then the positive
- Wait several minutes for capacitor charge to dissipate
Step 2: Removing Portable and Magnetic Trackers
These are straightforward.
Magnetic battery trackers: Locate the device under the bumper or frame rail. Overcome the magnetic hold and pull the unit free. No wiring involved.
OBD-II plug-in trackers: Grip the plastic housing and pull straight out. Don’t twist or wiggle — that bends the data pins and damages your diagnostic port.
Passthrough harness trackers: Unclip the dummy OBD port, trace the cable into the dashboard, disconnect the hidden module, remove the entire harness, and snap your original factory port back into place.
Step 3: Removing a Hardwired Tracker
Use plastic trim tools to remove dashboard panels without cracking them. Trace the aftermarket wires back to their splice points. Here are the color codes for the two most common brands:
| Manufacturer | Constant Power | Ground | Ignition Sense | Starter Interrupt Output |
|---|---|---|---|---|
| Spireon GoldStar Edge M2 | Red | Black | White | Green |
| Spireon Talon | Red | Black | White | Green |
| PassTime Trax 7 | Red | Black | Pink | Orange |
Cut the aftermarket wires cleanly, as close to the splice points as possible. Don’t cut factory wires. Re-insulate every exposed copper end with high-grade electrical tape or heat-shrink tubing to prevent future shorts.
Step 4: Reversing a Starter Interrupt System
This is the most complex removal. Simply unplugging the tracker module won’t work — the relay it installed in your starter circuit will stay open and permanently prevent your car from starting.
You need to remove the relay AND restore your factory starter wire. Here’s the process:
- Find the relay block by tracing the interrupt output wire (Green on Spireon, Orange on PassTime) from the module until it leads to the physical relay
- Identify the two thick wires connected to relay pins 30 and 87a — these are spliced into your factory starter circuit
- Cut the aftermarket connections cleanly and extract the relay, the module, and all associated wiring
- Reconnect the two severed factory wire ends — strip the insulation, intertwine the copper strands, solder the joint for maximum conductivity, and seal it with marine-grade heat-shrink tubing
- Reconnect the battery — positive terminal first, then negative — and verify the starter engages without hesitation
Check your dashboard for any error codes or warning lights after reassembly.
One Thing That’ll Make Removal Backfire Instantly
Modern trackers don’t go quietly. The moment you cut power to a hardwired device, it switches to its internal backup battery and fires off a tamper alert directly to the dealership’s dashboard.
Wrapping it in foil doesn’t help either. The system detects a sustained loss of satellite signal while the cellular connection stays active — and flags it as suspected tampering automatically.
Unauthorized removal on a financed vehicle almost guarantees repossession agents show up at your last known coordinates. Don’t learn that the hard way.
After you pay off your loan completely, always request written confirmation that the device has been deactivated. Don’t assume the dealership turns it off automatically — many don’t.