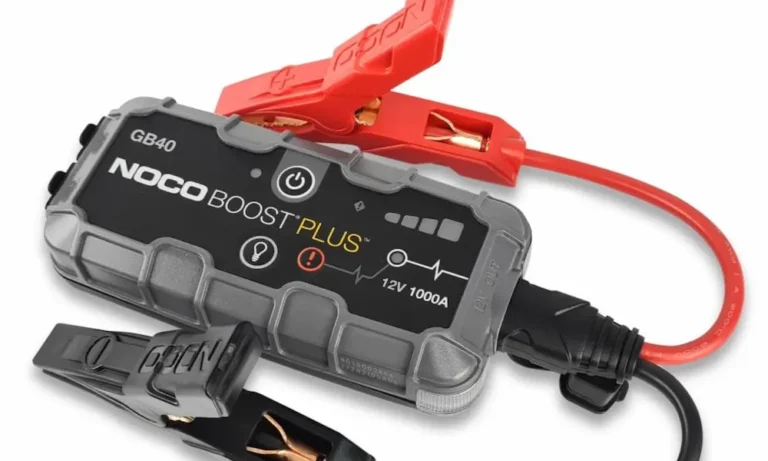
Stuck with a dead battery and no idea where to start? The NOCO Boost Plus GB40 can get you back on the road in minutes — but only if you use it correctly. This guide walks you through every step, from charging the unit to jump-starting your car safely. Stick around, because the manual override section alone could save you from a costly mistake.
What You’re Working With: GB40 Key Specs
Before you learn how to use the NOCO Boost Plus GB40, it helps to know what it can actually do.
The GB40 packs a 1000-amp peak current into a 1.65-pound unit. That’s enough grunt to start most passenger cars, trucks, motorcycles, boats, and ATVs. It runs on a 24 watt-hour lithium-ion cell, which means it holds a charge far longer than older lead-acid boosters.
Here’s a quick look at the specs you’ll actually care about:
| Spec | Detail |
|---|---|
| Peak Current | 1,000 Amps |
| Internal Battery | 24 Wh Lithium-Ion |
| Engine Compatibility | Gas up to 6.0L / Diesel up to 3.0L |
| USB Output | 5V, 2.1A |
| Operating Temperature | -4°F to 122°F |
| Charging Temperature | 32°F to 104°F |
| IP Rating | IP65 (ports must be closed) |
| Weight (with clamps) | 2.4 lbs |
| LED Flashlight | 100 Lumens, 7 modes |
It’s also worth knowing what the GB40 won’t work on. It’s built for 12-volt lead-acid batteries only. That includes Wet cell, Gel cell, AGM, EFB, and Maintenance-Free batteries. Don’t use it on 24-volt systems or dedicated lithium vehicle batteries.
Step 1: Charge the GB40 Before You Need It
The GB40 usually ships with a partial charge. Don’t assume it’s ready to go — charge it fully before you store it.
Plug the included Micro USB cable into the device’s input port, then connect the other end to any USB power source. A wall adapter, laptop port, or car charger all work fine.
The fastest way to charge it is with a 2.1-amp USB adapter. Here’s how long it takes based on your charger’s output:
| Charger Output | Charge Time (Fully Depleted) |
|---|---|
| 0.5A | ~12 hours |
| 1.0A | ~6 hours |
| 2.0A (recommended) | ~3 hours |
How to Read the Charge Indicator Lights
While it charges, four LED indicators show you where you’re at:
- 1 light pulsing → below 25% charge
- 1 solid red → 25% reached, 2nd light now pulsing
- 2 solid red → 50% reached, 3rd light pulsing
- 3 solid yellow → 75% reached, 4th light pulsing
- 4 solid green → 100% — fully charged and ready
A pulsing green light after full charge means the device is in maintenance mode. That’s normal.
Step 2: Safety First — Don’t Skip This Part
Before you clip anything to your battery, run through this checklist. The GB40 has built-in spark-proof and reverse polarity protection, but these features don’t replace your own attention.
Do these things:
- Wear safety glasses — a damaged battery can crack and spray acid
- Remove rings, watches, and metal bracelets before touching any terminals
- Check that your vehicle runs a 12-volt lead-acid battery
- Turn off all accessories inside the car (lights, AC, stereo, heated seats)
- Keep the GB40’s port covers closed to maintain the IP65 water resistance
Never do these things:
- Smoke or use an open flame near the battery — batteries release explosive gas
- Cover the GB40 with clothing or blankets while it’s running
- Attempt to jump a frozen battery — it can explode
- Use the GB40 if the clamps, cables, or housing show visible damage
- Jump a battery in a voltage system other than 12 volts
Step 3: Connect the Clamps Correctly
This is where most mistakes happen. Take your time.
First, identify your battery terminals. The positive terminal is usually larger and marked with “POS,” “P,” or a + symbol. The negative terminal is marked with “NEG,” “N,” or a – symbol.
For standard negative-ground vehicles (which covers virtually every modern US car), connect in this order:
- Red clamp → Positive (+) terminal on the dead battery
- Black clamp → Negative (–) terminal on the dead battery, or an unpainted metal part of the chassis away from the battery
Connecting the black clamp to the chassis instead of the battery terminal is the safer option. It reduces the chance of sparking near battery gases.
Avoid connecting to:
- Thin sheet metal or body panels
- Fuel lines or fuel rails
- Carburetors or any plastic components
Step 4: Power On and Start the Engine
Once your clamps are secure:
- Press the power button on the GB40
- The device runs a quick self-check — all lights flash briefly
- The GB40 reads your battery’s voltage
If the connection is good and polarity is correct, the white Boost light turns solid. That’s your green light to start the engine.
Go to the driver’s seat and start the car normally. Most vehicles fire up on the first try.
If it doesn’t start on the first attempt:
- Return the ignition to off
- Wait 20–30 seconds (this lets the GB40 push a surface charge into the battery)
- Try again
Important duty cycle rule: Don’t crank the engine more than 5 times within 15 minutes. After 5 attempts, give the GB40 a mandatory 15-minute rest. Skipping this step can permanently damage the unit.
Step 5: Disconnect Safely After the Engine Starts
Once the engine is running:
- Press the power button to turn the GB40 off
- Remove the black clamp first
- Remove the red clamp second
- Store the GB40 in its bag or case, away from the hot engine
Reversing the removal order from the connection order is the standard safe practice for any jump-starting equipment.
How to Use the Manual Override on the GB40
Here’s where things get interesting — and where you need to pay close attention.
If a battery has dropped below 2 volts, the GB40’s sensors won’t detect it. You’ll turn the unit on, connect the clamps, and the white Boost light won’t appear. The safety relays stay open because the device thinks nothing is connected.
This is where the Manual Override feature comes in.
Read This Before You Use Manual Override
Engaging Manual Override disables both the spark-proof technology and reverse polarity protection. If you have the clamps on backward during override, you risk:
- Destroying the vehicle’s ECU (engine control unit)
- Melting the cables
- Causing a battery explosion
Double-check your connections before proceeding. Triple-check them.
Also — never let the red and black clamps touch each other while override is active. With safety circuits bypassed, contact between the clamps creates an immediate short circuit with 1,000 amps behind it.
Manual Override Steps
- Verify polarity — red clamp on positive, black clamp on negative or chassis
- Press the main power button to turn the unit on
- Find the Manual Override button — it has a red exclamation point icon
- Hold it down for 3 seconds
- The white Boost light will begin flashing — this confirms override is active
- Attempt to start the vehicle
- For extremely dead batteries, let it sit connected for up to 60 seconds before cranking
- Once the engine starts, press the power button to turn the GB40 off BEFORE removing the clamps
That last step matters. Turning off the unit de-energizes the clamps before you disconnect them, preventing dangerous sparking.
Understanding the Error Lights
The GB40 talks to you through its indicator lights. Here’s what the common warning patterns mean:
| Light Pattern | What It Means | What to Do |
|---|---|---|
| Solid red Error light | Reverse polarity detected | Power off, swap clamps, reconnect correctly |
| Rapidly blinking red Error light | Device is overheating | Disconnect, move to shade, let it cool |
| White Boost light stays off | Battery below 2V or no connection | Check clamp contact or use Manual Override |
| Flashlight won’t turn off | Thermal protection mode active | Let the unit cool down completely |
If the device feels hot to the touch during use, stop immediately. Excessive heat is an early warning sign you don’t want to ignore.
Using the GB40 as a Power Bank
The GB40 isn’t just for dead batteries. The 5V/2.1A USB output port turns it into a capable portable charger.
A fully charged unit can deliver roughly 4 complete smartphone charges before it needs recharging itself. It works with phones, tablets, cameras, and wireless earbuds — handy during a power outage or road trip.
One rule: don’t charge the GB40 and draw from the USB output at the same time. Per FCC guidelines, simultaneous charging and discharging puts too much thermal stress on the internal circuitry.
Using the Built-In Flashlight
Hold down the Light Mode button to activate the 100-lumen LED. Press it repeatedly to cycle through all 7 modes:
- 100% brightness
- 50% brightness
- 10% brightness
- SOS pattern
- Blinking
- Emergency strobe
- Off
The SOS and strobe modes are genuinely useful if you’re broken down at night on the side of a highway.
Storing and Maintaining the GB40
Proper storage keeps the GB40 ready when you actually need it.
Storage tips:
- Store indoors in a cool, dry location
- Don’t leave it in a hot car trunk all summer or a freezing garage all winter — both degrade the battery over time
- Keep it away from direct sunlight and heat sources
- Charge it to 100% before storing
Maintenance schedule:
The GB40 holds roughly 70% of its charge after a full year in storage under good conditions. That’s decent, but don’t rely on a year-old charge in an emergency. Plug it in for a top-up every 6 to 12 months to keep it at full capacity.
For extra protection during transport, the GBC013 EVA Protection Case gives you a semi-rigid, water-resistant shell with custom molding for the unit and its clamps.
Frequently Asked Questions
Can the GB40 jump-start a diesel engine?
Yes, but only diesel engines up to 3.0 liters. For gasoline engines, it handles up to 6.0 liters. Diesel engines have much higher compression, which demands more from the starter motor.
What happens if the clamps touch each other in standard mode?
Nothing happens. The GB40’s spark-proof technology keeps the circuit open until it detects a valid battery above 2 volts. Touching the clamps together in standard mode won’t trigger sparking or a short circuit.
Can the GB40 jump-start a motorcycle or riding lawnmower?
Absolutely. It works on any 12-volt lead-acid application, including motorcycles, ATVs, personal watercraft, and riding mowers. The device only delivers the amperage the vehicle actually demands, so smaller systems aren’t overwhelmed.
Can I charge my phone and jump-start my car at the same time?
No. You shouldn’t use the USB output while jump-starting a vehicle or while the unit is charging. All three activities should happen separately.
Is the GB40 waterproof?
It’s IP65 rated, which means it resists dust and water jets — but only when the port covers are fully closed. Don’t submerge it, and don’t use it while standing in pooled water.
How do I know if my battery is frozen?
A visibly swollen or cracked battery case is a warning sign. If temperatures have been well below freezing and your battery is deeply discharged, treat it as potentially frozen and don’t attempt to jump it. A frozen battery can explode when current is applied.
Can I use the GB40 as a long-term trickle charger for stored vehicles?
No. The GB40 is a high-amperage emergency jump starter, not a battery maintainer. It doesn’t have the hardware or software for trickle charging. You’ll need a dedicated smart charger for that job.
How do I turn off the flashlight if it won’t stop flashing?
A flashlight that won’t turn off usually means the GB40 is in thermal protection mode. Let the unit cool down completely in a shaded, open area. Once the internal temperature drops back into the safe range, normal function returns.