Your car’s AC blowing warm air? A dirty condenser is often the culprit. This guide walks you through how to clean car AC condenser the right way — no expensive shop visit needed. Stick around, because one wrong move can cost you a new condenser.
What Does the Car AC Condenser Actually Do?
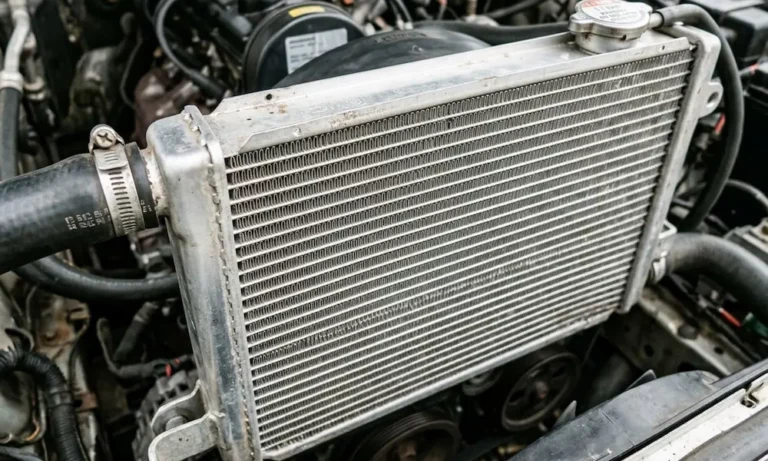
The condenser sits at the front of your engine bay, right ahead of the radiator. Hot refrigerant gas flows in from the compressor. Air passes through the aluminum fins, pulls the heat out, and the refrigerant turns into a cool liquid again.
When bugs, road grime, and dust clog those fins, heat can’t escape. Your compressor works harder, your fuel economy drops, and eventually, things break. The condenser is the heart of your AC’s heat rejection system — keep it clean and everything runs smoother.
Signs Your Condenser Needs Cleaning
Don’t wait until your AC dies completely. Watch for these warning signs:
| Symptom | What It Means |
|---|---|
| Warm or lukewarm air from vents | Heat exchanger is fouled and can’t do its job |
| AC compressor cycling rapidly | Head pressure is too high — a blocked condenser is likely |
| Engine temperature creeping up at idle | Heat from the condenser is spilling over to the radiator |
| Weak airflow even on max fan | Fins are clogged and restricting air passage |
If you’re seeing two or more of these at once, your condenser probably hasn’t been cleaned in years. Blocked airflow causes system pressures to spike, which puts every component in the loop under stress.
Tools You’ll Need Before You Start
Grab these before you touch anything:
- Non-acidic alkaline foaming cleaner — avoid anything with hydrofluoric acid, it eats aluminum and causes micro-leaks
- Soft-bristled nylon brush — stiff wire brushes will destroy the fins
- Garden hose with adjustable nozzle — wide fan setting only
- Fin comb kit — adjustable, 8–14 fins per inch range
- Plastic sheeting or trash bags — to protect electrical components
- Compressed air source
- Absorbent drying towel — polyvinyl alcohol works best
- Socket wrench and panel trim tool — for bumper removal
Skip the pressure washer. Seriously. High-pressure water bends condenser fins permanently, and then you’ve got a different problem entirely.
Safety First: What You Must Not Do
Before anything else — do not open any valve or fitting on your AC system. Some guides suggest draining fluid from the condenser. That’s dangerous and wrong.
Your AC system runs under high pressure. Opening a fitting releases refrigerant, which can cause severe chemical freeze burns to your skin and eyes. It also violates federal environmental regulations that prohibit venting fluorinated refrigerants into the atmosphere. External cleaning doesn’t require touching the refrigerant circuit at all.
How to Access the Condenser
Modern cars make you work for it a little. Here’s how to get proper access:
- Park on a flat surface and turn off the engine
- Disconnect the negative battery terminal — this prevents cooling fans from kicking on unexpectedly
- Cover the alternator, fuse boxes, and any exposed electrical connectors with plastic sheeting
- Remove the upper radiator shroud and lower splash shield using a socket wrench and trim tool
- Pull out the six to eight fasteners inside the wheel wells and along the lower valance
- Carefully pull the bumper cover forward, unplugging fog light or parking sensor connectors
- Set the bumper on a soft surface so you don’t scratch the paint
On some vehicles, removing the front grille inserts gives you enough clearance without pulling the whole bumper. Check your specific model before committing to full disassembly.
How to Clean Car AC Condenser: Step-by-Step
Step 1: Dry Debris Removal First
Always start dry. Direct compressed air through the condenser from the engine side outward. This backwash action pushes dried leaves, bugs, and road grit back out the way they came in.
Follow up with your soft nylon brush to sweep away remaining surface dust. Skipping this step and going straight to water turns dry debris into a thick paste that plugs the fin channels deeper than before.
Step 2: Low-Pressure Water Pre-Rinse
Set your garden hose nozzle to a wide, gentle fan pattern. Rinse the condenser from top to bottom to loosen baked-on mud and dissolve water-soluble grime.
Keep the pressure low. You’re moistening and softening the buildup, not blasting it off.
Step 3: Apply the Foaming Cleaner
Mix your non-acidic alkaline foaming coil cleaner according to the manufacturer’s dilution instructions. Spray it over both the front and rear faces of the condenser until you have full coverage.
Let it dwell for 5 to 10 minutes. The active surfactants expand into a foam and chemically lift grease, road film, and oxidation out from between the tight fin rows. You’ll see the foam darken as it pulls the contamination out.
Step 4: Gentle Agitation
For stubborn bug buildup or thick road grime, use your soft brush — but always brush parallel to the fins, never across them. Crossing the fin direction bends them, and that’s a problem you’ll fix later with a fin comb if it happens.
Step 5: Backwash Rinse
Rinse thoroughly with the garden hose. For a deeper clean, a slim backwashing wand inserted between the radiator and condenser lets you flush dirt forward and out of the assembly without disassembling the cooling stack.
Rinse until the runoff is completely clear and foam-free. Leftover alkaline cleaner corrodes aluminum over time and damages paint if it dries on body panels.
Step 6: Dry Completely
Let the condenser air-dry, or park the car in direct sunlight to speed things up. Use an absorbent polyvinyl alcohol towel to dry surrounding painted panels and structural components. Water sitting on bare metal causes rust.
How to Straighten Bent Condenser Fins
Cleaning a condenser with crushed fins is only half the job. Bent fins block airflow just as effectively as dirt does, and they force the compressor to work harder. Here’s how to fix them properly using a fin comb:
Match the comb spacing to your condenser density:
| Condenser Type | Fin Spacing | Comb Tine Clearance |
|---|---|---|
| Modern microchannel | Tight | 0.025 to 0.03 inches |
| Older standard design | Wider | 0.045 to 0.05 inches |
Follow these steps:
- Inspect the fins first — if they’re brittle or heavily corroded, combing will snap them off and cause irreversible damage
- Spray the bent area with a diluted dish soap and water solution to lubricate the fins
- Insert the comb teeth into an undamaged section adjacent to the bent area
- Hold the tool at a 10 to 15-degree angle to the condenser face
- Pull the comb through in a slow, straight, sweeping motion
- Work in 3 to 5 pass intervals, checking alignment after each pass
- Don’t force the comb if you hit resistance — forcing it can slice refrigerant tubes and cause a major leak
Once the fins are straight, blow a quick burst of compressed air through the area to clear soapy residue.
Don’t Forget the Rest of the AC System
A clean condenser produces cold air, but the rest of the system needs attention too. Here’s what else to tackle while you’re at it:
Cabin Air Filter
Find it behind the glove box. Replace it every 12 months or 10,000 miles. A clogged filter chokes airflow and dumps dust straight onto your evaporator core.
Interior Vents
Use a slim foam brush or detail brush with a mild cleaning solution to wipe between the dashboard louvers. Avoid harsh solvents — they’ll discolor the plastic trim.
Fresh Air Intake Cowl
Clear leaves and organic debris from the base of the windshield. With the blower running on high, spray an enzymatic disinfectant into the intake ducting to kill mold and bacteria growing on the evaporator.
Condenser Fan Blades
Wipe down the fan blades while the engine is cool and off. Dirt buildup causes rotational imbalance and premature motor wear. Make sure the fan spins freely with nothing caught in the shroud.
Reassembly and System Check
Reassemble the bumper cover or grille, align the mounting tabs with the chassis holes, and reinstall the screws and clips without overtightening — stripped plastic threads are a headache you don’t need.
Remove the plastic coverings from your electrical components. Reconnect the battery.
Start the engine and turn the AC to maximum cooling. Let it run for several minutes. Use a dial thermometer at the vents to confirm cold air output. A successful clean delivers a rapid temperature drop, stable engine temps, and quiet compressor operation.
If you have a manifold gauge set, check that high-side and low-side pressures are within normal operating ranges. Pressures that are still elevated after cleaning point to a different problem — a refrigerant overcharge, a failing fan, or an internal system issue that surface cleaning won’t fix.