Your car’s paint looks chalky, dull, or faded? That’s oxidation — and yes, you can fix it yourself. This guide walks you through every step, from diagnosing what you’re dealing with to protecting the finish so it stays glossy. Stick around — the section on single-stage paint alone could save you from a very expensive mistake.
What Is Paint Oxidation, Really?
Oxidation happens when UV rays break down the organic binders in your car’s paint. The smooth, reflective surface turns porous and chalky. Light scatters instead of bouncing back, and the result is that dull, faded look you’re trying to fix.
Paint oxidation is a progressive chemical process — it doesn’t happen overnight, and it won’t fix itself. The longer you wait, the deeper it goes.
Clear Coat vs. Single-Stage Paint: Why It Matters
Most cars built after the mid-1980s have a two-layer system:
- A base coat holding the color pigment
- A clear coat sitting on top as a protective shield
When you correct modern paint, you’re working entirely within that clear coat. The color layer stays untouched.
Older vehicles (and some specialty finishes) use single-stage paint, where color and protection are mixed into one layer. Single-stage finishes oxidize faster, fade harder, and need a completely different correction approach. More on that below.
Where You Live Makes It Worse
Your zip code affects how fast oxidation hits. Coastal environments with salt-laden air accelerate oxidation by up to 40% compared to dry inland climates. Here’s how different US regions stack up:
| Region | Main Stressors | What Happens to Your Paint |
|---|---|---|
| Southwest Deserts (e.g., Southern Utah) | Extreme UV, desert heat, abrasive dust | Rapid fading, cracking, clear-coat breakdown |
| Pacific Northwest (e.g., Everett, WA) | Constant rain, acid precipitation, soot | Surface haze, water spotting, chemical etching |
| US Coastal Areas | Marine salt spray, high humidity | Chalky, porous, calcified oxidation — fast |
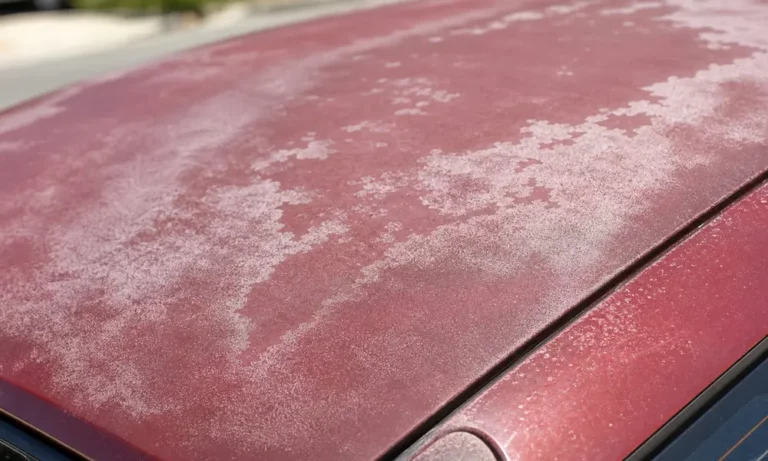
Red paint is especially vulnerable. Red pigments absorb short-wavelength UV light, which rapidly destroys the organic bonds in the paint. White single-stage paint, while chemically more stable, goes chalky fast without dark pigments to absorb UV energy.
Step 1: Figure Out What You’re Actually Dealing With
Before you touch a polisher, you need to know two things: what type of paint system you have and how much paint thickness is left.
The Towel Test
Grab a clean white microfiber towel. Put a small amount of fine polish or mild rubbing compound on it. Gently rub an inconspicuous spot on the panel.
- Color transfers onto the towel? You’ve got single-stage paint. The pigment is sitting right on the surface.
- Towel stays clean (or picks up dark, grayish residue) and the surface gets glossy? That’s a clear-coat system.
This simple test determines your entire correction strategy — don’t skip it.
Measure Your Paint Thickness
Working on clear coats without knowing the remaining thickness is a real risk. Too thin, and you’ll grind through the clear coat and expose the base coat. That’s a repaint job.
Use a paint thickness gauge before you start. Map five to seven readings per panel — focus on flat zones, curves, and edges where paint runs naturally thin.
| DFT Reading | Classification | What It Means for You |
|---|---|---|
| Above 140 microns | Heavy/Repainted | Prior bodywork likely. Proceed carefully. |
| 90–140 microns | Normal Factory Finish | Healthy paint. Safe for standard machine correction. |
| 80–89 microns | Moderately Thin | Prior polishing. Use ultra-light polishing only. |
| Below 80 microns | Dangerously Thin | Stop. Machine correction prohibited. Needs professional refinishing. |
Step 2: Decontaminate the Paint First
Polishing dirty paint drags grit across the surface and creates deep swirl marks and scratches. Decontamination isn’t optional — it’s the foundation of good results.
Two-Bucket Wash Method
Set up two buckets:
- Soapy water — use a pH-neutral car wash shampoo with no wax or gloss additives
- Rinse water — clean water only
Both buckets need grit guards at the bottom. Wash top to bottom, starting at the roof and working down. Rinse your mitt in the clean bucket before dipping back into the soap bucket. This keeps abrasive grit from transferring back onto your paint.
After washing, dry completely with a dedicated microfiber drying towel before moving forward.
Iron Remover and Clay Bar
A regular wash doesn’t pull out bonded contaminants like brake dust, industrial fallout, and road tar. Here’s how to handle them:
- Spray a pH-safe iron remover across the panels. Watch it turn purple as it dissolves embedded metallic particles.
- Use a dedicated tar remover on sticky spots.
- Clay bar the entire car. Apply clay lubricant generously, then glide a flattened clay bar across the surface in straight, overlapping lines. No circular motions. If you drop the clay bar, throw it away immediately.
The baggie test: Slip your hand inside a thin plastic sandwich bag and glide it over the dried paint. Feel roughness? Clay again until the surface feels like glass.
Once you’re done claying, wipe down every panel with a 15–25% isopropyl alcohol solution in distilled water to strip away polish oils, old wax, and lubricant residue. This ensures the compound makes direct contact with the paint during correction.
Step 3: Remove Oxidation from Clear-Coat Paint
The golden rule of paint correction: use the least aggressive product that still gets the job done. This saves clear coat thickness and prevents damage.
Why a Dual-Action Polisher Beats a Rotary
A rotary buffer spins on one fixed axis. It’s powerful, but it builds localized heat fast. Hold it in one spot for even a few seconds and you’ll burn through the clear coat. Rotary machines also leave behind buffer trails and holograms if you’re not experienced.
A dual-action (DA) orbital polisher oscillates and spins simultaneously. Heat spreads over a broader area, keeping panel temperatures safe. DA polishers finish down cleanly and are far more forgiving. For most people learning how to remove oxidation from car paint, a DA is the smart choice.
Stage 1: Compounding
Pair an aggressive foam cutting pad or microfiber cutting pad with a rubbing compound containing micro-abrasives. Products like Meguiar’s M100 Pro Speed Compound are built for this.
- Apply 3–4 pea-sized drops to the pad
- Press the pad flat onto a 2×2 foot section of the panel
- Set polisher to low speed and spread the product evenly
- Increase to speed 4–5 and work in a cross-hatch pattern — four to six slow horizontal passes, then four to six vertical passes
- Use light, consistent pressure. Let the machine do the work.
- Wipe away residue immediately with a clean microfiber towel
Stage 2: Finishing Polish
Compounding removes oxidation but leaves micro-marring and haze. Switch to a soft foam finishing pad and a fine finishing polish like Meguiar’s Ultimate Compound.
Repeat the same cross-hatch process at a lower speed (3–4). Wipe clean. Then spray a 20% IPA solution to remove any residual oils before inspection.
Check your work under angled LED lights or direct sunlight. All oxidation, haze, and micro-scratches should be gone.
Step 4: Removing Oxidation from Single-Stage Paint
Single-stage paint correction is a completely different game. The pigment lives on the surface. Push too hard or generate too much heat, and you’ll grind the color right off.
Rehydrate the Paint First
Dry, chalky single-stage paint is porous — it soaks up oils like a sponge. Before you polish anything, apply a non-abrasive glaze rich in reconditioning oils, such as Meguiar’s Number Seven Mirror Glaze. Work it in by hand with a terrycloth applicator pad and let it dwell overnight. This restores chemical flexibility to the paint and means you have to remove less paint thickness to get the finish back.
Correction Rules for Single-Stage Paint
- Use a moderate-cut or mild compound with high oil content and finer abrasives
- Choose soft foam polishing or finishing pads — no wool, no aggressive cut pads
- Apply very light pressure — let the polisher float across the surface
- Keep machine speeds low (1,000–1,500 RPM)
- Touch the panel frequently — if it’s warm, stop and let it cool. Keep panel temp below 110°F
- Clean your pad after every single panel. Single-stage paint loads the pad with pigmented residue fast. A clogged pad stops cutting and starts marring.
Step 5: Wet Sanding for Severe Oxidation
If compounding fails to restore the finish, wet sanding is the last resort before repainting. This physically shaves off a microscopically thin layer of oxidized clear coat using ultra-fine sandpaper. It’s only safe on panels with confirmed healthy paint thickness.
How to wet sand safely:
- Soak 1200, 1500, 2000, and 3000-grit waterproof sandpapers in water with a few drops of pH-neutral car soap for 15–30 minutes
- Wrap the paper around a semi-rigid foam sanding block — never bare fingers
- Keep the surface wet constantly and sand in straight, overlapping, unidirectional passes. No circular motions.
- Progress through grits, sanding each new grit at 90 degrees to the previous direction. This confirms you’ve replaced the coarser scratch pattern.
- Once finished, machine polish with a cutting pad and rubbing compound to remove sanding scratches, then refine with a finishing polish
Step 6: Protect the Paint So It Doesn’t Oxidize Again
Freshly corrected paint is vulnerable. Without protection, UV rays and oxygen will re-oxidize the surface within months. Here’s how the main options compare:
| Protection Type | Longevity | UV & Chemical Defense | Heat & Detergent Resistance |
|---|---|---|---|
| Natural Carnauba Wax | 1–3 months | Low | Poor |
| Synthetic Polymer Sealant | 4–6 months | Moderate | Moderate |
| Ceramic Coating | 1–5+ years | Maximum | Outstanding |
Ceramic coatings chemically bond with the paint to create a semi-permanent, hydrophobic glass-like shield against UV rays, acid rain, bird droppings, and light scratches. For long-term protection, it’s the clear winner.
To apply any coating correctly:
- Wipe the panel with isopropyl alcohol first to strip polishing oils
- Apply ceramic coating in small, overlapping sections using an applicator block and suede cloth
- Buff off once it begins to flash (within 30 seconds to 2 minutes)
- Keep the car indoors and away from water for 12–24 hours while it cures
To keep oxidation from coming back:
- Wash regularly with pH-neutral soap
- Avoid automatic car washes with spinning plastic brushes — they introduce swirl marks that scratch protective coatings
- Apply a polymer spray sealant or ceramic booster every 3–6 months
Know When to Stop
If correction gives you less than 60% improvement, or you see primer or bare metal showing through, stop immediately. More polishing won’t help at that point — the paint has failed. The panel needs professional refinishing.
The same applies if your paint thickness gauge reads below 80 microns anywhere on the car. Machine correction on paper-thin paint will burn straight through. Walk away and talk to a body shop instead.