That crusty, colorful mess on your battery terminals isn’t just ugly — it’s actively killing your car’s electrical system. The good news? You can fix it at home in under an hour with stuff you probably already have. Stick around, because the safety steps alone could save you from a serious injury.
What Is That Crusty Stuff on Your Battery?
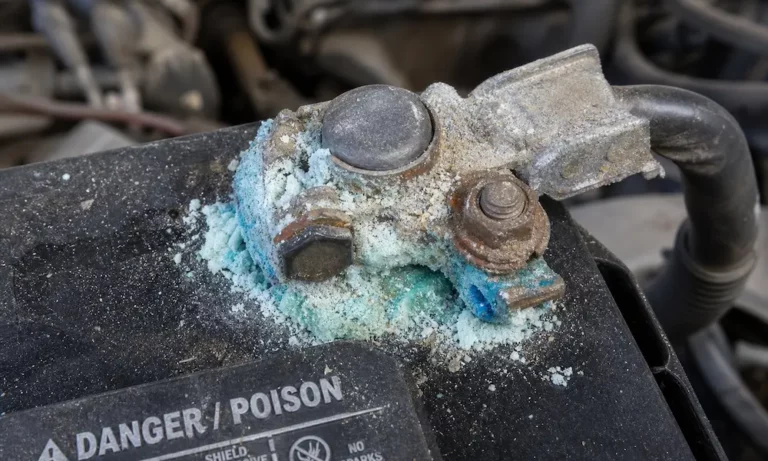
That powdery buildup is battery corrosion, and it forms through a straightforward chemical process. Your lead-acid battery vents hydrogen gas during normal operation. That gas mixes with moisture, oxygen, and airborne salts in the engine bay. The result? Solid sulfuric acid crystals that bond to your terminal posts and cable clamps.
The color of the buildup actually tells you something useful:
- White or light gray — Lead sulfate from acid reacting with lead posts
- Bluish-green or teal — Copper sulfate from acid reacting with copper or brass clamps
- Brown or dark gray — Lead dioxide from high heat and oxidation
What the Corrosion Location Tells You
Don’t just clean the terminals and move on. Where the corrosion appears is a direct clue about what’s wrong under the hood.
| Affected Terminal | Color | Root Cause | What It Means |
|---|---|---|---|
| Positive only | White, gray, or brown | Alternator overcharging | Charging voltage likely exceeds 14.5V; check voltage regulator |
| Negative only | Bluish-green | Alternator undercharging | Too many short trips with heavy accessory use |
| Both terminals | Mixed colors | Battery aging or casing damage | Battery may be at end of its 3–5 year lifespan |
Fixing the symptom without addressing the cause means the corrosion comes right back.
Safety First — This Part Isn’t Optional
Lead-acid batteries contain sulfuric acid and produce flammable hydrogen gas. That’s not a combination to take lightly. Before you touch anything, get these safety measures in place.
Gear up:
- Chemical-resistant rubber gloves
- Safety goggles (not just glasses)
- Long-sleeved clothing
- Rubber-soled boots
Set up your workspace:
- Work outdoors or in an open garage with active airflow
- No open flames, cigarettes, or sparks anywhere nearby
- Keep soap and water within arm’s reach in case of skin contact
- Have a second person nearby, within earshot
Before you touch the battery:
- Turn off the engine and remove the keys
- Let the engine bay cool completely if you’ve been driving
- Remove all metal jewelry — rings, watches, bracelets
- Touch a grounded metal surface to discharge static electricity
A 12V lead-acid battery can generate enough short-circuit current to instantly melt metal. A ring on your finger near the wrong terminal isn’t a minor mistake — it’s a burn injury.
The Right Way to Disconnect Your Battery
The order you disconnect cables matters enormously. Get it wrong and you risk a violent short circuit, extreme heat, and potentially an explosion.
Always disconnect the negative (-) cable first.
Here’s why: your entire vehicle chassis connects to the negative terminal as a common ground. If you loosen the positive clamp first while the negative cable is still attached, any accidental contact between your wrench and any nearby metal completes a live circuit instantly.
Disconnect the negative first, and the chassis ground breaks. The positive terminal becomes inert even if your wrench slips.
Reconnection reverses the order — positive first, then negative.
| Step | Action | Why It’s Safe |
|---|---|---|
| Disconnect 1st | Remove negative (-) cable | Breaks the chassis ground loop |
| Disconnect 2nd | Remove positive (+) cable | Chassis already isolated; no spark risk |
| Reconnect 1st | Attach positive (+) cable | No return path yet; chassis still isolated |
| Reconnect 2nd | Attach negative (-) cable | Completes the circuit safely |
Protect Your Car’s Memory Before You Disconnect
Modern vehicles store a lot of data in volatile memory — engine idle calibration, transmission shift points, power window limits, and your radio presets. Disconnect the battery without a backup power source and you wipe all of it.
A diagnostic memory saver costs between $9 and $20. It plugs into your OBD-II port under the driver’s side dash and connects to an auxiliary 12V source like a portable jump starter. It keeps continuous voltage flowing to your ECU while the main battery is disconnected.
Critical things to manage when using a memory saver:
- Roll your driver’s window down first. If the auxiliary power triggers an auto-lock cycle, you’ll need to get back in.
- Work within 30 minutes. Many vehicles time out the OBD port after 30 minutes of low draw.
- Wrap the positive cable immediately. Because the memory saver keeps power flowing, the disconnected positive clamp stays live. Wrap it in a plastic bag or rubber glove the moment it comes off the post.
- Turn off accessories. Dome lights, climate control, and audio displays all draw current your auxiliary source may not handle.
- Never use it during chassis welding. Voltage spikes from welding will feed back through the memory saver and destroy your vehicle’s control modules.
Inspect Before You Clean
Don’t dive straight into scrubbing. Take 60 seconds to check two things first.
Battery casing: If it’s bloated, cracked, or leaking fluid, cleaning won’t help. Replace the battery immediately.
Battery cables: If the rubber insulation is cracked, peeling, or the copper wire strands inside are frayed or heavily corroded, replace the cables before reconnecting anything. Damaged cables create high resistance and cause hard starts.
How to Clean Car Battery Corrosion — 4 Methods That Actually Work
Method 1: Baking Soda Paste (Best for Most Cases)
This is the go-to method for cleaning car battery corrosion because baking soda neutralizes acid chemically. Mix four tablespoons of baking soda with one-quarter cup of warm water into a thick paste.
Apply it carefully. Use a stiff-bristled brush or cloth to work the paste onto corroded areas only. When it touches the acid buildup, it fizzes. That’s the neutralization happening.
One critical warning: Never pour baking soda into the battery vents. If it reaches the internal cells, it neutralizes the sulfuric acid inside and permanently destroys the battery’s chemistry.
Scrub with a wire terminal brush, rinse with a small amount of distilled water (not tap — minerals in tap water accelerate future corrosion), then dry completely with a microfiber towel.
Method 2: Commercial Aerosol Cleaner (Fastest and Most Diagnostic)
Aerosol battery cleaners do two things at once: they clean the terminals and identify active acid leaks. The foam sprays on yellow and turns pink on contact with sulfuric acid. Keep spraying until the foam stays yellow — that confirms all active acid is neutralized.
Let it dwell for one to two minutes, scrub with a wire brush, then wipe clean. Keep overspray off painted surfaces; the solvents can damage automotive paint.
Method 3: Boiling Water (Best for Heavy Buildup)
When the terminals look like a science experiment with thick, cauliflower-shaped deposits, boiling water dissolves them fast. Pour a small, targeted amount directly over the corroded area. The heat melts the sulfate crystals without heavy scrubbing.
The downside: boiling water doesn’t neutralize residual acid. Follow up with the baking soda method. Also use minimal water — pooling in the battery tray leads to rust and damaged electrical connectors.
Method 4: Vinegar or Isopropyl Alcohol (Light Maintenance Only)
White vinegar or lemon juice work on light surface oxidation only. Apply with a cotton swab, let it sit briefly, then rinse thoroughly with distilled water. Don’t leave lemon juice residue — the sugar content caramelizes under heat and attracts dirt.
Once the primary cleaning is done, a finishing wipe with 70-90% isopropyl alcohol strips remaining grease and evaporates clean. No conductive residue left behind.
What NOT to Use
Two household items get recommended online constantly, and both are bad ideas:
- Baking powder — Contains acidic starch compounds that cancel out its own alkaline properties. It won’t neutralize battery acid.
- Coca-Cola or soda — The phosphoric acid and sugars leave a sticky, caramelized residue under engine heat that attracts dirt, damages wire insulation, and degrades drive belts.
Replacing Corroded Terminal Clamps
If the clamps crack, won’t tighten, or the bolts are seized solid, cleaning them isn’t enough. Replace the clamps using these steps:
- Cut the damaged terminal as close to the old clamp as possible using heavy-duty cable cutters
- Strip exactly half an inch of rubber insulation to expose clean copper wire
- Inspect the copper — brush off any green oxidation until the metal is bright
- Insert the cable into the new clamp collar, leaving one-eighth inch of bare wire visible outside the collar
- Tighten securely with insulated wrenches — wiggle-test the connection; movement means a loose clamp
Don’t overtighten. Excessive torque can crack the soft lead battery posts.
How to Stop Corrosion From Coming Back
Cleaning is only half the job. You need a physical barrier to block acidic vapors from reaching the metal again.
Anti-Corrosion Felt Washers
These small felt discs slide over the battery posts before you reinstall the cable clamps. They’re pre-saturated with an alkaline compound that traps and neutralizes acidic vapors before they reach the terminals. Under $10 for a set, and they work continuously with zero maintenance.
Protective Coatings
- Silicone-based grease — Best choice for under-hood use. High melting point, stays put in extreme heat, and forms a durable waterproof seal around the connection.
- Dielectric grease — Excellent moisture barrier but electrically non-conductive. Only apply it over the exterior of the assembled connection, never between the post and the clamp.
- Petroleum jelly — Works in a pinch but melts under intense heat and can interfere with electrical contact if applied too thickly inside the clamp.
- Aerosol terminal protector spray — Products like CRC Battery Terminal Protector dry into a visible protective film that resists acid and moisture long-term.
Long-Term Battery Health Habits
Cleaning and coating buys you time. These habits prevent the root causes from returning:
- Drive regularly. Short trips with heavy electronics use chronically undercharge your battery and accelerate negative terminal corrosion.
- Test charging voltage annually. Your alternator should output no more than 14.5V at idle. Anything higher overcharges the battery, boils the electrolyte, and forces acid vapors through the vents.
- Check the battery hold-down bracket. A loose battery vibrates constantly, which can create micro-cracks in the casing around the posts and cause continuous acid leaks.
- Inspect twice a year. Catching light buildup early takes five minutes. Ignoring it can mean a no-start situation at the worst possible time.
- Consider upgrading to an AGM battery. Absorbed Glass Mat batteries use fiberglass mats to absorb the acid electrolyte, which drastically reduces outgassing and nearly eliminates terminal corrosion.
Now you’ve got everything you need to clean car battery corrosion safely, do it right the first time, and keep it from showing up again next season.