Your driver side window picks the worst moments to quit — usually mid-rainstorm or at a drive-through. Before you panic or hand over your wallet to a mechanic, there’s a good chance you can diagnose this yourself. Read to the end and you’ll know exactly what broke, why it broke, and how to fix it.
Why the Driver Side Window Fails First
Your driver side window works harder than any other window in the car. Think about it — every time you pay a toll, grab coffee, or wave at a neighbor, that’s another cycle on the motor and regulator. All that use adds up fast.
The driver side also controls every other window in the car. That master switch assembly in your armrest handles logic for the whole passenger cabin, which means it carries more electrical load than any other switch. More load equals more wear.
Here’s the short version of what’s inside your door:
| Component | Location | What It Does |
|---|---|---|
| Master Switch Assembly | Driver door armrest | Controls all windows |
| Window Lift Motor | Lower door shell | Converts electricity to movement |
| Window Regulator | Vertical door interior | Guides the glass up and down |
| Wiring Harness | Door jamb | Carries power to the motor |
| Fuse / Relay | Fuse box (cabin or engine bay) | Protects the circuit |
Any one of these can kill your window. Let’s figure out which one is the problem.
Start Here: The 60-Second Diagnosis
Before you pull a single trim panel, run this quick test. It’ll save you time.
Turn on your dome light. Then press the window switch. Watch the dome light closely.
- Light dims slightly when you press the switch? Power is reaching the motor. The motor itself is seized, or the regulator is jammed.
- Light doesn’t dim and there’s no sound? The circuit is broken before it even gets to the motor. Think blown fuse, bad switch, or a broken wire in the door jamb.
This old-school trick narrows down the fault quickly without touching a single tool.
What Does Your Window Actually Do When You Press the Switch?
The symptom tells you a lot. Match what you hear and see to the table below.
| What Happens | Most Likely Electrical Cause | Most Likely Mechanical Cause |
|---|---|---|
| Nothing — no sound, no movement | Blown fuse or dead switch | Motor brushes completely worn |
| Clicking sound but no movement | Relay engaging, motor stalled | Regulator jammed or gears stripped |
| Humming but no movement | Voltage present, not enough current | Motor internal short or missing gear teeth |
| Slow or jerky movement | Corroded connectors, high resistance | Dry tracks or frayed regulator cable |
| Window drops into the door | Not electrical | Snapped cable or broken regulator guide |
Got your symptom matched? Good. Now let’s trace the fault step by step.
Check the Fuse First — It’s Free
This is the first real step. A blown fuse costs nothing to check and about $1 to replace.
Your power window circuit is typically protected by a 20-30 amp fuse. For most vehicles, that fuse lives in the passenger compartment fuse panel — usually behind a kick panel or in the footwell.
On a Ford F-150 (2021+), there are actually two fuse boxes. The cabin box in the passenger footwell handles the windows and interior electronics. You pop that kick panel straight back toward the rear of the truck to release the clips.
Pull the fuse and look at it against a light. If the metal strip inside is broken or looks burned, replace it. If the new fuse blows immediately, you’ve got a short in the wiring or a seized motor drawing too much current.
If the fuse looks fine, move on.
Test the Switch — It’s the #1 Culprit
Window switches fail more often than most people expect. The contacts inside wear out from constant use, and they carry more current than your average interior switch.
Grab a 12-volt test light or a multimeter. Ground it to the chassis, then probe the back of the switch connector with the ignition in the “on” or “accessory” position.
- Power present at the switch input but not the output when you press the button? The switch is dead. Replace it.
- Power leaving the switch but the motor still won’t move? The problem is downstream — either the wiring harness or the motor itself.
One thing worth knowing: in newer vehicles, the switch doesn’t directly power the motor. It sends a signal to a body control module, which then commands the motor. If you probe those wires with a test light and see 5 or 7 volts instead of 12, those are data signals — not power. Don’t mistake them for a dead circuit. You’ll need a scan tool for those systems.
Check the Door Jamb Wiring — The Hidden Weak Spot
Here’s something most people overlook. The wiring harness runs from the car’s body into the door through a rubber boot in the door jamb. Every single time you open the door, those wires flex. Do that 50,000 times and the insulation cracks. The copper strands fatigue and snap.
This creates an intermittent fault — your window might work when the door is at a certain angle and stop working when it’s closed. That’s a classic sign of a broken wire inside the boot.
Wiggle the rubber boot near the door hinge while someone presses the window switch. If the window suddenly works or stutters, you’ve found your problem.
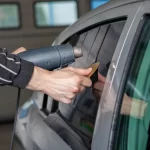
How to Pull the Door Panel (Without Destroying It)
If the fuse and switch check out, you need to get inside the door. This sounds intimidating, but it’s straightforward if you’re patient.
Use plastic trim tools only. Metal screwdrivers will chew up your door panel and scratch your armrest.
Here’s the general sequence:
- Pop off the switch panel with a plastic trim tool and unplug the connectors
- Remove any screws hiding behind the door handle bezel and armrest pull cup
- Remove the screws along the bottom edge of the door panel (usually 8mm or 10mm)
- Use a forked trim tool to pop the plastic “Christmas tree” clips along the bottom edge, working upward
- Lift the panel straight up to clear the top of the door frame
- Disconnect the door handle cable and any speaker or light wiring
Behind the panel, you’ll find a plastic vapor barrier. Peel it back carefully — don’t cut it. That barrier keeps water out of your interior, and a damaged one causes expensive problems later.
Test the Motor Directly
With the panel off, you can now reach the motor connector. This is the definitive test.
Unplug the motor connector. Apply 12 volts directly from a battery to the motor terminals. Reverse the polarity to test both directions.
- Motor spins both ways? The motor is fine. Your fault is in the wiring harness or the switch.
- Motor doesn’t move? The motor is dead. Replace it.
- Motor hums but doesn’t turn? The internal gears are stripped, or the regulator is mechanically jammed.
You can also check for power at the motor connector while pressing the switch. If your test light lights up in both directions but the motor doesn’t move, the motor is confirmed bad.
Motor Worn Out? Here’s What’s Happening Inside
The window lift motor is a permanent-magnet DC motor. Inside, carbon brushes make contact with a spinning armature. Over time, those brushes wear down and the debris they leave behind causes high resistance or a full break in the circuit.
The motor also connects to the regulator through a small plastic drive gear. If someone tried to force a frozen window open, those plastic gear teeth can strip completely. The motor will whirr away happily, and the glass won’t move an inch.
Regulator Problems — When the Glass Moves Wrong
If your motor tests fine but the window still acts up, the regulator is the suspect. There are two main types:
- Scissor-type: Common in older trucks and heavy sedans. Metal arms expand to lift the glass. Durable but heavy.
- Cable-and-pulley type: The modern standard. Uses a steel cable and plastic pulleys. Lighter, but the plastic components get brittle with age — especially in hot climates.
When a plastic pulley or cable guide snaps, the window falls into the door. When the cable frays, movement becomes slow and uneven. Both require regulator replacement.
How to Replace the Motor or Regulator
Before you unbolt anything, secure the glass. Push it to the fully closed position and tape it to the door frame with heavy-duty painter’s tape — over the top of the door, securing both sides. You can also wedge a piece of wood inside the door cavity to support the glass from below.
Then:
- Unbolt the glass from the regulator carriage
- Remove the regulator mounting bolts (usually 10mm)
- Carefully maneuver the regulator out through the largest access hole in the door shell — the metal edges are sharp, so watch your hands
- Slide the new assembly in and torque the bolts carefully — too tight and you’ll crack the glass, too loose and it’ll rattle
Check the window regulator replacement guide from CarParts.com if you want step-by-step photos for your specific vehicle type.
| Vehicle Type | Mounting Style | Common Problem |
|---|---|---|
| Modern US Sedans | 10mm Bolts | Plastic guide breakage |
| Late Model US Trucks | Bolts or Rivets | Cable fraying |
| Older Classic Cars | Heavy Gauge Bolts | Scissor arm pivot wear |
| Compact Import Sedans | 8mm Bolts | Motor brush failure |
Note: some older US trucks use rivets instead of bolts. You’ll need to drill those out and install bolts when fitting the new unit.
Reset the Window After Replacing Parts
Disconnect the battery or swap out a window component, and your car might “forget” the window’s travel limits. The express-up function stops working, or the window bounces back down when it hits the top. That’s the anti-pinch system getting confused.
Here’s the standard reset that works on most vehicles:
- Turn the ignition to “Run” without starting the engine
- Hold the switch down until the window is fully open — keep holding for 5 seconds after it stops
- Hold the switch up until the window is fully closed — keep holding for 5 seconds after it stops
- Test the auto function
If it still doesn’t work, repeat the process and extend the hold time to 10 seconds.
Toyota models often require you to do this from the door’s local switch, not the master switch. Ford vehicles may need several full open-and-close cycles within 30 seconds to clear the previous memory. Always check your owner’s manual for the exact sequence — skipping this step is the #1 reason windows seem broken right after a repair.
Stuck Down and It’s Raining? Do This Right Now
If the motor died with the window open, here’s a quick temporary fix. Disconnect the motor from the regulator. The regulator carriage should be free to move by hand. Push the glass up manually and wedge it in place with a piece of wood inside the door cavity, or clamp locking pliers to the regulator track.
For a temporary window cover, use clear plastic sheeting or a heavy trash bag. Tape it to the inside of the door frame with clear packing tape or painter’s tape.
One thing to avoid completely: don’t use duct tape on painted surfaces. The adhesive bakes into the clear coat in the sun and takes the paint with it when you pull it off. Clear packing tape in a lattice pattern gives you enough visibility to drive safely until the repair is done.
One Last Thing: Prevent This From Happening Again
A little maintenance goes a long way with power windows.
- Lubricate the window tracks with a dry silicone spray once a year. Grease mixed with dust turns into a paste that drags on the motor and burns it out prematurely.
- Don’t force a frozen window. If your window is frozen shut, warm up the car first. Forcing it causes a massive current spike that can burn out the motor’s windings or snap the plastic clips holding the glass to the regulator.
- Check the door jamb boot every few years on high-mileage vehicles. Catching a cracked wire early is a $5 fix. Ignoring it can mean chasing an intermittent fault for months.
The driver side power window not working is almost always a fixable problem — and in most cases, you don’t need a shop to sort it out. Start at the fuse, work your way to the switch, test the harness, and confirm the motor. You’ll find the fault faster than you think.