Having your ABS light suddenly pop up on the dashboard is never a welcome sight. If you’re dealing with this issue, a faulty wheel speed sensor might be the culprit. These small but critical components keep your anti-lock braking system functioning properly and play a key role in your vehicle’s stability control systems.
What is a Wheel Speed Sensor?
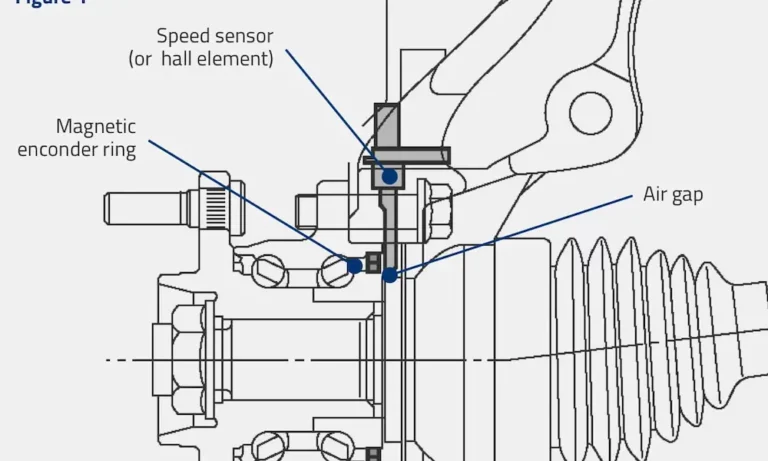
Wheel speed sensors monitor how fast each wheel is rotating and send this information to your vehicle’s computer systems. These tiny devices are the eyes and ears of your ABS system, detecting magnetic field changes and converting them to electrical signals that your vehicle’s computer can interpret.
There are two main types you’ll encounter:
- Passive sensors (two-wire) – Generate an AC signal as a toothed ring passes by
- Active sensors (Hall-Effect or magneto-resistive) – Use external power to create a digital signal with better accuracy
Active sensors have largely replaced passive ones in newer vehicles because they work better at low speeds and can detect directional changes.
Signs of a Failing Wheel Speed Sensor
Your vehicle will usually let you know when a wheel speed sensor is failing. Here are the telltale symptoms:
- Warning lights: ABS or ESC (Electronic Stability Control) light stays illuminated after starting
- Strange braking behavior: Pulsating brake pedal at inappropriate times
- Traction control issues: System may activate unnecessarily or fail to engage
- Speedometer problems: Intermittent or inaccurate readings
If you notice any of these symptoms, it’s time to check your wheel speed sensors before more serious problems develop.
Diagnosing the Problem
Before replacing any parts, confirm that a wheel speed sensor is actually the problem.
Using a Diagnostic Scanner
The simplest way to diagnose the issue is with a diagnostic scanner that can read ABS codes:
- Connect the scanner to your OBD-II port (usually under the dashboard)
- Navigate to the ABS module section
- Read the trouble codes
Look for codes like “C1234 Right-Front Sensor Signal Missing” which pinpoint the exact sensor that’s failing. Remember that basic code readers often miss ABS codes – you’ll need a more advanced scanner.
Manual Testing Methods
If you don’t have a scanner, you can test the sensor with a multimeter:
- Resistance check: Most passive sensors should read between 980-2350 ohms
- Output test: With the wheel spinning, passive sensors should generate at least 0.2V AC
- Visual inspection: Look for damaged wires, corroded connectors, or physical damage
Pay special attention to the connecting wires – they’re often damaged by road debris or improper routing.
DIY Wheel Speed Sensor Replacement: Step-by-Step
Replacing a wheel speed sensor is within most DIYers’ capabilities. Here’s how to do it safely:
Tools You’ll Need
- Jack and jack stands
- Lug wrench
- Torx or hex bits (check your vehicle’s requirements)
- Wire brush or emery cloth
- Dielectric grease
- Penetrating oil
- Torque wrench
1. Preparation and Safety
Start with safety first:
- Park on level ground and set the parking brake
- Loosen (but don’t remove) wheel lug nuts while the tire is still on the ground
- Jack up the vehicle and secure it on jack stands
- Remove the wheel
Never work under a vehicle supported only by a jack – always use proper jack stands.
2. Locate and Disconnect the Sensor
The wheel speed sensor is typically mounted on the wheel hub, brake backing plate, or steering knuckle:
- Trace the wiring harness from the wheel area to find where it connects to the main harness
- Release any clips or fasteners securing the wire
- Disconnect the electrical connector (check for corrosion while you’re there)
3. Remove the Old Sensor
This can be the trickiest part due to corrosion:
- Remove the mounting bolt (usually a Torx or hex head)
- Gently twist and pull the sensor to extract it
- If it’s stuck, apply penetrating oil and wait 15-30 minutes before trying again
For severely seized sensors, you might need to use locking pliers to twist while pulling. Be careful not to damage the surrounding components.
4. Clean the Mounting Area
Proper cleaning is crucial for your new sensor to function correctly:
- Use a wire brush or rolled emery cloth to clean rust from the sensor bore
- Wipe away debris, being careful not to push it into the bearing
- Inspect the tone ring (the toothed wheel the sensor reads) for damage
If the tone ring is damaged, you may need to replace the entire hub assembly.
5. Install the New Sensor
Now it’s time to install the new part:
- Verify you have the correct sensor – left and right sensors aren’t always interchangeable
- Apply a thin layer of silicone dielectric grease to the O-ring (but keep the sensor tip clean)
- Carefully insert the sensor into the bore
- Tighten the mounting bolt to the manufacturer’s specifications (typically 5-8 Nm)
- Route the wire along the original path, securing all clips to prevent wire chafing
6. Reconnect and Test
The final steps:
- Reconnect the electrical connector
- Reinstall the wheel and torque the lug nuts to specifications (usually 80-140 Nm)
- Lower the vehicle
- Clear the ABS codes with your scanner
- Test drive to confirm the warning lights stay off
Most ABS systems need a short drive (straight, above 25 mph for at least five seconds) to verify the new sensor is working properly.
Common Challenges and Solutions
| Challenge | Solution |
|---|---|
| Broken sensor bolt | Use a left-hand extractor, then clean threads with a tap before installing new sensor |
| Seized sensor | Apply overnight penetrating oil, then alternate gentle prying and twisting |
| Damaged wiring | Repair or replace the wiring harness segment rather than just the sensor |
| Cracked tone ring | Replace the ring if serviceable, or install a new hub assembly |
Cost Comparison: DIY vs. Professional Repair
Replacing a wheel speed sensor yourself can save significant money:
| Expense | DIY Cost | Professional Cost |
|---|---|---|
| Parts | $30-125 | $125-250 |
| Labor | Your time | $100-250 |
| Total | $30-125 | $225-500+ |
Luxury vehicles and those with advanced driver assistance systems may cost significantly more, sometimes exceeding $700 when calibration is required.
Preventive Maintenance Tips
Keep your wheel speed sensors working properly with these preventive measures:
- Regular cleaning: If you live in areas with road salt, wash the brake assemblies periodically
- Inspect wiring: Check the sensor wires during brake services for signs of chafing or damage
- Keep wheel bearings tight: Excessive play can alter sensor gap and cause false readings
- Add dielectric grease: Apply to connectors during wet weather to prevent corrosion
- Check after off-roading: Mud and debris can interfere with the sensor’s function
Why Proper Wheel Speed Sensor Function Matters
A working wheel speed sensor does more than just keep warning lights off your dashboard. It’s essential for:
- ABS operation: Prevents wheels from locking during hard braking
- Traction control: Helps maintain grip on slippery surfaces
- Stability control: Assists in preventing skids and rollovers
- Adaptive cruise control: Provides crucial speed data for advanced driver assists
- Vehicle safety: Many modern safety systems rely on accurate wheel speed data
With today’s integrated vehicle systems, a single faulty sensor can disable multiple safety features.
Wrapping Up
Wheel speed sensor replacement is a manageable repair that can restore your vehicle’s safety systems and eliminate those annoying warning lights. With the right tools and a methodical approach, you can save money while ensuring your vehicle’s ABS and stability control systems function properly.
Remember to verify the problem with proper diagnosis before replacing parts, and always follow torque specifications when reinstalling components. Your brakes—and potentially your safety—depend on getting this small but critical repair done right.