Your ABS light just came on. Maybe your traction control light too. And now you’re wondering if a wheel speed sensor replacement is in your future — and how much it’s going to hurt your wallet. This guide covers everything: what’s wrong, how to diagnose it, what it costs, and how to replace it yourself if you’re up for it. Stick around — the fix might be simpler than you think.
What Does a Wheel Speed Sensor Actually Do?
Your wheel speed sensor sits at each wheel hub and tracks how fast each wheel spins. It sends that data to your car’s computer dozens of times per second.
That data doesn’t just run your ABS. It feeds your traction control system, stability control, cruise control, speedometer, and even your transmission shift timing. On newer cars, it also supports Advanced Driver Assistance Systems (ADAS) like automatic emergency braking and lane-keeping assist.
In short — it’s a small sensor doing a massive job.
Two Types of Wheel Speed Sensors (And Why It Matters for Replacement)
Before you buy a replacement part, you need to know which type your car uses. They work completely differently.
| Feature | Passive (Inductive) | Active (Hall Effect) |
|---|---|---|
| Needs power supply | No — self-generating | Yes — 5V to 12V from ECU |
| Output signal | AC sine wave | Digital square wave |
| Works at low speeds? | No (needs 3+ mph) | Yes — works at 0 mph |
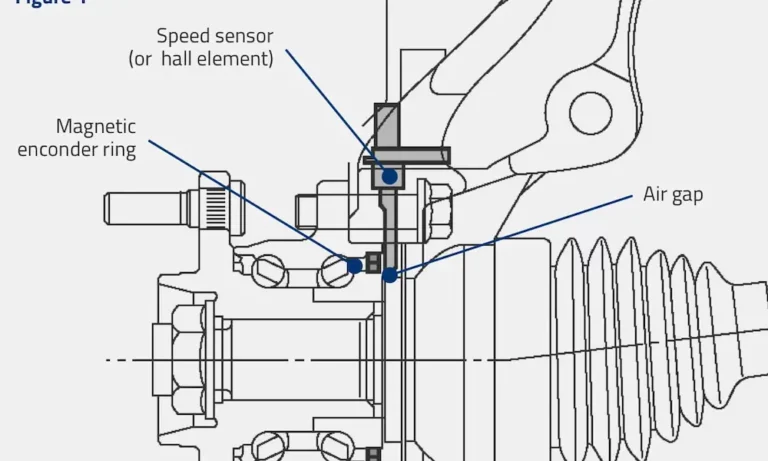
| Tone ring type | Toothed steel ring | Magnetic multipole ring |
| How to test | Resistance with multimeter | Oscilloscope + supply voltage check |
| Air gap sensitivity | Very high | Low to moderate |
Passive sensors use a magnet and coil. As the toothed ring spins past, it creates a fluctuating magnetic field that generates an AC voltage signal. Simple, but they struggle at low speeds.
Active sensors use Hall Effect chips and produce a clean digital signal. They detect rotation down to zero mph and handle electromagnetic interference much better. Most cars built after 2005 use active sensors.
Signs You Need a Wheel Speed Sensor Replacement
These symptoms point directly at a failing sensor. Don’t ignore them — a bad sensor disables your ABS and stability control entirely.
The ABS, Traction Control, and Stability Light Come On Together
This is the most common sign. When the ECU detects a fault in a wheel speed circuit — like a broken wire, short to ground, or dead signal — it shuts down all three systems at once. Your regular brakes still work, but you’ve lost your safety net.
ABS Kicks In During Normal Stops
This one’s sneaky. Your ABS activates on dry pavement at speeds between 3 and 18 mph. You feel a pulsing or “kickback” through the brake pedal when you’re barely slowing down. The ECU misreads a weak signal as a locking wheel and starts pulsing the brakes unnecessarily.
Speedometer Reads Erratically or Drops to Zero
Your speedometer pulls data from wheel speed sensor signals. A faulty sensor can make your speed readout jump around or go dead mid-drive.
Cruise Control and ADAS Features Stop Working
Your Adaptive Cruise Control needs accurate speed data to hold a steady following distance. If it suddenly refuses to engage, a bad sensor is often why. Same goes for lane-keeping assist — it uses differential braking (braking one wheel slightly) to steer you back into your lane. That’s impossible without reliable speed data from every corner.
How to Diagnose a Bad Wheel Speed Sensor
Don’t just replace a sensor because the ABS light is on. Test it first — ABS parts aren’t cheap, and the problem might be a wiring issue or a dirty tone ring.
Step 1: Pull Diagnostic Trouble Codes
Connect an OBD-II scan tool that accesses the ABS module — not just the engine codes. Codes like C0035 (Left Front) or C0040 (Right Front) point you to the exact corner. But a circuit code doesn’t automatically mean the sensor itself is dead.
Step 2: Check Live Data
Use your scan tool’s live data stream to watch all four wheel speeds while someone drives slowly. A sensor reading 0 mph while the others read 20 mph is almost certainly failed or disconnected. A sensor reading 18 mph when the others read 20 mph might just have a dirty tone ring or an air gap problem.
Step 3: Test the Sensor Electrically
For passive sensors: Use a digital multimeter and check resistance across the sensor terminals. A healthy sensor reads between 1,000 and 2,500 ohms. Infinite resistance means a broken wire. Zero resistance means a short.
For active sensors: Don’t use a simple resistance test — it won’t tell you much and might damage the sensor. Instead, check for supply voltage at the connector and use an oscilloscope to watch for a clean square wave as you spin the wheel by hand.
What Causes Wheel Speed Sensors to Fail?
Sensors live in a brutal environment — heat, cold, road salt, water, and constant vibration. Here’s what typically kills them:
| Failure Mode | What Happens | Root Cause |
|---|---|---|
| Rust jacking | Corrosion physically lifts the sensor away from the tone ring | Road salt and moisture |
| Debris buildup | Metal particles clog the sensing tip | Brake dust and road filings |
| Wiring fatigue | Internal wire breaks from constant flex | Suspension and steering movement |
| Tone ring damage | Cracked or missing teeth cause erratic signals | Impact damage or severe rust |
| Bearing play | Worn bearing lets the tone ring wobble | Bearing wear or loose axle nut |
The “Rust Jacking” Problem
This one trips up a lot of people — even after replacing the sensor. In salt-belt states, rust forms between the steel knuckle and the plastic sensor body. That rust expands and physically pushes the sensor out of its bore by a fraction of a millimeter. Magnetic field strength drops sharply with even tiny increases in air gap, which triggers false ABS activation at low speeds. If you don’t clean the bore thoroughly before installing a new sensor, the rust jacking continues with the new part.
Wheel Speed Sensor Replacement: Step-by-Step (Bolt-In Type)
This applies to sensors that are separately replaceable from the hub bearing — the most common setup on rear wheels and many older vehicles.
Tools You’ll Need
| Tool | Why You Need It |
|---|---|
| Hydraulic jack + 2-ton jack stands | Safe vehicle elevation |
| 10mm / 12mm socket set with extensions | Standard sensor bolt sizes |
| Wire brush and emery cloth | Removing rust from the sensor bore |
| Penetrating oil (PB Blaster works well) | Freeing seized sensor bolts |
| Torque wrench (in-lb and ft-lb) | Precise fastener torque |
| Bi-directional OBD-II scan tool | Clearing codes and verifying the fix |
The Replacement Process
- Disconnect the negative battery cable. Never work on sensor connectors with the ignition on — a voltage spike can fry the ABS module’s input circuit.
- Loosen the lug nuts, jack up the car, set it on jack stands, and pull the wheel.
- Find the sensor connector — usually clipped behind the fender liner or along the chassis. Unclip it carefully without breaking the locking tab.
- Spray penetrating oil on the 10mm or 12mm retaining bolt. Let it soak for a few minutes, then remove it. Wiggle the sensor gently to break the rust bond. Use a twisting motion with pliers if it’s stuck. Don’t pry against the sensor body — the plastic snaps easily and leaves the tip stuck in the hub.
- Clean the sensor bore aggressively. Use a wire brush and emery cloth until you see bare, bright metal. Any remaining rust will cause the new sensor to sit too high, recreating the same problem.
- Check your new sensor against the old one. Same connector pin count, same sensor head length? Good. Apply a thin coat of anti-corrosion compound to the sensor body — but don’t coat the sensing tip unless the instructions say to.
- Install and torque the retaining bolt to spec. For many passenger cars this is as low as 5 Nm (about 3.7 ft-lbs) — use a proper torque wrench, not a guess.
- Route the wiring harness exactly as the factory did. Use all original clips and grommets. Make sure there’s enough slack for full suspension travel and steering lock-to-lock — harness fatigue from improper routing is a common cause of repeat failures.
- Reinstall the wheel, lower the car, clear the DTCs, and do a road test. Confirm the ABS light stays off and the speedometer reads cleanly.
Integrated Hub Replacement
On many front-wheel-drive cars, the sensor is built into the hub and bearing assembly — you can’t replace it separately. This means removing the caliper, rotor, and axle nut as well.
The biggest mistake people make here: using an impact wrench to install the axle nut. That nut sets the bearing preload. Overtightening crushes the bearing races and causes premature failure — sometimes within 1,000 miles. Axle nut torque specs typically run 150 to 300 ft-lbs. Always use a torque wrench.
Wheel Speed Sensor Replacement Cost
Here’s what you’re looking at, whether you go DIY or shop:
Parts Cost by Brand Tier
| Brand Tier | Price Range | Warranty |
|---|---|---|
| OEM / Direct Replacement | $140 – $250 | 1 Year |
| Premium Aftermarket (Standard, Vemo) | $75 – $150 | 3 Years / 36k Miles |
| Budget Aftermarket (Holstein, A-Premium) | $25 – $75 | Varies |
| Integrated Hub Assembly | $250 – $600 | Limited Lifetime |
Total Repair Cost by Vehicle (Parts + Labor)
| Vehicle | Est. Labor | Est. Parts | Total Range |
|---|---|---|---|
| Toyota Camry | $44 – $99 | $140 – $180 | $184 – $279 |
| Honda Civic | $66 – $97 | $180 – $202 | $246 – $299 |
| Chevy Silverado 1500 | $109 – $152 | $250 – $350 | $359 – $502 |
| Nissan Altima | $80 – $134 | $253 – $380 | $333 – $514 |
| Honda Fit | $100 – $150 | $187 – $305 | $287 – $455 |
Most professional shops bill 1.5 to 2.5 hours of labor, including diagnostic time. Going DIY saves you the labor cost — which is often more than the part itself.
Don’t Skip the Tone Ring Check
Before you wrap up any wheel speed sensor replacement, inspect the tone ring. On passive systems, metallic debris can bridge the gap between teeth and make them invisible to the sensor. Clean a clogged ring with a brass wire brush and brake cleaner.
But if the ring is cracked — often from rust expanding on the CV axle beneath it — cleaning won’t fix it. A cracked ring creates a gap in the pulse pattern that generates an unfixable erratic signal. In that case, the tone ring or the axle needs to come out and get replaced.
One More Safety Check: Tire Uniformity
Here’s something most guides skip. A significant mismatch in tire size — like running a compact spare on one corner, or one badly underinflated tire — gives the ABS module a speed discrepancy between wheels that looks exactly like a bad sensor. It can trigger fault codes even on a car with a perfectly healthy sensor. Make sure all four tires match in size and have proper inflation before you start replacing parts.