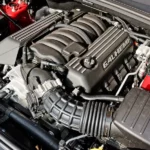
Your car’s AC just stopped working, and the compressor clutch isn’t spinning. That’s frustrating — especially in the middle of summer. The good news? This problem usually has a clear cause. This guide walks you through every reason your AC compressor clutch isn’t engaging, how to diagnose it yourself, and what a real fix looks like.
What the AC Compressor Clutch Actually Does
Before you start pulling fuses, it helps to understand what you’re dealing with.
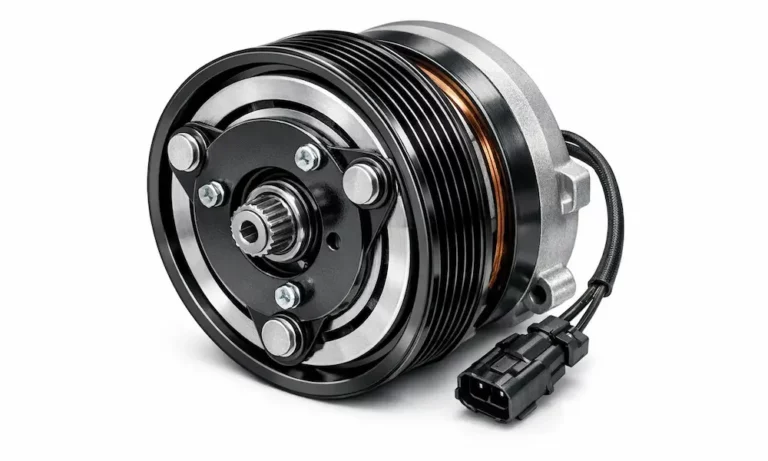
The compressor clutch is a three-part electromagnetic assembly: a pulley, a field coil, and a clutch plate. The pulley spins constantly when the engine runs, driven by the serpentine belt. The clutch plate connects directly to the compressor shaft. When you switch on the AC, electricity flows to the field coil, which creates a magnetic field that pulls the clutch plate into the spinning pulley. That mechanical connection is what drives the compressor.
No engagement = no refrigerant circulation = hot, miserable cabin.
The Most Common Reasons the AC Compressor Clutch Won’t Engage
There’s no single answer here. The AC compressor clutch not engaging can trace back to mechanical wear, electrical faults, refrigerant pressure problems, or the engine computer intentionally shutting things down. Let’s break each one down.
The Air Gap Is Too Wide
The air gap is the tiny physical space between the clutch plate and the pulley face when the AC is off. It sounds minor, but it’s critical.
The correct gap sits between 0.4 mm and 0.8 mm. After thousands of engagement cycles, the friction material wears down and that gap slowly grows. Once the gap gets too wide, the magnetic field from the coil can’t generate enough pull to snap the plate into contact.
Signs of an excessive air gap:
- You hear a faint click but the clutch doesn’t spin
- The clutch engages when the car is cold but drops out when hot
- Fine rust-colored dust around the front of the compressor
The fix involves removing the clutch plate and adding precision shims to bring the gap back into spec. Skipping this step on a new clutch is one of the most common DIY mistakes — and it causes premature failure.
A Blown Fuse or Bad Relay
This is the first place to check. It’s simple, fast, and free to diagnose.
Every AC compressor clutch circuit runs through a dedicated fuse and relay. The relay acts as a high-current switch so your car’s computer doesn’t have to handle the electrical load directly.
| Component | What It Does | How to Test It |
|---|---|---|
| Fuse | Protects the circuit from overload | Visual check + continuity test |
| Relay | Switches power to the clutch coil | Swap with identical relay, listen for click |
| Relay contacts | Carry current to the compressor | Measure voltage at relay output terminal |
A blown fuse almost always means something caused an overload — a short in the wiring, a failing coil, or a seized compressor. Replace the fuse, but find the root cause before the new one blows too.
If the relay clicks but the clutch still doesn’t engage, the internal switch contacts are likely burnt. Swap the relay with an identical one from another circuit in the fuse box and retest.
Low Refrigerant — The System Is Protecting Itself
Here’s one people often miss. If your refrigerant level drops too low due to a leak, the system won’t let the compressor run at all.
The low-pressure switch on the suction side of the system monitors refrigerant pressure constantly. If pressure drops below roughly 30 PSI, the switch opens the circuit and cuts power to the clutch. This isn’t a malfunction — it’s intentional protection. Running the compressor without enough refrigerant means no lubricating oil circulates, and the compressor seizes within minutes.
Suction side pressure under 33 PSI? The compressor stays off — period.
You’ll need a manifold gauge set to check this. If pressure is low, there’s a leak somewhere in the system. Simply recharging without finding and fixing the leak is a temporary fix at best.
A Faulty Electromagnetic Coil
The field coil is an electromagnetic winding mounted to the compressor body. It’s what creates the magnetic pull that snaps the clutch plate in. When the coil fails, the clutch gets no signal at all — even if every other part of the circuit works perfectly.
You can test the coil yourself with a multimeter set to resistance (ohms):
- Unplug the electrical connector at the compressor
- Measure resistance across the coil terminals
- A healthy coil reads 3.0 to 5.0 ohms
- Infinity = open circuit (broken wire inside the coil)
- Near zero = internal short
A shorted coil will also blow the circuit fuse repeatedly. If you keep replacing fuses and they keep blowing, the coil is the prime suspect.
The good news: you can often replace just the coil without touching the refrigerant lines.
The Engine Computer Is Blocking Engagement
Modern vehicles give the powertrain control module (PCM) full authority over the AC compressor. The computer doesn’t just flip a switch — it constantly decides whether conditions are safe enough to run the compressor.
Several scenarios cause the PCM to intentionally keep the AC compressor clutch from engaging:
Engine overheating: The condenser sits right in front of the radiator. If the engine is already running hot, adding AC load makes things worse. The PCM monitors coolant temperature and shuts off the clutch when temps get too high. You may see an “Engine Hot, AC Off” message on the dash.
Wide-open throttle: Stomp the accelerator and the computer temporarily drops the clutch to free up horsepower for acceleration. This is normal behavior — the clutch re-engages once you back off the throttle.
Cold ambient temperatures: Below approximately 40°F, the system locks out the compressor entirely. Cold refrigerant exists partly as a liquid. Compressing liquid destroys the compressor valves instantly.
Very high RPM: At extreme engine speeds, the PCM disengages the clutch to stay within the compressor’s mechanical design limits.
If you suspect the computer is blocking engagement, a scan tool that reads live data is the fastest way to check. Look for “AC Request” and “AC Enable” status in the data stream. If the request shows active but the enable doesn’t, the PCM is seeing a sensor value it doesn’t like.
OBD-II Codes That Point Directly at the Clutch Circuit
If your check engine light is on, these codes tell you exactly where to look:
| Code | What It Means | Likely Cause |
|---|---|---|
| P0645 | AC Clutch Relay Control Circuit | Wiring fault in relay trigger circuit |
| P0646 | Relay Control Circuit Low | Short to ground in control wiring |
| P0647 | Relay Control Circuit High | Short to voltage in control wiring |
| P0532 | Pressure Sensor Circuit Low | System is empty or sensor has failed |
Code P0645 is one of the most common. It means the PCM is sending a signal to the relay but not seeing the expected response back. That points to relay wiring, the relay itself, or a ground issue.
How to Diagnose an AC Compressor Clutch Not Engaging — Step by Step
Don’t randomly replace parts. Work through this in order and you’ll find the fault without wasting money.
Step 1: Visual check with the engine off
Look at the serpentine belt. Is it cracked, glazed, or loose? A slipping belt won’t turn the pulley. Check around the front of the compressor for rust-colored dust (clutch wear) or oil staining (shaft seal leak).
Step 2: Watch the clutch with the engine running
Set the AC to max cold. Watch the front of the compressor. Is the outer pulley spinning? If the pulley spins but the center hub stays still, the clutch isn’t engaging. That’s your confirmation.
Step 3: Check the fuse
Find the AC compressor fuse in your fuse box diagram. Pull it and check visually. Confirm with a test light or multimeter.
Step 4: Test voltage at the compressor connector
Unplug the connector at the compressor. With the AC on and engine running, probe the connector with a multimeter. You want to see 12 to 14 volts.
- 12-14V present? The car’s control system is working. The fault is the coil or the air gap.
- No voltage? The fault is upstream — relay, fuse, wiring, or the PCM is blocking the signal.
Step 5: Measure coil resistance
With power off, measure resistance across the coil terminals. 3–5 ohms is healthy. Anything outside that range means replace the coil.
Step 6: Connect a scan tool
If voltage is missing, connect a diagnostic scan tool and check live data. Look at pressure sensor readings, coolant temperature, and AC enable/disable status. The computer will tell you exactly what it’s reacting to.
What It Costs to Fix
Repair costs vary a lot depending on the root cause:
- Blown fuse: Under $5, DIY in minutes
- Bad relay: $10–$30, easy swap
- Clutch coil replacement: $50–$150 in parts, plus 1–2 hours labor
- Full clutch kit (plate, pulley, coil): $80–$200 in parts
- Complete compressor replacement: $300–$900 depending on vehicle
- Refrigerant recharge + leak fix: $150–$400 at a shop
If the compressor itself has seized internally, replace the whole assembly. A seized compressor also sends metal debris through the system — you’ll need to flush the lines and replace the receiver-drier too.
Maintenance That Prevents AC Compressor Clutch Failure
A few simple habits keep this problem from coming back:
- Run the AC for at least 10 minutes monthly, even in winter. This keeps the seals lubricated and the refrigerant circulating.
- Replace your cabin air filter on schedule. A clogged filter restricts airflow, causes the evaporator to freeze, and forces the PCM to cut the clutch repeatedly.
- Inspect the serpentine belt annually. A glazed or cracked belt slips under AC load and stresses the clutch plate.
- Don’t ignore small refrigerant leaks. A slow leak eventually drops system pressure low enough to trigger the low-pressure cutout — and running low on refrigerant destroys compressors.
The AC compressor clutch not engaging is almost never one single thing going wrong in isolation. It’s usually a chain of events — a slow leak leads to low pressure, which triggers a safety lockout, which looks exactly like an electrical failure. Work through the diagnosis methodically and you’ll find the real problem every time.