Your AC stops blowing cold air, and you’re not sure if the whole compressor is shot or just the clutch. Good news — it might be a simpler fix than you think. This guide walks you through everything about AC compressor clutch replacement: how to spot a failing clutch, how to test it, and exactly how to replace it step by step. Read to the end before you start wrenching.
What Does the AC Compressor Clutch Actually Do?
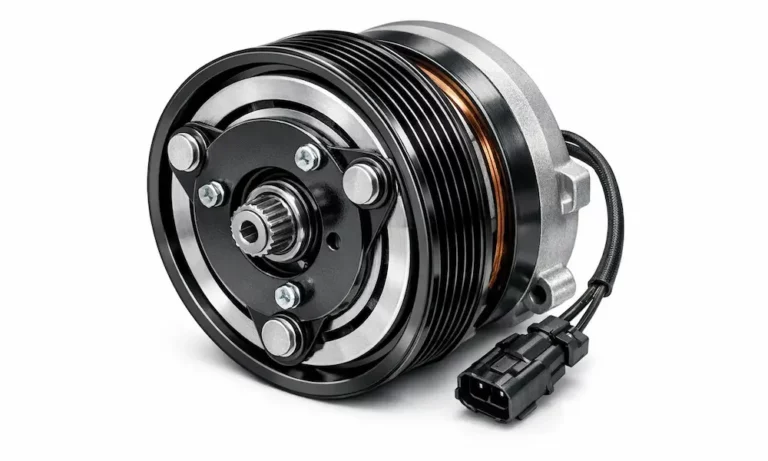
The clutch is the gatekeeper between your engine and your AC compressor. It lets the compressor spin when you need cold air and disconnect when you don’t. That saves fuel and reduces engine wear.
Three parts make this happen:
- Field coil — a stationary electromagnet mounted to the compressor body
- Pulley (rotor) — spins constantly with the serpentine belt, even when the AC is off
- Armature plate (hub) — connects directly to the compressor shaft
When you hit the AC button, a 12-volt signal energizes the field coil. It creates a magnetic field that pulls the armature plate across a tiny gap — usually less than 1mm — and locks it to the spinning pulley. The compressor fires up in a fraction of a second.
When the AC turns off, the plate springs back, the compressor disconnects, and the pulley just freewheels. Simple in theory. Finicky in practice.
Signs You Need an AC Compressor Clutch Replacement
Don’t replace the whole compressor until you’ve ruled out the clutch. Here’s what a failing AC compressor clutch looks like:
Warm air after 15–20 minutes of driving
The field coil heats up as the engine runs. If it’s already weak, rising temperatures push it past its limit. It can’t pull the armature in anymore, so the clutch drops out. Intermittent cooling that gets worse with engine heat is a classic coil failure pattern.
Grinding or screeching when the AC kicks on
A noise that starts with the AC points to glazed friction surfaces or an incorrect air gap. The clutch slips instead of fully locking, which generates intense heat and that awful metal-on-metal sound.
Noise that stops when the AC turns on
This is the opposite scenario — and it points to a failing pulley bearing. The bearing whines under constant load, but when the clutch engages, the armature and pulley lock together and the relative motion stops. The bearing noise disappears — temporarily.
The clutch isn’t engaging at all
No click, no cold air, no engagement. Could be a blown fuse, a bad relay, a dead coil, or an air gap that’s grown too wide for the magnetic field to bridge. Diagnose before you replace anything.
Visual red flags
- Fine orange or black powder around the front of the compressor (friction material wearing fast)
- Burn marks or scorched metal on the clutch plate
- Black rubber residue sprayed around the compressor nose (melted dampeners)
- Oil on the clutch face (failed shaft seal — oil destroys friction surfaces)
| Symptom | Probable Cause | What’s Happening |
|---|---|---|
| Screeching on engagement | Glazed surfaces or wide air gap | Clutch slips before locking, creating heat |
| Constant grinding | Failed pulley bearing | Races are pitted — risks snapping the serpentine belt |
| No engagement with power | Weak coil or excessive air gap | Magnetic field can’t bridge the distance to the hub |
| Rapid on/off cycling | Low refrigerant or bad pressure switch | System protecting itself from low oil return |
| Oil on clutch face | Failed compressor shaft seal | Friction surfaces contaminated — engagement impossible |
Diagnose First — Don’t Skip This Step
Jumping straight to parts replacement wastes money. Run through these checks first.
Check the Fuse and Relay
Start at the fuse box. A blown AC clutch fuse usually means a short in the field coil or a seized compressor that overloaded the circuit. If the fuse is fine, test the clutch relay. You can bridge the relay socket to bypass it temporarily — if the clutch engages, the relay is your problem, not the clutch.
Test the Field Coil’s Resistance
Unplug the electrical connector at the compressor. Set your multimeter to resistance (ohms). A healthy field coil reads between 3 and 5 ohms. Higher than spec means heat damage or an internal open circuit. Zero ohms means a dead short. Either way, the coil is bad.
Check the Ground Connection
Many compressors ground through their mounting bolts to the engine block. Corroded bolts or a broken ground strap breaks the circuit. No complete circuit, no engagement. Test for ground with your multimeter — it’s a five-second check that saves hours of unnecessary disassembly.
Measure the Air Gap
Grab your feeler gauges. Slide them into the gap between the armature plate and the rotor. The target is 0.35mm to 0.60mm — roughly the thickness of a business card. Wider than 0.8mm and the magnetic field likely can’t pull the hub in. This is a common failure point on higher-mileage vehicles where friction surfaces have worn down over years of use.
Don’t Overlook the Pressure Switch
A low refrigerant level triggers the low-pressure cutout switch, which opens the circuit to the clutch relay. The compressor stops running as a safety measure — no refrigerant means no lubrication oil circulating through the system. If your vehicle has a slow refrigerant leak, this looks exactly like a clutch failure. Check system pressure before condemning the clutch.
Tools You Need for AC Compressor Clutch Replacement
Don’t skip the specialty tools. Trying to pry off the armature hub with a screwdriver bends the plate or snaps the compressor’s input shaft. Neither outcome is fun.
| Tool | What It Does | Risk If You Skip It |
|---|---|---|
| Clutch holding tool | Holds the hub still while you remove the center bolt | Stripped bolt heads or damaged compressor internals |
| Hub puller/installer set | Draws the hub off the shaft without force | Warped armature plates or broken input shafts |
| Snap ring pliers | Removes and installs the retaining rings | Broken rings or damaged retention grooves |
| Feeler gauges | Measures the air gap for shimming | Incorrect gap — clutch slips or drags immediately |
| Multimeter | Tests coil resistance and circuit continuity | Misdiagnosis — replacing mechanical parts when the issue is electrical |
| Torque wrench | Torques center bolt and fasteners to spec | Loose or over-torqued hardware causes immediate re-failure |
How to Replace an AC Compressor Clutch
Step 1: Prep the Vehicle
Disconnect the negative battery terminal. On many vehicles, you’ll need to pull the front right wheel and remove the inner fender liner to reach the compressor comfortably. Don’t try to work blind in a tight engine bay — you’ll regret it.
Step 2: Remove the Serpentine Belt
Use a wrench or belt tool on the tensioner pulley to release tension. Slide the belt off the AC pulley and set it aside. Inspect it while you’re here — a glazed or cracked belt should be replaced at the same time.
Step 3: Remove the Center Bolt
Attach the clutch holding tool to keep the armature hub from spinning. Break the center bolt loose — it often has thread-locking compound, so firm steady pressure is the move here. Set the bolt aside along with any washers.
Step 4: Pull the Armature Hub
Thread the hub puller into the armature plate. Turn the puller’s center bolt against the compressor shaft to draw the hub off the splines. Catch the shims — those small metal washers sitting between the hub and the compressor nose are critical for setting the air gap during reinstallation. Don’t lose them.
Step 5: Remove the Pulley
Use snap ring pliers to remove the large retaining ring holding the pulley in place. Slide the pulley off the compressor nose. If it’s stuck from rust, a two-jaw puller works — just don’t mar the friction face.
Step 6: Remove the Field Coil
Remove the smaller snap ring holding the coil. Disconnect the electrical lead and any ground wires or clips. Lift the coil off the compressor body.
Step 7: Inspect the Compressor Nose
Look at the cylindrical projection the pulley rides on. Scoring or a change in diameter means the old bearing failure damaged the housing. A damaged nose prevents the new bearing from seating correctly — and your new clutch will fail fast.
Installing the New Clutch Components
Install the Field Coil First
Clean the compressor nose of all dirt, grease, and corrosion. Align the coil’s locator pin with the hole on the compressor face. Seat the coil and secure it with its snap ring. Install snap rings with the beveled edge facing outward — that’s the position that resists the ring being pushed out by vibration.
Install the Pulley
Slide the pulley onto the compressor nose. If it needs a nudge, tap only on the inner bearing race using a wooden block or plastic mallet. Never pound the outer diameter — you’ll damage the bearing. Secure with the snap ring and spin it by hand. It should rotate smoothly and quietly.
Install the Armature Hub and Set the Air Gap
This is the most important step in the whole job — don’t rush it.
Place your original shims on the compressor shaft. Push the hub onto the splines, install the center bolt, and torque it to spec. Typical torque values vary by manufacturer:
| Compressor Type | Center Bolt Torque | Target Air Gap |
|---|---|---|
| Sanden (rotary) | 19 N·m (14 ft-lbs) | 0.35 – 0.60 mm |
| Visteon style | 15 N·m (11 ft-lbs) | 0.35 – 0.75 mm |
| Toyota / Denso | 18 N·m (13 ft-lbs) | 0.35 – 0.60 mm |
| Honda compact | 14–16 N·m (10–12 ft-lbs) | 0.35 – 0.65 mm |
| Ford full-size truck | 18–22 N·m (13–16 ft-lbs) | 0.45 – 0.80 mm |
After torquing, measure the air gap at four or five points around the clutch face with your feeler gauges. If it’s outside the spec, remove the hub and adjust shims:
- Gap too wide → remove a shim (bring the hub closer to the rotor)
- Gap too narrow → add a shim (prevent dragging when the AC is off)
Shims typically come in 0.1mm, 0.3mm, and 0.5mm sizes. It’s a bit iterative, but skipping this step is the number-one reason freshly replaced clutches fail early.
A gap that’s too wide causes slipping under load — the magnetic force is weakest over distance. A gap that’s too narrow causes constant dragging — which wastes fuel, generates heat, and can cook the compressor’s internal seals.
Manufacturer Differences Worth Knowing
Not every clutch comes apart the same way. Here’s what to know before you start:
Visteon compressors have a trick worth knowing. On many models, you can remove the hub by threading an 8×1.25mm bolt into the center of the hub — it presses against the shaft and pops the hub off without a separate puller tool.
Denso compressors often use a dedicated ground wire for the field coil rather than grounding through the engine block. If you don’t reconnect that wire properly, the clutch won’t complete its circuit and won’t engage.
Sanden compressors use different groove patterns on their pulleys. A single-groove pulley can’t swap with a double-groove version without throwing off the alignment of the entire accessory drive.
Toyota applications have specific stator locator pins that must line up exactly during installation. Miss the pin and the coil can rotate, which damages the wiring lead.
Keep Your New Clutch Healthy
A few habits extend clutch life significantly:
- Run your AC for a few minutes once a week, even in winter. It keeps the shaft seal lubricated and prevents rust from forming on the friction surfaces.
- Inspect your serpentine belt regularly. A glazed or loose belt slips against the pulley and transfers heat directly to the bearing.
- Use quality parts. Universal-fit clutches often don’t match the original coil resistance spec, which can blow fuses or damage relays. OEM-equivalent parts give you a precise air gap fit and the correct electrical characteristics.
- Keep the compressor area clean. Road salt, oil leaks, and mud contaminate friction surfaces and reduce clutch grip. If you’re in a coastal or salt-heavy region, this matters even more.
Your AC compressor clutch replacement doesn’t have to be a mystery. Diagnose the circuit first, use the right tools, set the air gap carefully, and torque everything to spec. Do it right once, and you won’t be doing it again anytime soon.