Your car’s sluggish, guzzling gas, and the check engine light is staring you down. A dirty mass air flow sensor might be the culprit — and cleaning it could fix everything in under an hour. Read on to find out exactly how to do it right without destroying a part that costs $100–$300 to replace.
What Does a Mass Air Flow Sensor Actually Do?
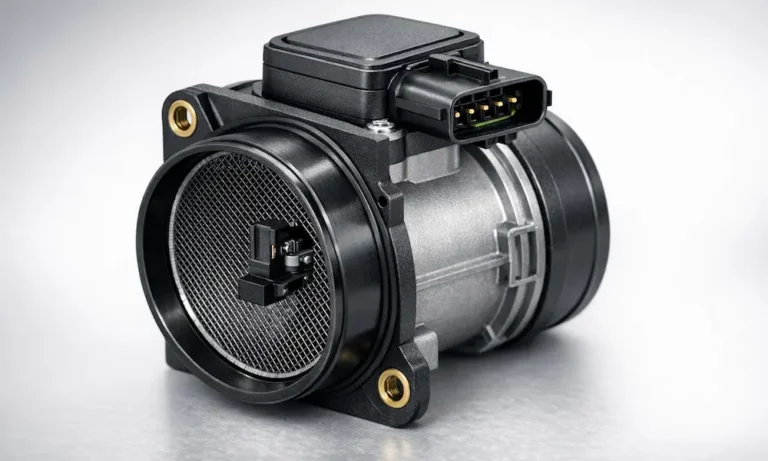
Your engine needs a precise mix of air and fuel to run. The mass air flow (MAF) sensor measures exactly how much air enters the engine so the computer can match it with the right amount of fuel.
It doesn’t just measure volume — it measures the mass of air. That matters because air density changes with altitude, temperature, and humidity. A sensor that measures mass gives your engine computer an accurate read no matter where you’re driving.
When that sensor gets dirty, the whole calculation goes wrong.
Signs Your MAF Sensor Needs Cleaning
A contaminated MAF sensor doesn’t always trigger a check engine light right away. Instead, it gives you a slow drip of annoying symptoms that get worse over time.
Watch for these common signs of a failing MAF sensor:
- Rough idle — engine shakes or hunts at stoplights
- Hesitation on acceleration — a “stumble” when you press the gas
- Poor fuel economy — you’re filling up more than usual
- Black exhaust smoke — engine is running too rich
- Hard starts — long cranking, especially in cold weather
- Check engine light — often codes P0101, P0171, or P0174
The symptoms hit hardest at low speeds and light throttle, when even a small sensor error throws off the whole fuel calculation.
| Symptom | What’s Happening | Long-Term Risk |
|---|---|---|
| Rough idle | Engine can’t hold steady fuel mix | Strain on engine mounts |
| Hesitation during acceleration | Lean fuel mix causes flat spots | Knocking, piston damage |
| Black smoke from exhaust | Over-rich mixture | Fouled spark plugs |
| Poor fuel economy | Computer compensating for bad data | Catalytic converter failure |
| Long crank times | Incorrect air/fuel starting ratio | Battery and starter wear |
What Causes a MAF Sensor to Get Dirty?
The MAF sensor sits between your air filter and throttle body — right in the path of everything coming into your engine. Over time, two things coat the sensing wire:
- Dust and pollen that sneak past the air filter
- Oil vapor from the crankcase ventilation system
Oil vapor is the real troublemaker. It sticks to the sensing wire and acts as an insulator, slowing heat transfer and making the sensor under-report airflow. The engine computer then delivers too little fuel, causing a lean condition.
If you run an aftermarket oiled air filter, over-oiling it is a fast track to a contaminated MAF sensor. Always follow the manufacturer’s re-oiling instructions exactly.
What You Need Before You Start
Getting this right comes down to using the correct cleaner. Don’t improvise here.
Use only: Specialized MAF sensor cleaner — it’s fast-evaporating, leaves zero residue, and won’t attack plastic housings.
Never use:
- Brake cleaner
- Carburetor cleaner
- Throttle body cleaner
- WD-40
These products leave a film on the sensing wire or contain lubricants that make contamination worse. The propellants in some of these can also snap the platinum sensing wire, which is thinner than a human hair.
Full supply list:
| Item | Why You Need It |
|---|---|
| MAF sensor cleaner (aerosol) | Only safe cleaning agent for sensing elements |
| Nitrile gloves | Prevent skin oil transfer to the sensor |
| Safety goggles | Protect against aerosol splash-back |
| Lint-free shop towels | Surface protection and runoff management |
| Magnetic parts tray | Keeps small screws from rolling away |
| Phillips or Torx screwdriver | Removes sensor mounting screws |
How to Clean a Mass Air Flow Sensor: Step-by-Step
Step 1: Let the Engine Cool Completely
Cold spray on a hot sensor can cause thermal shock and crack the ceramic components. Wait until the engine is cool to the touch — or work on it the morning after your last drive.
Step 2: Disconnect the Battery (Optional but Smart)
Removing power from the sensor before you touch anything prevents accidental shorts. It also starts the adaptive memory reset you’ll need later.
Step 3: Take a Photo Before You Remove Anything
Snap a quick photo of the intake assembly. You’ll thank yourself when you’re reassembling and can’t remember which way the sensor faced or how the hose clamps sat.
Step 4: Unplug the Electrical Connector
Most MAF connectors use a push-tab or lift-tab release. Apply firm, steady pressure — don’t yank. These plastic tabs get brittle from heat cycles, and a broken connector tab is an annoying fix.
Step 5: Remove the Sensor
Loosen the mounting screws (usually Phillips or Torx security bits) and slide the sensor out of the intake duct. Drop the screws straight into your magnetic tray.
Step 6: Inspect Before Cleaning
Hold the sensor up to the light. Look for a visible film of oil or dust on the sensing wire. If you see a crack in the wire or visible physical damage, cleaning won’t fix it — you’ll need a replacement.
Step 7: Spray the Sensing Element
Place the sensor on a clean, lint-free towel on a stable surface. Hold the aerosol can 4–6 inches away from the sensing wire. Apply 10–15 short bursts directly at the wire and surrounding housing.
Let the cleaner drench the element. The goal is to dissolve contaminants so they run off with the solvent — not to scrub them.
Critical rule: Never touch the sensing wire with your fingers, a swab, a brush, or any tool. One touch can break it.
Step 8: Clean the Electrical Connector
Spray a few short bursts into the connector terminals too. Oxidation on the pins causes signal errors just like contamination on the wire.
Step 9: Air Dry for at Least 30–60 Minutes
This step gets rushed more than any other. The solvent needs time to fully evaporate — including from inside the sensor housing. Set a timer and walk away.
Don’t use:
- Compressed air (breaks the wire)
- Hair dryer or heat gun (damages circuitry)
Just wait.
Step 10: Reinstall the Sensor
Slide the sensor back into position. Tighten the mounting screws snugly — not tight. The housing is plastic and cracks easily. Reconnect the electrical harness until it clicks.
How to Verify It Worked
Before you declare victory, confirm the cleaning actually made a difference. A scan tool showing live data is the best way to do this.
At warm idle, the airflow reading in grams per second should roughly match your engine’s displacement in liters. A 2.0L engine should show around 2 g/s at idle. At 2,500 RPM, expect 15–25 g/s depending on the engine.
Quick check without a scan tool: Start the car and let it idle. If the idle is noticeably smoother and the stumble on acceleration is gone, you’re on the right track.
| OBD-II Code | What It Means | MAF Related? |
|---|---|---|
| P0101 | Range/Performance Problem | Yes — often dirty sensor |
| P0102 | Low Input Signal | Possibly — broken wire or air leak |
| P0171 / P0174 | System Too Lean (Bank 1 or 2) | Yes — sensor under-reporting |
| P0172 / P0175 | System Too Rich | Less common for dirt |
Reset the ECU After Cleaning
Here’s a step most DIYers skip — and it matters. Your engine computer has been adjusting fuel delivery for months to compensate for the dirty sensor. After cleaning, it’ll keep applying those old corrections unless you clear them.
The fastest fix: clear the codes with an OBD-II scan tool or reset adaptive values through the tool’s menu.
No scanner? Disconnect the negative battery terminal for 15–30 minutes. This clears the computer’s volatile memory and forces it back to factory defaults on the next start.
Note: A battery disconnect may reset your radio presets and clock. Some vehicles also need a power window or sunroof re-learn after this.
After the reset:
- Start the engine and idle for 5–10 minutes without touching the throttle
- Take a 10–15 mile test drive with a mix of city and highway driving
- The computer remaps the new signal and recalibrates fuel delivery
| Reset Method | How to Do It | Trade-Off |
|---|---|---|
| Scan tool | Clear codes via OBD-II port | Most precise, keeps other settings |
| Battery disconnect | Remove negative cable 15–30 min | Free, but resets radio/clock |
| ECM fuse removal | Pull the ECU fuse for 15 min | Targeted, avoids some setting loss |
| Drive cycle | 50–75 miles of normal driving | No tools needed, just takes time |
How to Keep Your MAF Sensor Clean
Cleaning your MAF sensor fixes today’s problem. These habits prevent the next one.
Replace your air filter regularly. Check it at every oil change. Replace it every 12,000–15,000 miles or sooner if it looks dirty. A clogged filter lets more debris reach the sensor.
Vacuum out the airbox when you change the filter. Loose dust sitting in the box gets sucked straight past a fresh filter.
Don’t over-oil performance air filters. If you run an oiled cotton gauze filter, follow the manufacturer’s instructions exactly. Let it sit for several hours before starting the engine so the oil fully absorbs into the media.
Inspect the intake boot. Any crack between the MAF sensor and the engine lets in unmetered air — air the computer doesn’t know about. Check the accordion folds of the rubber duct for cracks every time you’re under the hood. Tighten all hose clamps while you’re at it.
Clean the MAF sensor at every air filter change. It takes 10 minutes and a few sprays of cleaner. Building it into your regular schedule prevents minor buildup from becoming a major problem.
A $10 can of MAF cleaner used twice a year beats a $200+ sensor replacement every time.