Your ABS light just came on, and now you’re wondering if you can fix it yourself or if you’re about to drain your bank account at a shop. The good news? Anti-lock brake sensor replacement is one of the more approachable DIY repairs — if you know what you’re dealing with. This guide walks you through symptoms, diagnostics, costs, and the full replacement process.
What Does an ABS Sensor Actually Do?
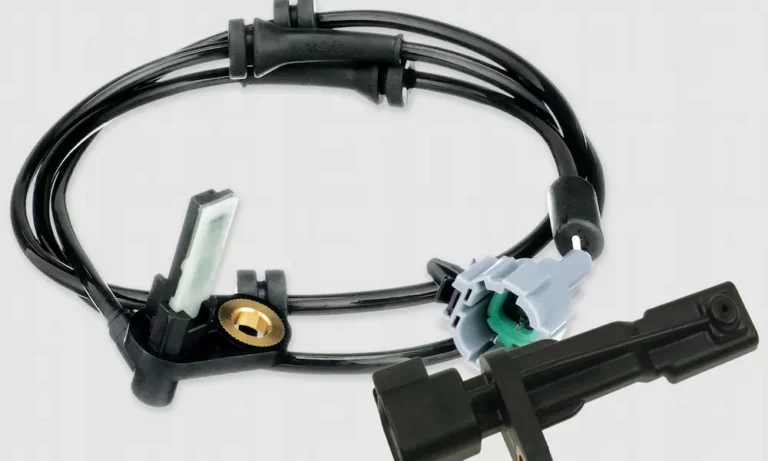
Your ABS sensor (also called a wheel speed sensor) sits at each wheel hub and feeds real-time speed data to your car’s ABS control module. When you brake hard, the module uses that data to prevent wheels from locking up, which keeps you steering while stopping.
But the sensor doesn’t just serve your ABS. It also feeds data to:
- Traction control (TCS)
- Electronic stability control (ESC)
- Electronic brakeforce distribution (EBD)
- Transmission shift-point logic
- Navigation dead-reckoning (when GPS drops out)
Modern four-channel ABS systems place an independent sensor at every wheel, so one bad sensor can take down multiple safety systems at once.
Two Types of ABS Sensors — And Why It Matters
Before you buy a replacement part, you need to know which type of sensor your car uses. Installing the wrong one will leave the ABS light on regardless.
| Feature | Passive (Variable Reluctance) | Active (Hall Effect) |
|---|---|---|
| Power Source | Self-generating (no external power) | Requires 5V–12V from ECU |
| Signal Output | Analog sine wave (AC) | Digital square wave |
| Target Type | Toothed ferrous tone ring | Magnetic multipolar encoder |
| Low-Speed Performance | Poor — signal fades near 0 mph | Excellent — reads down to 0 mph |
| Common Wiring | 2-wire | 2 or 3-wire |
Most vehicles built after the mid-2000s use active Hall Effect sensors. These produce a steady digital signal at any speed, which makes them essential for hill-hold assist and low-speed collision avoidance. Older vehicles or heavy trucks often use passive sensors that generate their own AC voltage from a spinning toothed ring.
Check your wiring connector before ordering — a 2-wire connector on an older vehicle likely means passive; 3-wire almost always means active.
Warning Signs Your ABS Sensor Is Failing
Don’t wait for a full failure. These are the most common symptoms that signal it’s time to look at your wheel speed sensors:
- ABS warning light on the dash
- Traction control or stability control light illuminated
- ABS activating during normal dry-road stops (a clear sign something’s wrong)
- Speedometer behaving erratically on some platforms
- Hesitation or rough shifts in automatic transmissions that rely on wheel speed data
The NAPA Know-How blog notes that a single faulty sensor can trigger multiple warning lights simultaneously, which often leads drivers to misdiagnose the problem as something far more expensive.
Why ABS Sensors Fail: The Main Culprits
ABS sensors live in one of the worst spots on your vehicle — right next to the wheel, exposed to heat, road salt, brake dust, and constant vibration. Here’s what actually kills them:
Brake dust contamination — The magnetic tip of an active sensor acts like a magnet for metallic brake dust. Enough buildup creates a “shunt” that distorts the signal below the module’s detection threshold.
Wiring harness fatigue — The harness flexes every time your suspension moves. Over years and thousands of cycles, the copper strands inside can fracture. This often shows up as an intermittent fault that only appears during sharp turns or rough roads when the harness stretches fully.
Thermal cracking — The plastic sensor housing sits close to brake calipers. Heat cycles make the plastic brittle, it cracks, moisture gets in, and the sensing electronics corrode.
Worn wheel bearings — A bearing with excessive play causes the tone ring to wobble. The fluctuating air gap between the sensor and ring creates signal noise that the ABS module reads as a fault. In extreme cases, the ring physically contacts the sensor and destroys it.
“Rust jacking” on tone rings — In the rust belt or coastal areas, iron oxide builds up between the tone ring and the axle. Since rust takes up more volume than steel, it expands and eventually cracks the ring. A cracked tone ring sends a “dead spot” signal once per revolution, causing the ABS to activate incorrectly during normal braking — a genuinely dangerous situation that extends stopping distances.
Reading the Diagnostic Trouble Codes First
Before you pull anything apart, connect a scan tool and read the fault codes. Standard OBD-II readers grab engine codes (P-codes), but ABS diagnostics need a tool that accesses the chassis network (C-codes).
Here are the most common codes you’ll encounter:
| DTC | Description | Likely Cause |
|---|---|---|
| C0035 | Left front wheel speed sensor | Sensor, wiring, or connector |
| C0040 | Right front wheel speed sensor | Sensor, wiring, or connector |
| C0045 | Left rear wheel speed sensor | Sensor, wiring, or connector |
| C0050 | Right rear wheel speed sensor | Sensor, wiring, or connector |
| C1000 | Wheel speed sensor 1 general failure | Electrical harness break |
| P215C | Output shaft speed correlation | Signal mismatch between transmission and wheel |
A code that says “short to ground” or “open circuit” points to an electrical failure in the sensor or harness. A code saying “signal erratic” or “invalid signal” usually means mechanical trouble — a damaged tone ring, debris buildup, or a worn wheel bearing.
That distinction matters. Don’t replace a sensor when the real problem is a cracked tone ring or a loose bearing.
Testing the Sensor Before You Replace It
Don’t spend money on a new sensor until you’ve confirmed it’s actually dead. Grab a digital multimeter and run these tests:
For passive sensors:
- Disconnect the sensor and measure resistance between both pins. A healthy coil reads roughly 1,000–2,500 ohms. Zero ohms means a short; “OL” means an open winding.
- Set the multimeter to AC voltage, spin the wheel by hand, and confirm you get a measurable AC signal. No signal means the sensor or tone ring has failed.
For both types:
- Check that neither pin shows continuity to the sensor’s metal body. Any measurable resistance to ground means an internal short.
- With the ignition on, check for reference voltage on the harness side of the connector to confirm the ABS module is powering the circuit correctly. If there’s no reference voltage, the problem may be upstream of the sensor entirely.
This detailed testing guide from Ersa Electronics walks through the full multimeter procedure with expected values for both sensor types.
Anti-Lock Brake Sensor Replacement: Step-by-Step
Once you’ve confirmed the sensor is bad, here’s how to replace it properly.
Tools you’ll need:
- Socket set (8mm, 10mm, 12mm)
- Torque wrench
- Penetrating oil (Kroil or PB Blaster)
- Wire brush or sandpaper
- Anti-seize compound
- Scan tool with live data capability
The process:
- Stabilize the vehicle on jack stands — never work under a car supported only by a floor jack. Disconnect the battery before starting.
- Remove the wheel to expose the hub assembly. Note how the sensor harness routes through the suspension — you’ll need to replicate this exactly.
- Soak the retaining bolt with penetrating oil and let it sit for several minutes. These bolts live in a high-heat environment and snap easily if you rush them.
- Remove the sensor carefully — typically one 10mm or 12mm bolt holds it. Rock the sensor gently to break the rust bond. Yanking straight out often leaves the tip behind in the bore.
- Clean the mounting bore thoroughly with a wire brush. A dirty bore prevents the new sensor from seating flush, which increases the air gap and causes signal errors.
- Apply a thin coat of anti-seize to the sensor body — not the sensing tip. This prevents the same seized-sensor nightmare when you need to pull it again in five years.
- Torque the retaining bolt to spec. Don’t guess on this. Subarus, for example, use a very low torque spec, and over-tightening cracks the plastic mounting ear.
- Route the new harness exactly like the original. Incorrect routing leads to wires getting pinched during steering or contacting rotating components. The CarParts.com replacement guide emphasizes this step as one of the most common post-installation failure points.
What to Do When the Sensor Is Seized
In rust-prone regions, the sensor often fuses to the knuckle. The plastic head snaps off when you try to remove it, leaving the body stuck in the bore. Here’s how to handle it:
Screw extraction method — Drill a small pilot hole into the center of the stuck plastic body. Drive a large self-tapping screw into the hole, then lever against the screw head with a pry bar to pull the sensor body out mechanically.
Thermal cycling — A heat gun softens the plastic and the surrounding metal expands slightly, which can break the rust bond. Keep heat away from rubber brake lines and bearing seals. On steel knuckles only, some technicians use a torch followed by rapid cooling with water to shock the rust loose. Never use a torch on aluminum knuckles — it permanently alters the metal’s strength.
Drilling out — Last resort. Drill out the sensor body carefully, avoiding the tone ring or encoder ring just millimeters beneath the sensor seat. Go slow and stay centered.
For stubborn fasteners and seized sensors, Kroil penetrating oil consistently outperforms standard WD-40, which lacks the viscosity to penetrate deep into corroded bores. A 50/50 mix of acetone and automatic transmission fluid is the top DIY alternative — cheap and genuinely effective.
Inspect the Tone Ring While You’re In There
Since you’ve already got the wheel off, inspect the tone ring. Rotate the hub slowly and look for:
- Cracked or missing teeth
- Heavy rust buildup between teeth
- Any sections where teeth look deformed or smeared
If the ring is dirty but intact, clean it with a brass wire brush and brake cleaner. Brass is specified because steel brushes leave metallic fragments that the magnetic sensor will pick up as interference.
On modern vehicles, the encoder ring is built into the wheel bearing seal. If it’s contaminated with metallic debris or has lost its magnetism, the whole bearing assembly must be replaced — the ring isn’t sold separately.
After Replacement: Calibration and Live Data Validation
The ABS light won’t turn off on its own after you swap the sensor. You need to clear the stored DTCs with a scan tool.
Some vehicles also require a calibration procedure:
| Calibration Type | Typical Application | Method |
|---|---|---|
| Steering angle (G85) reset | VAG, BMW, Mercedes | Center wheel, cycle lock-to-lock, verify 0.0° |
| Brake pedal reset | Ford, Mazda | Pump pedal 10–15 times with ignition in “ON” |
| Static ECU reset | Various | Disconnect battery for 30 minutes |
| Dynamic re-learn | Most modern vehicles | Drive at 25 mph for 5+ minutes in a straight line |
Once codes are cleared, take the car for a test drive with a passenger monitoring live wheel speed data on a scan tool. At a steady 30 mph, all four sensors should report nearly identical values. A sensor reading significantly lower or higher than the others points to an air gap issue, wrong part number, debris in the bore, or a mismatched sensor type.
What Does Anti-Lock Brake Sensor Replacement Cost?
Prices vary widely depending on your vehicle and whether you’re buying OEM or aftermarket parts.
| Vehicle Type | Parts (Aftermarket) | Parts (OEM) | Labor | Total Range |
|---|---|---|---|---|
| Economy sedan | $45–$80 | $120–$180 | $100–$150 | $150–$350 |
| Domestic pickup | $60–$120 | $150–$250 | $150–$250 | $250–$500 |
| European luxury | $140–$220 | $280–$450 | $200–$450 | $450–$900+ |
| Integrated hub assembly | N/A | $350–$600 | $250–$400 | $600–$1,000 |
The integrated hub scenario is the painful one. AutoZone’s cost breakdown explains that GM, Ford, and others often bond the sensor into a non-serviceable hub assembly. So even if only the $50 sensor has failed, you may need to replace the entire $400+ hub to restore function.
Why You Shouldn’t Ignore a Faulty ABS Sensor
Your car still brakes without ABS. But on wet pavement during a panic stop, a locked wheel has a significantly lower friction coefficient than a rolling one. That means:
- Longer stopping distances — the vehicle travels further before stopping
- No steering control — a locked front wheel can’t generate the lateral force needed to turn
- Potential spin-out — rear wheel lockup during a corner can cause oversteer that your stability control can’t correct without functioning wheel speed data
The NHTSA’s vehicle safety data consistently links ABS malfunctions to increased accident risk, particularly on wet or icy surfaces. This isn’t a warning light you defer until next month.
Fix it, validate it, and drive knowing your safety systems are actually working.