That little ABS warning light can feel intimidating — especially when you don’t own a scan tool. Good news: you can reset it yourself using a few simple methods. This guide walks you through every option, from a quick battery disconnect to brand-specific tricks. Stick around — one of these fixes will likely solve it today.
What Does the ABS Light Actually Mean?
Before you reset anything, it helps to know what you’re dealing with.
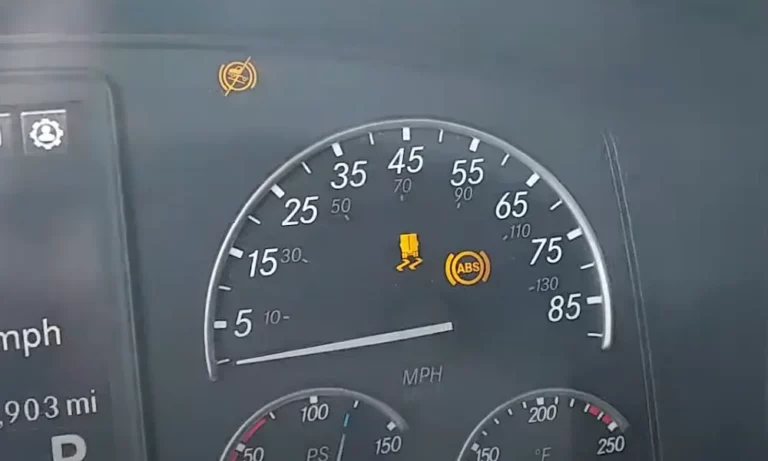
When your ABS light turns on, your car’s Electronic Control Unit (ECU) has spotted a problem in the anti-lock braking system. In most cases, the ABS shuts itself off while your standard brakes still work — so you won’t lose all braking power.
That said, driving without ABS is genuinely risky. Without it, your wheels can lock during hard braking, which kills your ability to steer. That’s why fixing this matters — not just for passing an inspection, but for staying safe.
Common causes include:
- Low brake fluid
- A dirty or damaged wheel speed sensor
- A cracked tone ring
- A blown ABS fuse
- A loose gas cap (yes, really — more on that later)
- Battery voltage issues
Start Here: The Easiest Fixes First
Don’t jump straight to tools and wiring. Try these first — they fix the issue more often than you’d think.
Check your brake fluid level. Pop the hood and look at the reservoir. If it’s sitting below the MIN line, top it off with the correct fluid (DOT 3, 4, or 5.1 — check your cap). As brake pads wear down, calipers extend further and fluid levels drop. Refilling it often clears the light after the next ignition cycle or short drive.
Check your gas cap. This sounds unrelated, but it’s a real thing. On Subaru and Toyota vehicles especially, a loose gas cap triggers EVAP system codes that can disable ABS and traction control. Tighten it, drive a few cycles, and the light may go out on its own.
Check your tires. Severely underinflated tires can confuse wheel speed sensors, causing a false ABS fault.
How to Reset ABS Light Without Scan Tool: Battery Disconnect Method
This is the most universal reset method — it works on almost every make and model.
Here’s what to do:
- Turn the ignition off and remove the key.
- Disconnect the negative battery terminal (the black cable).
- Wait 30 full minutes — don’t rush this step. Modern vehicles use capacitors that hold charge for several minutes, and draining them completely clears the ECU’s volatile memory.
- While the battery is disconnected, press the brake pedal or turn on the headlights briefly. This drains residual charge faster.
- Reconnect the battery, start the engine, and check the dash.
Heads-up: This reset will clear your radio presets, clock, and power window settings. It may also cause a rough idle for the first 20–30 miles while the ECU relearns its fuel trims. That’s normal — don’t panic.
Ignition Power Cycling Method
Got a minor glitch? This method often clears it without touching the battery at all.
- Turn the ignition to ON (engine off) — don’t start it.
- Wait 3 seconds.
- Turn ignition back to OFF.
- Repeat this cycle three times.
- On the third cycle, start the engine.
During these cycles, the ABS ECU runs an internal electrical test. If the fault was just a communication glitch, it clears itself. If the light stays on after this, move on to the next steps.
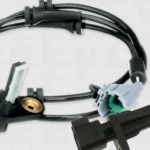
Clean Your Wheel Speed Sensors
If the basic resets don’t stick, dirty sensors are the next most likely culprit.
Wheel speed sensors sit in one of the harshest spots on your car — exposed to mud, salt, heat, and brake dust constantly. Magnetic sensors attract tiny metal shavings from brake pad wear. These particles build up on the sensor tip and distort the signal.
Here’s how to clean them:
- Jack up the vehicle and remove the wheel.
- Locate the sensor on the steering knuckle or hub assembly.
- Unbolt it carefully.
- Wipe the tip with a dry microfiber cloth.
- For stubborn buildup, use mild soapy water — then dry it completely.
- Reinstall and repeat on all four corners.
Don’t use chemical solvents or lubricants near sensors. They can damage the plastic housing or contaminate your brake pads.
Inspect the Tone Ring
The tone ring (also called the exciter ring) is what the wheel speed sensor actually reads. It’s a toothed ring that spins with your wheel.
Rust can build up underneath the ring — a process called “rust jacking” — which causes it to crack or contact the sensor tip. A cracked ring creates a false signal that usually triggers the ABS light once the vehicle hits 10–20 mph.
When you’ve got the wheels off to clean the sensors, inspect each tone ring for:
- Visible cracks
- Missing teeth
- Heavy rust buildup
- Physical contact marks from the sensor
A cracked tone ring needs replacement — no amount of resetting will permanently fix it.
| Component | Common Failure | Manual Fix |
|---|---|---|
| Wheel Speed Sensor | Metal debris on sensor tip | Remove and wipe with microfiber cloth |
| Tone Ring | Rust jacking, cracking | Clean teeth or replace ring |
| ABS Fuse | Blown from electrical surge | Replace with same-amperage fuse |
| Brake Fluid | Level below MIN line | Top off with correct DOT fluid |
| Wiring Harness | Corrosion, rodent damage | Visual inspection and repair |
Check and Replace the ABS Fuse
This takes two minutes and costs nothing if you already have spares.
Find your fuse box (usually under the hood or beneath the dashboard — check your owner’s manual). Locate the ABS fuse. Pull it out and hold it up to the light. A blown fuse has a visible break in the metal strip inside.
Replace it with a fuse of the exact same amperage. Never go higher — that can damage the ABS module.
If the new fuse blows again immediately, there’s a deeper electrical fault you’ll need to diagnose.
Manufacturer-Specific Reset Methods
Some brands have built-in manual reset sequences — no scan tool needed. These are especially useful for clearing soft codes after a repair or battery change.
Chrysler, Jeep, and Dodge
- Ignition OFF, vehicle on level ground — press the brake pedal firmly and hold for 10 seconds.
- While still holding the pedal, turn ignition to ON (engine off). Hold another 10 seconds.
- Start the engine while keeping the brake pressed. Hold for 10 more seconds, then release.
- The light should extinguish within 1–2 minutes, or after a short drive.
Toyota and Lexus (1997–mid-2000s)
Toyota has a clever manual diagnostic mode using a paperclip or jumper wire in the OBD connector.
- Locate the 16-pin DLC connector under the dash.
- Connect Terminal 13 (TC) to Terminal 4 (CG — chassis ground) with a paperclip or wire.
- Turn ignition to ON.
- The ABS light will blink out stored codes.
- To clear: depress the brake pedal 8+ times within 5 seconds while terminals are still jumped.
- Successful reset shows rapid 0.25-second blink pattern.
Honda and Acura
For many Honda models, turn the ignition to ON and press the brake pedal 8 times within 5 seconds. This forces the ABS ECU to clear its temporary fault buffer — particularly effective after a battery replacement or jump-start.
General Motors and Kia/Hyundai
Turn the ignition to ON (engine off). Press the accelerator pedal to the floor 3 times within 5 seconds. Turn ignition off, then start the engine to verify the reset.
Recalibrate the Steering Angle Sensor
If you disconnected the battery and now see both the ABS and traction control lights on together — this is almost certainly a steering angle sensor (SAS) calibration issue.
The fix is surprisingly simple:
- Start the engine.
- Turn the steering wheel all the way to the left.
- Turn it all the way to the right.
- Return to center.
This lock-to-lock sequence lets the ECU relearn the steering limits, and the lights typically clear immediately.
Complete a Verification Drive Cycle
Even after a successful reset, the ABS light sometimes stays on until you complete a proper drive cycle. The ECU needs to verify everything’s working before it signs off.
The ABS runs two self-tests: a static electrical check when you turn the ignition on, and a dynamic rolling test once you hit about 6–10 mph. That’s why the light sometimes comes back on shortly after pulling away.
| Manufacturer | Speed Required | Duration | Notes |
|---|---|---|---|
| Ford | 45–65 mph | 10 minutes | Avoid sharp turns and hills |
| Chrysler | 30–45 mph | 2 minutes | Needs 8-hour cold soak first |
| General Motors | 55 mph steady | 5 minutes | May need 5 separate cycles |
| Toyota | 25 mph steady | 2 minutes | 9-minute idle required first |
| Subaru | Over 50 mph | 20 minutes | Followed by 1-minute idle |
Drive at steady speeds, avoid sharp turns, and include a few gentle stops. If everything is fixed, the light stays off.
Don’t Clear the Code Before an Inspection
One important warning: resetting the light right before a state emissions or safety inspection usually backfires. Inspectors check whether your OBD readiness monitors are in a “Ready” state. A fresh reset sets those monitors back to “Not Ready” — and the vehicle gets rejected until you complete a full drive cycle anyway.
Do the repair, complete the drive cycle, confirm the light stays off — then head to the inspection.
When the Light Keeps Coming Back
If the ABS light re-illuminates every time you hit about 10 mph, the ECU is failing its rolling self-test. That points to a genuine hardware fault — usually a damaged sensor, cracked tone ring, or failing ABS module.
At that point, manual resets won’t hold. The underlying problem needs a proper repair before the system can pass its own internal checks. The ABS warning light is a legitimate safety indicator — clearing it while a real fault exists means your ABS won’t activate during an emergency stop. Locked wheels during hard braking increase your stopping distance and eliminate your ability to steer around an obstacle. That’s not a trade worth making.