Your dashboard just went dark, and now you’re driving blind to your speed, engine temp, and warning signals. That’s a real problem. This guide walks you through every likely cause of dashboard lights not working — from a $2 fuse to a bad ground wire — and shows you exactly how to fix each one.
Start Here: Is It Everything or Just One Thing?
Before you touch a single wire, do this quick check. Turn on your ignition and look at your entire instrument cluster.
- Every gauge and light is dead? You’re dealing with a systemic issue — blown fuse, bad ground, or a failed main connector.
- Only one gauge or section is dark? That points to a single burned-out bulb, failed sensor, or bad stepper motor.
Knowing this upfront saves you hours of guesswork. Start with the easiest fix first — the fuse box.
Check the Dimmer Switch First (Seriously)
This is the most common reason dashboard lights stop working. Someone bumps the dimmer dial down to zero, and the entire backlighting shuts off.
Turn on your headlights, find your dimmer control knob, and rotate it through its full range. If the lights come back, you’re done. If the lights flicker only when you move the dial, the switch’s internal resistive track is worn or dirty. A shot of electronic contact cleaner often fixes this before you need to replace anything.
Check the Fuse Box — Probably the Real Culprit
A blown fuse is the most common cause of dashboard lights not working. Fuses protect your car’s wiring by melting when a circuit pulls too much current. When the dashboard fuse blows, the lights go dark instantly.
Where to Find the Right Fuse
Most vehicles have two fuse boxes:
- Under the hood — handles high-current circuits
- Inside the cabin — usually under the driver-side dash or behind the glove box
Open your owner’s manual and look for a fuse labeled “Dash Lights,” “Cluster,” “IPC,” or “Gauges.” This is your target.
How to Check a Fuse
- Turn off the ignition and remove the key
- Pull the fuse using the plastic fuse puller in your fuse box lid — don’t use metal pliers
- Hold the fuse up to a light source
- If the metal strip inside is broken or the casing shows black/brown discoloration, it’s blown
You can also test the fuse with a multimeter set to continuity mode. Touch the probes to the two small metal test pads on top of the blade fuse. No continuity means it’s blown.
Fuse Color Guide
| Fuse Color | Amperage | What It Protects |
|---|---|---|
| Light Brown / Tan | 5A | Cluster logic, mirror controls |
| Red | 10A | Cluster gauges, backlighting, tail lights |
| Blue | 15A | Radio, accessory ports, fuel pumps |
| Yellow | 20A | Wiper motors, power windows |
| Green | 30A | Power seats, rear defrosters |
Critical rule: Always replace a blown fuse with the exact same amperage rating. Installing a higher-rated fuse allows excess current to melt your wiring harness and start an electrical fire.
If the New Fuse Blows Immediately
That tells you a short-to-ground exists in the circuit. A positive wire has worn through its insulation and is touching bare metal somewhere behind the dash. You need to trace the harness and find the damage before installing another fuse.
Inspect Your Battery and Charging System
Your instrument cluster runs on microprocessors. These chips are sensitive to voltage fluctuations. When your battery or alternator starts failing, the cluster is often the first thing that acts up.
What Healthy Voltage Looks Like
| Measurement | Healthy Value | What Goes Wrong If It’s Not |
|---|---|---|
| Battery voltage (engine off) | 12.6V | Cluster loses memory, resets clock |
| Battery voltage (engine running) | 13.8V – 14.8V | Undercharging drains battery; overcharging burns bulbs |
| Ground circuit voltage drop | Under 0.2V | High resistance causes flickering and ghost warning lights |
A failing alternator introduces voltage ripple into your electrical system. That ripple causes the cluster to flicker, reset itself mid-drive, or show gauge needles sweeping randomly.
Clean Corroded Battery Terminals
White, blue, or green powder on your battery terminals is corrosion. It acts as an electrical resistance barrier that starves your dashboard of clean voltage. Here’s how to clean it off:
- Turn off the ignition and remove the key
- Disconnect the negative terminal first, then the positive
- Scrub terminals with a wire battery brush
- Mix one tablespoon of baking soda into one cup of warm water and apply it to the terminals — it’ll fizz as it neutralizes the acid deposits
- Rinse with clean water and dry thoroughly
- Apply dielectric grease or petroleum jelly to the clean metal surfaces
- Reconnect the positive cable first, then the negative
If your battery case looks swollen or is leaking, don’t clean it. That battery needs to go. Firestone Complete Auto Care offers testing, recycling, and terminal cable replacement if you’d rather not handle a compromised battery yourself.
Test the Ground Wires
Every circuit in your car needs a return path back to the battery’s negative terminal. Your car uses the steel chassis as that return path. Over time, ground connections corrode or loosen, and the current has nowhere to go.
A bad ground creates “floating ground” conditions. Instead of flowing back to the battery normally, current backfeeds through other circuits. This triggers random warning lights — ABS, airbag, traction control — for no apparent reason.
How to Run a Voltage Drop Test
- Set your multimeter to DC voltage
- Connect the negative test lead to the battery’s negative terminal
- Connect the positive test lead to the cluster’s ground wire or the kick panel ground point
- Turn on the ignition and set the dimmer switch to maximum brightness
- Read the multimeter
A healthy ground reads under 0.2 volts. Anything higher means resistance is blocking the current. Unbolt that ground point, sand it down to shiny bare metal with abrasive paper, and reinstall it with a star washer to bite firmly into the metal.
Check the Headlight Switch
On most cars, the headlight switch and the dashboard dimmer work together. When you flip on the headlights, the switch signals the car’s computer to dim the cluster automatically. A failing headlight switch breaks this logic.
Here’s how to tell what’s failing:
- Only one section of the cluster is dark → Burned-out bulb or damaged circuit board trace
- Both headlights and entire dashboard backlighting fail together → Headlight switch or its power relay is the problem
- Backlighting flickers when you physically move the headlight switch → The switch contacts are worn or oxidized
Replacing a Dash-Mounted Headlight Switch
- Disconnect the negative battery cable
- Use plastic trim wedge tools to pry away the decorative panels around the switch — don’t force panels with hidden screws or you’ll crack the dash
- For pull-style switches, press the small spring-loaded release button on the switch body and pull the knob shaft straight out
- Remove the retaining collar or mounting screws and pull the switch forward out of the dash opening
- Press the locking tabs on the wiring connector and disconnect it — inspect the connector for melted plastic or blackened terminals, which signal heat damage from a failing switch
- If the connector is damaged, splice in a new pigtail before installing the new switch — otherwise the new switch will fail fast
- Plug in the new switch, reinstall all trim, reconnect the battery, and test all lighting modes
Cluster Bulbs and Circuit Board Repairs
When external checks come back clean, the problem is inside the cluster itself. You’ll need to pull it out.
Removing the Instrument Cluster
- Disconnect the battery
- Remove all dash trim panels — use your factory service manual to find every hidden screw before prying
- Remove the cluster bezel screws and pull the cluster forward
- Reach behind the cluster, press the connector locking tabs, and disconnect the harness
- Lift the cluster out
Incandescent Bulbs (Older Vehicles)
Twist the plastic bulb socket counterclockwise from the back of the cluster housing and pull it out. Grip the glass bulb with gloves — skin oil creates hot spots that kill bulbs early. Replace all the backlighting bulbs at once while the cluster is out, since the rest are equally old and likely to fail soon.
LED Clusters (Modern Vehicles)
Modern clusters use surface-mount LEDs soldered directly to the printed circuit board. You can’t twist these out. If one fails, the entire cluster needs replacement or a trip to a specialized electronics repair facility for micro-soldering work.
Cracked Solder Joints
Years of heat cycles and road vibration crack the solder joints on the circuit board — especially around stepper motor pins and main harness headers. These hairline cracks cause the cluster to shut off randomly while driving or flicker on rough roads. A qualified electronics repair shop can reflow the solder and restore function without replacing the whole unit.
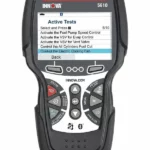
Read the Diagnostic Trouble Codes
Your car’s computer stores fault codes when something goes wrong with the cluster. Plug a scan tool into the OBD-II port under the driver-side dash and pull these codes before you start replacing parts.
| Code | What It Means | Where to Look |
|---|---|---|
| U0155 | Lost communication with instrument cluster | Check cluster fuse, power, and ground at the main connector |
| B2627 | Panel illumination circuit fault | Test dimmer switch; inspect backlighting wiring harness |
| B1650 | Gauge circuit malfunction | Run a gauge sweep test; check circuit board solder joints |
| B1676 | Battery voltage out of range | Test alternator output; check battery terminal voltage drop |
| U0167 | Lost communication with immobilizer module | Check ignition switch and communication lines to cluster |
AutoZone’s free Fix Finder service scans your OBD-II codes at no charge and gives you a printed report with likely repair paths. They’ll also test your battery and alternator in-store for free, which rules out charging system issues before you buy anything. If the codes point toward a programming issue — which happens when you replace a modern digital cluster — RepairPal connects you with certified shops that carry the factory software needed to reprogram the new module to your specific vehicle.