Your Duramax just threw a P2149 code, the “Reduced Engine Power” light is on, and the truck drives like it’s got four flat tires. This post breaks down exactly what’s happening, why it happens, and what actually fixes it — so you don’t waste money replacing parts you don’t need.
What Is the Duramax P2149 Code?
The P2149 code means Fuel Injector Group “B” Supply Voltage Circuit/Open. In plain English, the engine control module detected an electrical fault — an open circuit, a short, or a lost voltage supply — on one specific group of injectors.
Your 6.6L Duramax splits its eight cylinders into two electrical groups:
- Group A: Cylinders 1, 4, 6, and 7
- Group B: Cylinders 2, 3, 5, and 8
When the module detects trouble on Group B, it shuts the entire circuit down to protect itself. That means four cylinders instantly stop receiving fuel.
The result? A rough, stumbling, violently uneven engine that barely moves.
What You’ll Feel When P2149 Hits
You won’t miss this one. The symptoms hit hard and fast:
- “Reduced Engine Power” message appears on the dash
- Malfunction indicator lamp turns on
- Extremely rough idle — the engine shakes and surges without any throttle input
- Heavy hesitation and stumbling under acceleration
- Excessive exhaust smoke — white or gray indicates unburned fuel; thick black smoke means surviving cylinders are over-fueling
- Terrible fuel economy as the ECM pushes the functioning bank harder
- Possible stalling or extended crank times on startup
If you’re towing or merging onto a highway when this hits, it’s a genuine safety issue. Don’t push it.
Why the Duramax P2149 Code Happens: The Real Causes
There isn’t just one cause. The P2149 fault points to a break in the supply voltage circuit — and that break can happen in several places.
Wiring Harness Chafing Against Metal Brackets
This is the single most common cause on LLY-generation trucks. The engine bay is brutal — extreme heat, caustic fluids, and constant vibration. Over time, the corrugated plastic shielding on the harness wears through from rubbing against the alternator bracket or the control module retaining bracket.
Once bare copper wire is exposed, two things can go wrong:
- The wire grounds out against the engine block (short to ground)
- The copper strands break entirely (open circuit)
Both conditions make the ECM shut down Group B and set the P2149 code.
Terminal Fretting on Injector Connectors
This is a sneaky one. Terminal fretting is a physics problem — microscopic vibrations cause the male injector pins and female harness terminals to rub together constantly. That scraping wears away the protective metallic plating, and the exposed base metal oxidizes. You end up with a thick layer of electrical resistance right at the connection point.
Cylinders 2 and 7 suffer this worst because of the tight, stressful angle the factory harness uses at those connectors. The ECM reads the high resistance as an open circuit and kills Group B.
Heat cycling makes it worse. The female terminal spring clips weaken over time, so what started as a snug fit becomes a loose, intermittent connection — one that breaks entirely under specific vibration frequencies.
Fuel Injection Control Module Internal Failure
If the harness and connectors check out, the problem likely lives inside the Fuel Injection Control Module (FICM). The module steps up your 12-volt battery supply to roughly 48 volts to fire the heavy injector solenoids fast enough for precise timing.
That high-voltage circuit board — packed with capacitors, resistors, and step-up transformers — takes enormous thermal abuse. Constant heat cycling cracks the microscopic solder joints on the board, opening the internal circuit. When that happens, the module can’t generate or distribute supply voltage to Group B output pins.
Internal transistor failure is another possibility. When the low-side driver transistors overheat and fail, the module can’t switch the ground circuit for the injectors — and the whole bank goes dark.
Internal Injector Solenoid Failure
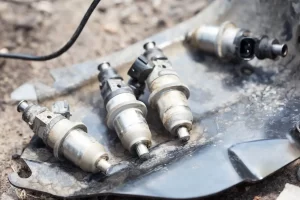
Less common, but it happens. The solenoid coil inside the injector itself can break internally, or the enamel insulation can degrade and create an internal short. When the module sends 48 volts to a shorted injector, current spikes dramatically. The module’s safety programming cuts Group B immediately to protect the driver transistors — and P2149 gets logged.
This is why just replacing the harness won’t fix a shorted injector.
Which Duramax Generation Gets Hit Hardest?
Not every generation is equally vulnerable. Here’s a quick breakdown:
| Generation | Years | Primary P2149 Risk |
|---|---|---|
| LB7 | 2001–2004 | FICM solder joint failure; injectors hidden under valve covers offer some harness protection |
| LLY | 2004.5–2005 | Worst affected — external harness routing near alternator bracket causes constant chafing and terminal fretting on cylinders 2 and 7 |
| LBZ / LMM | 2006–2010 | Improved routing, but harness wear and connector fatigue still occur with age and high mileage |
| L5P | 2017–Present | Better routing design, but emission system heat makes plastic connector bodies brittle, causing terminal failure and open circuit conditions |
The LLY is the poster child for Duramax P2149 issues. If you’ve got a 2004.5 or 2005, your harness routing near the alternator bracket is the first place to look.
How to Diagnose P2149 the Right Way
Skip straight to parts replacement and you’ll likely waste hundreds — or thousands — of dollars. Work through this methodically.
Step 1: Pull Freeze Frame Data
Before touching a single wire, connect a professional scan tool and pull the freeze frame data captured when the fault was logged. This snapshot shows the exact operating conditions at the moment of failure.
| Parameter | What It Tells You |
|---|---|
| Engine RPM | Failure under high-speed acceleration suggests the engine block torqued and stretched a damaged harness |
| Engine Load % | High load failures point to a weakened module capacitor that can’t sustain high-current demands |
| Coolant Temperature | Hot-only failures strongly indicate cracked FICM solder joints or heat-expanded terminal fretting |
| Commanded Injector Voltage | A flat zero-volt reading confirms the module has disabled Group B or suffered internal driver failure |
| Vehicle Speed | Correlates faults with chassis vibration to locate chafed harness sections |
Step 2: Check Injector Balance Rates
With the engine fully warmed and idling steady, pull live injector balance rate data. These values show how much the ECM is adding or subtracting from each cylinder to maintain even power output.
| Balance Rate | What It Means | Action |
|---|---|---|
| 0 to ±2.0 mg/stroke | Normal — injector and circuit are healthy | Routine maintenance only |
| ±2.1 to ±3.9 mg/stroke | Early deviation — minor terminal resistance or nozzle wear | Inspect connectors; consider fuel system cleaning |
| ±4.0 to ±5.9 mg/stroke | Significant deviation — beyond factory acceptable threshold | Electrical testing of that cylinder’s circuit; prepare for possible injector work |
| Beyond ±6.0 mg/stroke | Severe failure — dead, hanging, or clogged injector | Immediate repair required; stop driving the vehicle |
A massive positive deviation on cylinder 2, 3, 5, or 8 just before P2149 hard-sets narrows the diagnosis directly to that branch of the Group B harness — or that specific injector.
Step 3: Physical Electrical Testing
Now get your hands dirty. Start with a careful visual inspection of the harness routing near the alternator bracket and control module bracket. Look for:
- Worn or missing wire loom
- Melted insulation
- Any exposed copper wire
Then use a digital multimeter to check supply voltage at the Group B injector connectors. You should see stable voltage matching the module’s output specification. Anything significantly below that threshold points to high resistance in the harness.
Test continuity from the ECM output pin straight to the injector connector. Resistance greater than a fraction of an ohm means broken wire strands or severe internal corrosion.
To isolate the FICM itself, connect a known good test injector or a load resistor directly to the module output pins. If the module drives the test load but fails with the truck’s harness connected, the module is fine and the harness is your problem. If the module can’t drive the test load either, the module has failed internally.
How to Actually Fix the Duramax P2149 Code
Install the GM TSB 05-06-04-047B Harness Upgrade Kit
For LLY trucks, GM issued Technical Service Bulletin 05-06-04-047B specifically to address recurring P2149 and P2146 codes. The fix is permanent and direct:
- Cut the original straight-angle connectors off the harness about 1.5 inches from the base
- Use heat-shrink crimp (Duraseal) connectors to install the new replacement pigtails
- The updated GM Part Number 98017958 kit uses 90-degree connectors — the angle routes wires close to the engine body, eliminating bending stress at the connector housing
- A revised wire harness support bracket secures the harness tightly to the engine block, changing its resonant frequency and stopping the vibration that causes terminal fretting
This is the definitive fix for connector-related P2149 codes. Do this before you even think about condemning the FICM or the injectors.
Aftermarket Harness Upgrade Options
If you can’t source the OEM kit or want something more robust, companies like Merchant Automotive, APDTY, and Dorman offer 90-degree pigtail upgrade kits with thicker 14-gauge copper wire and upgraded silicone weather seals. These cost roughly $150–$300 and are worth every cent if you’ve had repeated connector failures.
Repairing or Replacing the FICM
If load testing confirms the FICM is the problem, you’ve got two options:
Module rebuild: Services like Circuit Board Medics, UpFix, and GoECM open the module, reflow cracked solder joints, and swap out the original heat-stressed capacitors for high-temperature upgraded units. Cost: $200–$600. Your original module goes back in with its programming intact — no dealership reflash needed.
Remanufactured replacement: A fully remanufactured module programmed to your VIN runs $800–$1,300+. Only go this route if the logic board is catastrophically damaged and can’t be repaired.
The “Ice Pick Trick” — Emergency Only
You’ve probably seen this floating around diesel forums. If terminal fretting kills your connector tension and leaves you stranded, you can use a sharp awl to pierce the side of the plastic connector housing and physically bend the female terminal closer together. This restores grip on the injector pin and can clear the P2149 code temporarily.
It works in an emergency. That’s all it’s good for. The pierced housing destroys the weather seal, moisture gets in, and you’re right back to the same failure — usually worse. Do it to get home, then install the proper 90-degree pigtail kit.
The Hidden Danger: Cylinder Washdown and Fuel Dilution
Here’s the part most people don’t talk about. If P2149 is triggered by a physically failed injector with its pintle stuck open, the common rail system — running at over 20,000 PSI — continuously sprays raw diesel into that cylinder regardless of what the ECM commands.
That fuel can’t ignite properly. It washes away the oil film protecting the piston rings and cylinder walls — a condition called cylinder washdown. Direct metal-to-metal contact follows, and your cylinder walls get scored. Then the unburned fuel drains past the rings into your oil pan.
That’s fuel dilution, and it’s lethal to bearings. Here’s what diluted oil does:
| Fuel Dilution % | What Happens |
|---|---|
| Under 2% | Minimal impact; handled by normal oil changes |
| 4%–6% | Measurable viscosity loss; additive package degrades |
| 8%–10% | Critical film collapse; oil pressure drops dangerously |
| Over 10% | Imminent bearing failure; risk of engine runaway if vapors enter intake |
If your P2149 comes with heavy white smoke, a raw diesel smell, or a rising oil level on the dipstick — stop driving immediately and get the truck towed. Running the engine under load with diluted oil destroys crankshaft bearings. That turns a $400 harness repair into a $5,000+ engine rebuild.
What Does P2149 Repair Actually Cost?
Here’s a realistic breakdown of what you’re looking at in the US market:
- Harness upgrade (TSB kit + labor): $400–$800 total
- FICM rebuild service: $200–$600
- Remanufactured FICM: $800–$1,300+
- Full injector replacement (all 8): $4,000–$7,000+ parts and labor
That last number makes the argument for thorough diagnosis crystal clear. Exhaust every electrical test option before you authorize injector work. One misdiagnosis can cost you several thousand dollars unnecessarily.
The Duramax P2149 code is serious, but it’s fixable — and most of the time, the solution starts with a $200 harness kit and a multimeter, not a $6,000 injector job.