Got a tinting appointment coming up and wondering if you’ll need a ride or can just wait it out? The answer depends on your car, your film choice, and even the weather outside. This guide breaks down every factor that affects your timeline — so you know exactly what to expect before you show up.
The Short Answer: How Long Does Window Tinting Take?
For most standard passenger cars, window tinting takes between 1.5 and 4 hours. That’s the professional appointment time — not counting the curing period afterward.
Just want the front two windows done? You’re looking at 30 to 45 minutes. Full SUV with cargo windows and a panoramic roof? Clear your afternoon.
Here’s a quick breakdown by vehicle type:
| Vehicle Type | Typical Time | Why It Takes That Long |
|---|---|---|
| Front Two Windows Only | 30–45 Minutes | Simple flat glass, minimal edge work |
| Standard 4-Door Sedan | 1.5–2.5 Hours | Rear windshield curve, deck accessibility |
| Full-Size SUV | 2.5–4.0 Hours | Extra window count, cargo area panels |
| Full-Size Pickup Truck | 1.0–1.5 Hours | Vertical glass, smaller cabin area |
| Passenger Minivan | 2.0–4.0 Hours | Sliding doors, wide rear glass |
| Tesla / EV with Panoramic Glass | 3.0–4.0+ Hours | Massive rear panel, electronic protection |
What Actually Happens During Your Appointment
People assume most of the time goes toward sticking film to glass. It doesn’t. A professional tinting process follows a structured workflow:
- Vehicle intake and inspection (15 minutes)
- Interior protection — seat covers, floor mats (15 minutes)
- Deep glass cleaning and decontamination (15–30 minutes)
- Film cutting or plotter prep (15–20 minutes)
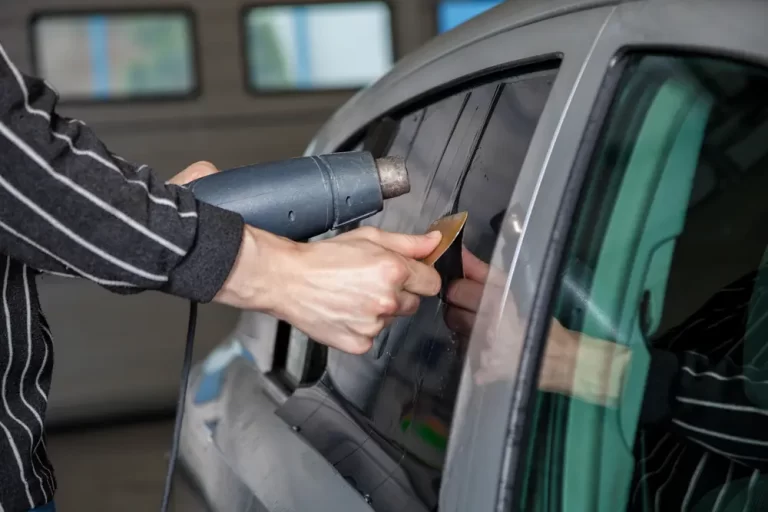
- Heat-shrinking and fitting the film (varies heavily)
- Wet application and squeegee work (core installation time)
- Final detailing and quality inspection (15 minutes)
- Customer walkthrough and aftercare briefing (10 minutes)
That last step matters. A good shop won’t hand you your keys without explaining the curing rules.
How Your Car’s Shape Affects the Clock
Sedans and Coupes
A four-door sedan is the industry benchmark — most time estimates are based on it. Coupes seem simpler since they have fewer windows, but that’s often misleading. Two-door vehicles frequently have more aggressively curved rear glass that requires extra heat-molding time.
SUVs and Minivans
These take longer because there’s simply more glass. Many SUVs have small quarter windows near the cargo area that require careful hand-trimming. Minivans add sliding door complexity to the mix. Budget for the high end of the time range with these vehicles.
Trucks
Full-size pickup trucks are actually the fastest vehicles to tint. The glass sits more vertically, which means less heat-shrinking work. The smaller cabin also means fewer total panels. If you drive a truck, you might be in and out in under 90 minutes.
Teslas and EVs with Panoramic Glass
The Tesla Model 3 and Model Y have rear windshields that stretch toward the center of the roof. Tinting that single panel can take over an hour on its own — the technician needs one oversized piece of film and a very deliberate heat-shrinking process. Add in the need to protect onboard electronics, and you’ve got one of the most time-intensive tinting jobs on the market.
The Film You Choose Changes Your Timeline
Dyed Film
This is the entry-level option. It’s thin, pliable, and responds quickly to heat. Installation is straightforward. It sets the baseline speed for the whole job — but it won’t perform as well or last as long.
Carbon Film
A step up. Carbon film requires more consistent, controlled heat during shrinking to avoid distortion. It adds moderate time compared to dyed film but delivers noticeably better heat rejection.
Nano-Ceramic Film
This is the premium tier. Ceramic films are thicker, more rigid, and contain multiple layers including infrared-blocking nanoparticles. Technicians must apply heat slowly and evenly to avoid ghosting in the ceramic layer. The actual time difference for a full car might only be 20 to 30 minutes — but the attention to detail is significantly higher.
Security / Safety Film
Exceptionally thick and designed to hold glass together on impact. This material needs specialized tools, extended squeegeeing, and longer drying time. It’s a niche product, but one of the most labor-intensive to install.
Why Cleaning Takes Longer Than You’d Expect
Here’s what surprises most people: the quality of a tint job is determined by the quality of the cleaning. Even a brand-new car off the dealer lot carries contaminants — transport film residue, industrial fallout, and what techs call “lot rot.”
A professional cleaning process involves:
- Mechanical scraping — razor blades remove paint overspray, mineral deposits, and stuck-on debris
- Chemical decontamination — specialized surfactants break down oils without leaving adhesive-interfering residue
- Gasket scrubbing — rubber seals trap dust that can migrate under the film during application
This prep phase takes 15 to 30 minutes on a clean sedan. It can take much longer on older or heavily used vehicles. A single hair or dust speck trapped under the film creates a visible bubble that can’t be fixed once the adhesive bonds.
Removing Old Tint Adds Major Time
If your car already has tint on it — especially old, bubbled, or purple-tinged film — your appointment just got longer. Removal alone can add 30 minutes to half a day depending on the condition of the existing film.
UV exposure causes the adhesive to cross-link with the glass over time. When that happens, the film doesn’t peel cleanly — it comes off in brittle shards, and the adhesive stays behind. The technician has to scrape every square inch manually.
The rear windshield is the trickiest part. Most modern cars have copper or silver defroster lines printed directly on the glass. A razor blade would destroy those circuits instantly, so technicians use steam or chemical softening to lift the film without damaging the electronics. Slow and careful — every time.
| Removal Condition | Extra Time Added | Main Challenge |
|---|---|---|
| Clean professional peel | 30–60 minutes | Minimal residue |
| Bubbled or delaminating film | 1–2 hours | Adhesive remains on glass |
| Aged rear glass with defrosters | 2–3+ hours | Can’t use blades near circuits |
The Dot Matrix Problem Nobody Talks About
See those black dots ringing the edges of your windshield or rear glass? That’s the dot matrix — also called the frit. Those dots are slightly raised above the glass surface, and that’s a real problem for window film.
The film can’t lie flat in the tiny gaps between the dots. This creates air pockets that show up as a white or silver ring from outside the vehicle — called the “silvering effect.” Fixing it properly adds 30 to 60 minutes to a rear windshield installation.
Techniques to address it include:
- Light sanding to reduce dot height
- Clear water-soluble glue to fill gaps before applying film
- Vinyl bordering in severe cases
- Manual pressing after full cure — which may require a return visit
It’s time-consuming, but it’s the difference between an amateur-looking job and a truly clean result.
How Long Does Window Tinting Take to Cure?
The installation appointment and the curing period are two different things. Once the film is on, water from the application solution needs to evaporate through the film’s edges before the adhesive fully bonds.
Your climate controls everything here:
| Climate Condition | Curing Timeline |
|---|---|
| Hot and dry (Arizona, Nevada) | 2–5 days |
| Hot and humid (Florida, Texas Gulf Coast) | 7–12 days |
| Cold winter months (Midwest, Northeast) | 3–5 weeks |
During this period, you’ll see small water bubbles, a milky haze, or slight distortion in the glass. These aren’t defects — they’re a normal part of the curing process and will clear up on their own.
Rules to Follow After Your Appointment
Breaking these rules shortens the life of your tint — sometimes dramatically.
Don’t roll the windows down for at least 3–5 days. In colder or humid climates, wait a full week. Rolling the glass down before the edges cure pulls the film against the window seal and causes peeling that can’t be fixed.
Don’t use the rear defroster for 48 hours. The sudden heat causes residual moisture to expand and form large bubbles.
Don’t touch the film while it’s curing. No pressing the bubbles, no cleaning, no contact.
Never use ammonia-based cleaners. Ammonia destroys the scratch-resistant coating and breaks down the adhesive. Stick to a mild soap and water solution or an ammonia-free glass cleaner with a clean microfiber cloth — that’s all you need.
Professional vs. DIY: The Time Reality
A DIY kit looks attractive when you’re comparing price tags. But the time investment is brutal if you’ve never done it before.
| Factor | Professional | DIY |
|---|---|---|
| Installation Time | 1–3 hours | 4–8+ hours |
| Tools | Plotters, pro heat guns | Hand-cut, household tools |
| Environment Control | Climate-controlled bay | Driveway, garage |
| Success Rate | High — backed by warranty | Low — frequent rework |
| Film Lifespan | 10+ years | 1–3 years |
Most DIY beginners struggle most with the rear windshield, where curves demand precise heat-shrinking. Without experience, you’ll end up with creases and “fingers” — vertical air pockets along the curved glass that eventually peel away from the surface.
Professional shops also run in controlled environments that minimize airborne dust. A home garage installation almost guarantees dust, hair, or insects trapped under the film. Those don’t come out.
Does Your Shop’s Workflow Affect Your Wait Time?
Yes — and it’s worth asking about. High-volume shops often use computerized plotters to pre-cut the film to your vehicle’s exact window dimensions. This saves 20 to 40 minutes compared to hand-cutting on the car and eliminates the risk of knife marks on your glass or seals.
Shops that hand-cut everything on-site aren’t necessarily worse — some experienced techs prefer it — but plotter-equipped shops tend to move faster without sacrificing quality on standard vehicles.
Know Your State’s Tint Laws Before You Go
Part of a professional installation includes verifying that your final tint level meets your state’s legal requirements. Every state sets its own rules for Visible Light Transmission (VLT) — the percentage of light allowed through the film.
A calibrated light meter test is part of the final inspection at any reputable shop. This is especially important because your vehicle’s factory glass already has a slight tint. Adding film on top of that darkens the combined result further than the film’s rated percentage alone.
If you want to go dark, make sure the combined VLT clears your state’s threshold — not just the film’s rated number on its own. Your installer should handle this check automatically, but it’s worth asking about before you choose your shade.