Your car’s stuttering, the fuel economy has tanked, and the check engine light just came on. There’s a good chance your MAP sensor is caked in oil and carbon gunk. The good news? You can clean it yourself in about an hour. This guide walks you through every step — from finding the sensor to resetting your ECU — so your engine runs right again.
What Does a MAP Sensor Actually Do?
The MAP sensor (Manifold Absolute Pressure sensor) measures the air pressure inside your intake manifold. Your engine control module (ECM) uses that data to calculate how much fuel to inject.
Think of it as the engine’s “effort detector.” High pressure means light throttle. Low pressure means the engine is working hard. Get that data wrong, and the whole fuel delivery system is guessing.
At idle, a healthy MAP sensor reads around 30–40 kPa. At startup with the engine off, it reads close to atmospheric pressure — about 101 kPa (14.7 psi). If those numbers look off on your scan tool, you’ve found your problem.
Why MAP Sensors Get Dirty
Your intake manifold isn’t just moving clean air. Two systems dump contaminants straight into it:
PCV system (Positive Crankcase Ventilation): This system pulls oily blow-by gases out of your engine’s crankcase and routes them back into the intake. That fine oil mist coats everything — including your MAP sensor port.
EGR system (Exhaust Gas Recirculation): This recirculates exhaust gases to lower combustion temperatures. In diesel engines especially, that means dry carbon soot enters the intake and mixes with the oily PCV residue. The result? A thick, sticky sludge that can completely block the sensor’s pressure port.
In turbocharged diesel engines, heat literally bakes this sludge onto the sensor. It’s one of the most aggressive contamination environments in any engine.
How Contamination Builds Up Over Time
| Degradation Stage | Sensor Condition | What You Notice |
|---|---|---|
| Early | Thin oil film on port | Fuel economy drops 5–10% |
| Intermediate | Visible carbon deposits | Rough idle, occasional surge |
| Advanced | Port partially blocked | Stalling, black smoke |
| Critical | Internal chip damage | Limp mode, massive power loss |
Signs Your MAP Sensor Needs Cleaning
Don’t wait for the check engine light. These are the symptoms that show up first:
- Rough idle that comes and goes
- Hesitation on acceleration — the engine feels like it’s thinking too hard
- Poor fuel economy without any obvious reason
- Black smoke from the exhaust (especially on diesels)
- Stalling at low speeds or in stop-and-go traffic
If your scan tool pulls any of these codes, a dirty MAP sensor is a likely culprit:
| OBD-II Code | Meaning | Most Likely Cause |
|---|---|---|
| P0106 | Range/Performance Problem | Contamination or lazy sensor |
| P0107 | Low Input Voltage | Short to ground or failed sensor |
| P0108 | High Input Voltage | Open circuit or short to power |
| P0109 | Intermittent Malfunction | Loose connector or damaged wiring |
| P1101 | Value Out of Range | Heavy contamination or vacuum leak |
One thing to check before cleaning: a cracked vacuum hose or leaking intake gasket can mimic these exact codes. Do a quick visual inspection of all intake hoses before you pull the sensor.
What You Need Before You Start
Get these together before you touch anything:
Required tools and supplies:
- MAF/MAP sensor cleaner (not brake cleaner, not carb cleaner)
- Flathead screwdriver or plastic trim tool
- 10mm socket or T20/T25 Torx bit (check your car)
- Nitrile gloves
- Safety glasses
- Lint-free microfiber cloth
- Clean toothbrush
Why the cleaner matters so much: Brake cleaner and carburetor cleaner are too aggressive. They’ll dissolve protective coatings on the sensor’s internal circuitry or cause the silicon diaphragm to swell and rupture. Stick to a cleaner specifically labeled for MAF or MAP sensors — they’re formulated to be plastic-safe and leave zero residue.
How to Find Your MAP Sensor
Location varies by vehicle. Here’s a quick reference:
| Vehicle | Typical Location | Watch Out For |
|---|---|---|
| Ford F-Series | Firewall or upper manifold | Tight space around hose clamps |
| VW Jetta (Diesel) | Intake piping after intercooler | Heavy soot deep inside port |
| Honda Civic | Top of the throttle body | Small, easy-to-strip screws |
| BMW MQB Chassis | Integrated intake tract | Gray secondary lock tabs on connector |
| Chevy Silverado | Behind the intake plenum | Hard-to-reach bolt near firewall |
On turbocharged engines, you’ll often see two sensors — one before the turbo and one after. The one after the turbo is the one that gets contaminated. That’s the one you’re cleaning.
Step-by-Step: How to Clean a MAP Sensor
Step 1: Let the Engine Cool Down Completely
Don’t skip this. Hot plastic is brittle and breaks easily. A hot engine is also a burn risk. Give it at least 30–45 minutes after driving.
Step 2: Disconnect the Negative Battery Terminal
Unplug the negative battery terminal before disconnecting the sensor. Modern ECMs are sensitive to voltage spikes. Unplugging a sensor with the battery connected can occasionally damage the computer’s input circuits. This is a 30-second step that protects a $500+ part.
Step 3: Disconnect the Electrical Connector
This is usually the trickiest part. Modern connectors use three main locking styles:
- Push-to-release: Press the center tab and pull the connector straight back
- Pull-to-release: Slide out a gray or red secondary lock first, then press the tab (common on European vehicles)
- Rotate-to-release: Twist the connector body before pulling
Use a small flathead screwdriver or plastic pry tool to nudge stubborn tabs. Never pull on the wires themselves — that pulls pins out of the housing and creates an intermittent fault that’s a nightmare to diagnose.
Step 4: Remove the Sensor
Unscrew the mounting fasteners (typically one or two 10mm bolts or Torx screws). Pull the sensor gently out of its seat. If it feels stuck, the rubber O-ring has bonded to the manifold. Wiggle it side to side — don’t yank.
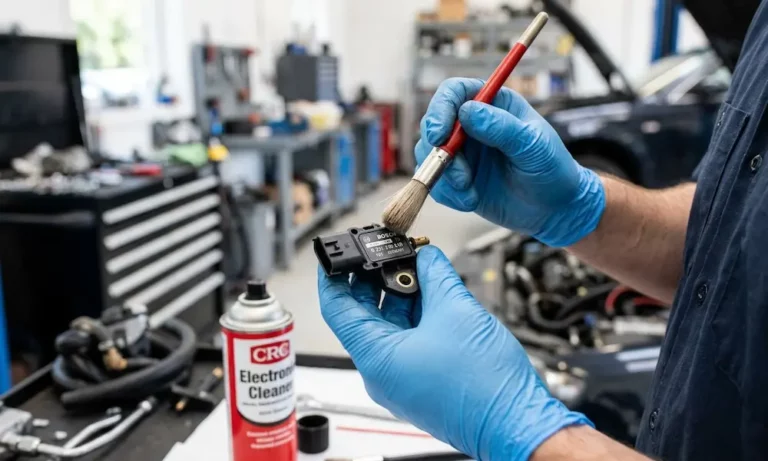
Step 5: Inspect the Sensor Port
Take it to a well-lit area. Look into the pressure port. On gasoline engines, you’ll usually see a light oily film. On diesels, you might see a hard black crust. That visual tells you how many cleaning passes you’ll need.
Step 6: Spray the Cleaner — Port Facing Down
This is critical. Hold the sensor so the pressure port faces downward. If it faces up, dissolved contaminants run deeper into the internal electronics and cause permanent damage.
Spray in short 1-second bursts directly into the port:
- Gasoline engine: 10–15 sprays
- Diesel engine: 20–30 sprays (more if it’s heavily caked)
If there’s stubborn carbon, let the solvent soak for a minute, then spray again. Let the chemistry do the work.
Step 7: Never Insert Anything Into the Port
Never stick a needle, wire, or cotton swab into the sensing port. The silicon sensing chip inside is as fragile as a piece of glass. One fiber from a cotton swab or a light touch from a probe can crack it instantly.
Here’s what else to avoid:
| Action | Why It Damages the Sensor |
|---|---|
| Inserting a probe or swab | Cracks the silicon chip permanently |
| Using compressed air | Ruptures the sensing diaphragm |
| Using brake or carb cleaner | Degrades plastic housing and sensor coating |
| Wiping with a cloth | Leaves fibers that block the pressure port |
| Reinstalling while wet | Short-circuits internal processing chips |
Step 8: Clean the Manifold Port Too
While the sensor dries, wipe the mounting hole on the manifold with a rag dampened in sensor cleaner. If the manifold port is also blocked, your freshly cleaned sensor still won’t get an accurate reading. Also check nearby vacuum hoses for soft, swollen rubber — that’s a sign of oil saturation and they should be replaced.
Step 9: Let It Dry — Minimum 15–30 Minutes
Place the sensor on a clean, dry surface and let it air-dry for at least 15–30 minutes. In a humid environment or if you used isopropyl alcohol, wait a full hour. No hair dryers. No compressed air. Thermal or physical shock can destroy the sensing element in seconds.
Reinstalling the MAP Sensor
Put a tiny drop of clean engine oil on the rubber O-ring. This helps it slide back in without tearing. Press the sensor into place, then snug up the mounting screws. Don’t overtighten — the plastic housing cracks easily.
Snap the electrical connector back in place and engage any secondary lock tabs. Then reconnect the negative battery terminal.
Resetting the ECU After Cleaning
Don’t just start the car and drive away. Your ECM has been compensating for the dirty sensor by adjusting fuel trims. Those “old” corrections applied to “new” accurate data can actually make your engine run worse initially.
You need to reset the adaptive memory. Here are your options:
Option 1 — OBD-II scan tool: Use the “Clear Codes” function. This resets long-term fuel trims and idle air control values even if no codes are stored. This is the best method.
Option 2 — Battery disconnect: Leave the negative terminal disconnected for 15–30 minutes. Press the horn briefly after disconnecting to drain residual power from the ECM’s capacitors. This performs a hard reset.
Option 3 — Ignition sequence: Some older vehicles use a specific key and pedal sequence to trigger a relearn. Check your service manual for the procedure.
The Relearn Drive Cycle
After the reset, the ECM needs to relearn sensor behavior. Run through this sequence:
- Idle for 5–10 minutes with no electrical loads — no A/C, no lights, until the engine reaches full operating temperature
- Drive 20–50 miles mixing city speeds (20–35 mph) and highway speeds (55–65 mph)
- Do several part-throttle accelerations — press the pedal about halfway through, not wide open
While you’re driving, monitor short-term fuel trim data on a scan tool. A healthy system stays within ±10%. If it’s consistently higher, you might have a vacuum leak — or the sensor needs replacement, not just cleaning.
How to Check If the Sensor Is Actually Working
If you want to verify your work with a multimeter, here’s what to look for on the signal wire:
| Test Point | Expected Reading | What It Means |
|---|---|---|
| Reference voltage | Exactly 5.0V | ECM is powering the sensor correctly |
| Ground integrity | Less than 0.1V | Solid ground circuit |
| Signal (engine off) | 4.0–4.5V | Reading atmospheric pressure correctly |
| Signal (at idle) | 0.5–1.5V | Sensing manifold vacuum |
| Signal (under boost) | Above 4.5V | Turbo pressure reading correctly |
If the reference voltage is wrong, the problem is in your wiring harness or ECM, not the sensor itself. If the signal won’t drop when the engine starts after cleaning, the sensor has internal damage and needs to be replaced.
How Often Should You Clean a MAP Sensor?
For most vehicles, every 30,000 to 50,000 miles is a solid interval. Don’t wait for symptoms to show up. Prevention is much easier than dealing with hard, baked-on carbon.
A few things that slow down contamination buildup:
- Use a quality air filter and replace it on schedule — less dust means less grime in the intake
- Replace your PCV valve every 50,000 miles — a worn PCV valve dumps more oil mist into the intake
- Use high-quality synthetic oil — it produces less blow-by mist than conventional oil
- Check your turbocharger seals — a leaking turbo oil seal sprays oil directly onto the sensor port, and that’s a much bigger job than a cleaning
The bottom line on how to clean a MAP sensor is this: it’s a straightforward job, and doing it right takes maybe an hour. Doing it wrong — using the wrong cleaner, poking inside the port, skipping the ECU reset — can turn a $0 fix into a $150 sensor replacement. Follow the steps above and your engine will thank you.