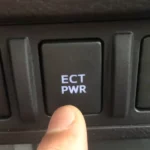
Is your car blasting hot air when you want cool air? Hearing strange clicking noises from your dashboard? Your blend door actuator might be the culprit. Don’t worry – you can fix this yourself without spending $400+ at the shop. I’ll walk you through the entire installation process with simple, clear steps that even first-time DIYers can follow.
What Is a Blend Door Actuator and Why Does It Fail?
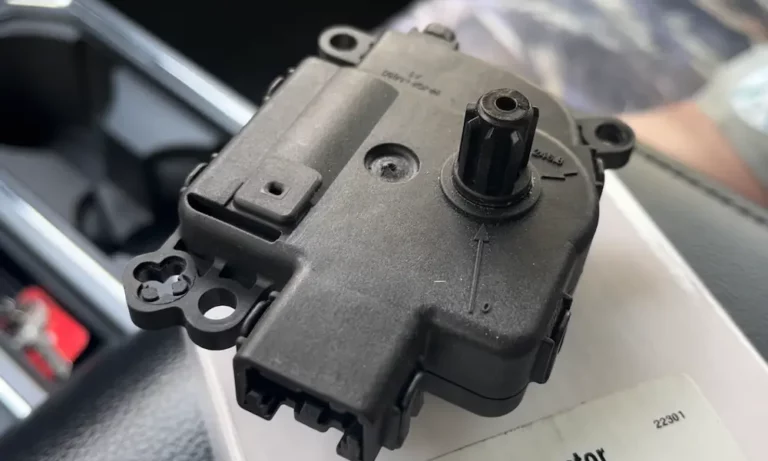
A blend door actuator is a small electric motor that controls the temperature in your vehicle’s HVAC system. It works by moving a door that directs airflow through either your heater core or air conditioning evaporator.
When this component fails, you’ll notice:
- Clicking or ticking noises from your dashboard
- Inconsistent temperatures (too hot or too cold)
- Airflow problems
- Temperature control that works incorrectly
The most common reasons for failure include worn gears, electrical issues, or simple age-related deterioration. Most actuators last 5-10 years before needing replacement.
Tools You’ll Need for the Job
Having the right tools makes this job much easier. Here’s what you should gather before starting:
Essential tools:
- 5.5mm socket (most common size for actuator mounting bolts)
- 1/4-inch ratchet with short extension
- Stubby Phillips screwdriver
- 7mm, 8mm, and 10mm sockets (for panel removal)
- Flashlight or headlamp
Helpful additions:
- 45-degree bent needle-nose pliers
- Inspection mirror
- Magnetic parts tray (to prevent losing tiny screws)
Don’t skip gathering these tools – working in tight dashboard spaces without the right equipment can turn a 1-hour job into a frustrating all-day project.
Safety First: Pre-Installation Preparation
Before touching anything under your dashboard, follow these safety steps:
- Park on a level surface and set the parking brake
- Disconnect the negative battery terminal
- Remove the ignition key completely
- Wait at least 30 seconds before proceeding (allows the system to reset)
These steps prevent electrical hazards and accidental airbag deployment while you’re working under the dashboard.
Locating Your Blend Door Actuator
Blend door actuators hide in different locations depending on your vehicle make and model. Here’s where to look:
- Passenger-side temperature control: Behind the glove box
- Driver-side temperature control: Above the accelerator pedal
- Mode control actuator: Near the blower motor
Most vehicles have 2-4 actuators controlling different aspects of the HVAC system. The location varies significantly by vehicle model, so consult your specific vehicle’s repair manual if you’re unsure.
Accessing the Actuator: Panel Removal
Now comes the part that intimidates most DIYers – removing dashboard panels to access the actuator. Here’s how to approach this based on which actuator you’re replacing:
Passenger-Side Actuator Access
- Open the glove box fully
- Locate the limiting stops on each side (plastic tabs or cords)
- Compress the sides inward to release these stops
- Lower the glove box completely or remove it entirely
- Look up behind where the glove box was to find the actuator
Driver-Side Actuator Access
- Remove lower dashboard trim panels (usually snap-fitted)
- Remove the lower steering column cover (typically 7mm screws)
- Look for the actuator near the accelerator pedal or under the steering column
Some vehicles require more extensive disassembly. If you’re working on a truck or SUV, you might need to remove more dashboard sections. Take photos as you go to help with reassembly.
Removing the Old Actuator
Once you’ve located the actuator, follow these steps to remove it:
- Locate the electrical connector on the actuator
- Press any retaining clips while pulling straight out to disconnect it
- Find the mounting screws (typically 2-3 screws using a 5.5mm socket or Phillips screwdriver)
- Remove these screws carefully, keeping track of where each one goes
- Gently pull the actuator away from the blend door shaft
If the actuator doesn’t come out easily, never force it. It may be caught on something or have an additional mounting bracket you missed.
The Critical Alignment Step Most People Miss
Here’s where many DIYers go wrong – proper alignment is absolutely crucial for successful installation. The new actuator’s arm must perfectly align with the blend door shaft.
Never force the actuator into position. This can damage internal gears or the blend door mechanism, leading to immediate failure.
The best alignment method:
- Connect the new actuator electrically before final mounting
- Turn the ignition to ON (engine off)
- Cycle through HVAC settings until the actuator arm aligns with the door shaft
- Some technicians use the old actuator’s gear position as a guide
This step is so important that multiple forum discussions focus solely on alignment problems and solutions.
Installing the New Actuator
With proper alignment confirmed, installation is straightforward:
- Position the new actuator so its arm engages properly with the blend door shaft
- Make sure the arm sits fully in the door’s track or slot (partial engagement will cause failure)
- Start all mounting screws by hand before tightening any of them
- Tighten screws to snug specification only (finger-tight plus 1/4 turn)
- Connect the electrical connector, ensuring it clicks fully into place
Be careful not to overtighten screws, as most actuator housings are plastic and can crack easily.
The Secret to Success: Proper Calibration
After installation, calibration is the most critical step that determines success or failure. The HVAC control module must learn the actuator’s position limits and movement range.
Here are three effective calibration methods:
Method 1: OBD-II Scanner Calibration (Most Reliable)
- Connect an OBD-II scanner with bi-directional capabilities
- Navigate to HVAC Control Module special functions
- Select “Recalibrate All Motors”
- This process typically takes 60 seconds
Method 2: Battery Disconnect Reset
- Disconnect the battery negative terminal for at least 5 minutes
- Reconnect the battery
- Turn ignition to ON position (engine off)
- Wait 5 minutes without adjusting any HVAC controls
- This allows the system to auto-calibrate actuator positions
Method 3: Fuse Removal Reset (Works best for Ford/GM Vehicles)
- Locate and remove HVAC control fuses (typically #10 and #12)
- Wait at least 1 minute
- Reinstall the fuses
- Turn ignition ON and wait 30 seconds for system initialization
The correct calibration procedure often makes the difference between a successful repair and continued problems.
Common Installation Problems and How to Fix Them
Even with careful installation, you might encounter these common issues:
Problem: Actuator won’t fit or align
- Likely cause: The blend door is in the wrong position
- Solution: Connect the actuator electrically and cycle through temperature settings until proper alignment occurs
Problem: No movement after installation
- Likely causes: Calibration failure or incorrect wiring
- Solution: Verify electrical connections are secure and perform proper calibration sequence
Problem: Clicking noises persist
- Likely causes: Internal actuator damage, improper mounting, or blend door obstruction
- Solution: Ensure actuator arm is fully engaged and mounting screws aren’t over-tightened
Problem: Temperature control works backward
- Likely cause: Actuator motor installed upside down
- Solution: Remove actuator, flip motor orientation 180 degrees, and reinstall
Vehicle-Specific Considerations
Different manufacturers design their HVAC systems differently. Here are some tips for common makes:
General Motors Vehicles
- Typically use 5.5mm mounting bolts
- Actuators usually located behind the glove box or above the accelerator pedal
- Often require battery disconnect or OBD-II calibration
Ford Vehicles
- Commonly place actuators behind the glove box with 8mm mounting bolts
- Frequently require fuse removal reset procedures
- May need drilling access holes for driver-side actuator replacement
Chrysler/Jeep Vehicles
- Often have the most complex access requirements
- May require extensive dashboard removal
- Benefit from the fuse reset calibration method
OEM vs. Aftermarket Parts: Which to Choose?
When selecting a replacement actuator, you have two main options:
OEM (Original Equipment Manufacturer) Parts:
- Generally provide better reliability
- Cost significantly more ($100-200)
- Perfect fit guaranteed
- Longer lifespan
Aftermarket Parts:
- Much more affordable ($30-80)
- Quality varies significantly between brands
- May require slight modifications
- Can have different calibration requirements
If you plan to keep your vehicle long-term, the extra cost of OEM parts often pays off with better reliability. For older vehicles or budget repairs, quality aftermarket brands can work well.
Time and Effort Assessment: What to Expect
Be realistic about the time commitment for this repair:
- Passenger-side actuators: Typically 30-60 minutes with good access
- Driver-side actuators: Often 2-3 hours due to more complex access
- Mode actuators: Usually 1-2 hours depending on location
First-time installers should plan for extended work times. The most time-consuming parts are usually gaining access and proper calibration.
A Complete Installation Checklist
For a successful blend door actuator installation, follow this checklist:
- ☐ Gather all necessary tools
- ☐ Disconnect battery and wait 30 seconds
- ☐ Remove necessary panels to access actuator
- ☐ Disconnect electrical connector from old actuator
- ☐ Remove mounting screws and old actuator
- ☐ Check blend door position and alignment
- ☐ Connect new actuator electrically to verify proper position
- ☐ Mount new actuator securely
- ☐ Reconnect electrical connector
- ☐ Perform proper calibration procedure
- ☐ Test operation through all temperature settings
- ☐ Reassemble all dashboard panels
By following these detailed steps and paying special attention to alignment and calibration, you’ll save hundreds of dollars on this repair while gaining valuable DIY skills.
Remember – take your time, be patient with alignment, and don’t skip the calibration steps. Your perfectly functioning climate control system will thank you!