
Stripping paint from a car sounds simple until you warp a hood panel or melt a bumper. This guide covers every method — mechanical, chemical, and media blasting — so you pick the right one for your project. Stick around to the end, because the primer and safety sections could save you a very expensive mistake.
Why Knowing Your Car’s Surface Matters First
Before you grab a sander or crack open a chemical stripper, you need to know what you’re working with. Cars aren’t just steel. They’re a mix of materials, and each one reacts differently to heat, abrasives, and solvents.
Here’s a quick breakdown:
| Surface Type | Main Weakness | What to Avoid |
|---|---|---|
| Steel panels (hood, doors) | Warps from heat | High-speed grinders, hard media blasting |
| Aluminum | Soft, gouges easily | Aggressive abrasives, high pressure |
| Fiberglass (e.g., Corvette) | Resin dissolves | Standard chemical strippers, coarse sanding |
| Plastic bumpers / trim | Melts and deforms | Heat guns, caustic solvents |
Getting this wrong doesn’t just look bad — it destroys panels that can’t be fixed. Fiberglass composites are especially vulnerable because aggressive solvents dissolve the resin matrix holding the glass fibers together.
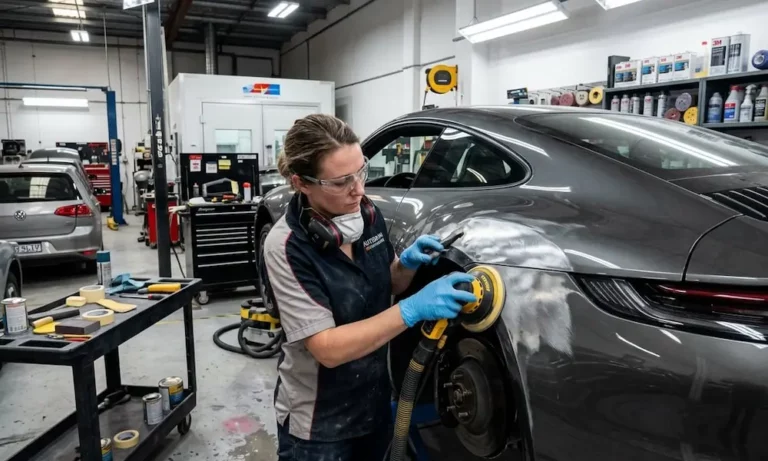
Method 1: Mechanical Paint Removal (Sanding)
Sanding is the most accessible way to remove paint from a car. You don’t need a spray booth or industrial equipment — just the right tools and some patience.
Use a Dual-Action Orbital Sander, Not an Angle Grinder
A dual-action (DA) sander moves in an eccentric orbit, which spreads heat across a wider area and avoids burning the metal. A standard angle grinder spins on one axis and generates intense localized heat — that’s how hoods warp.
Your sanding sequence matters:
- Start with 80-grit to break through the clear coat
- Move to 180-grit to clean up the scratch pattern
- Finish with 220-grit before priming
Don’t rush this. Move through the grits progressively or you’ll leave deep scratches that show through primer.
Strip-It Discs Cut Faster and Clog Less
Woven surface conditioning discs — often called strip-it discs — are the smarter choice for bulk removal. Their open nylon web structure lets paint dust escape instead of clogging, which means the disc keeps cutting instead of generating heat.
One important rule: these discs run at around 3,000 RPM. Mount one on a high-speed angle grinder and it disintegrates instantly — and can warp your panel before you blink.
Dealing with Tar, Undercoating, and Seam Sealer
Standard sandpaper is useless against rubbery undercoating and seam sealer. These materials absorb abrasion instead of cutting. Your options here:
- Wire wheel on an angle grinder for thick undercoating
- Oscillating cutter to shear sealer from seams
- Propane torch + metal scraper — heat softens the tar, then scrape it off immediately
Method 2: Chemical Paint Stripping
Chemical strippers work by penetrating the clear coat and breaking the bond between paint layers and metal. They’re ideal for curved surfaces, intricate body lines, and thin panels where sanding risks warping the metal.
The End of Methylene Chloride
Here’s what you need to know: the old-school strippers that worked in minutes are gone. The EPA permanently banned consumer sales of methylene chloride paint removers in November 2019. And under regulations finalized in 2024, commercial and industrial use phases out completely by April 28, 2026.
Modern alternatives — benzyl alcohol systems, citrus-based formulas like CitriStrip, water-based gels — are much safer but work considerably slower. Plan for overnight dwell times on heavily painted panels.
How to Apply Chemical Stripper Correctly
Don’t just brush it on and walk away. Follow this process for the best results:
- Scuff the entire surface with 80-grit first. Clear coat resists chemical penetration. Scratching it gives the stripper a way in.
- Remove all trim, handles, and weather seals. Cover any remaining glass with cardboard and duct tape.
- Seal panel gaps and seams with masking tape. Stripper trapped in seams will leach out later and blister your new paint from underneath — sometimes months after the job is done.
- Apply the gel heavily in one direction only. Back-and-forth brushing breaks the waxy vapor barrier that forms on the surface. That barrier keeps solvents active and working.
- Cover panels with plastic sheeting to trap vapors and prevent drying.
- Wait for bubbling and wrinkling to stop completely, then scrape with a wide metal or plastic putty knife.
- Repeat on old vehicles with multiple paint layers.
Neutralizing the Surface After Stripping
Once you scrape the paint off, the metal is covered in caustic residue. Any primer applied over it will fail. You need to neutralize it by scrubbing thoroughly with hot water and degreasing soap, or wiping down repeatedly with denatured alcohol, mineral spirits, or lacquer thinner. Use clean shop towels and keep wiping until there’s nothing left to pick up.
Stripping Fiberglass: Use Marine-Grade Products Only
Standard automotive strippers will dissolve the resin in fiberglass panels. Instead, look to the marine industry. Products like Aqua-Strip and Smart Strip Marine are water-based, biodegradable, and safe for gel coat and fiberglass composites. Apply them with laminated paper covers to prevent drying, and scrape very gently.
Method 3: Media Blasting
Media blasting propels particles at high speed using compressed air to strip paint, filler, and rust from complex shapes that sanding can’t reach. But the media you choose completely determines whether you strip the paint or destroy the panel.
Choosing the Right Blasting Media
| Media Type | Aggressiveness | Best For | Risk |
|---|---|---|---|
| Sodium bicarbonate (baking soda) | Very soft | Sheet metal, fiberglass, plastics | Leaves alkaline residue; won’t touch heavy rust |
| Crushed walnut shells | Soft | Paint removal without metal damage | Slow; ineffective on corrosion |
| Crushed glass / glass beads | Medium | General paint and rust removal | Can warp thin flat panels at high pressure |
| Aluminum oxide / silicon carbide | Very hard | Heavy rust, chassis frames | Destroys sheet metal and fiberglass; too aggressive for body panels |
Soda Blasting: The Gentle Giant
Soda blasting is one of the safest methods for delicate sheet metal and fiberglass. The baking soda crystals shatter on impact, transferring kinetic energy without gouging the surface. This means almost zero heat transfer — no warped panels.
There’s a catch though. Soda leaves a highly alkaline residue that will prevent primer from bonding. You must neutralize it before any coating goes on. Scrub with hot water and dish soap, or use a phosphoric acid-based metal etch product specifically formulated for post-blast treatment. These products neutralize the residue and leave a zinc phosphate coating that actually improves primer adhesion.
Vapor Blasting vs. Dry Blasting
Traditional dry blasting kicks up massive dust clouds and drives spent media deep into chassis cavities. Vapor blasting — also called dustless or wet blasting — mixes water into the abrasive stream at the nozzle.
The water does three important things:
- Captures dust and pulls it to the ground immediately
- Cushions the impact, reducing heat transfer to thin metal
- Flushes debris instantly, leaving a cleaner surface ready for primer
It’s more expensive to set up, but the surface quality is noticeably better — and it’s far safer to use indoors.
Method 4: Heat Gun Stripping
Heat guns soften paint bonds so you can scrape the paint off in long strips. Industrial units reach up to 932°F and offer digital temperature control, making them effective on thick, multi-layer paint jobs and rubberized undercoating.
The technique is unforgiving. Keep the gun moving constantly. Stop over one spot for even a second too long and the paint carbonizes into the metal pores — nearly impossible to remove without grinding. And never use a heat gun on fiberglass or plastic. The material will warp, blister, or melt beyond repair.
Sealing Bare Metal: Primer Isn’t Optional
The moment bare metal hits open air, it starts rusting. Flash rust forms fast. Getting primer on the surface quickly isn’t just good practice — it’s necessary.
Epoxy Primer vs. Self-Etching Primer
These two primers work completely differently, and choosing the wrong one ruins the job.
| Feature | Self-Etching Primer | Two-Part Epoxy Primer |
|---|---|---|
| How it bonds | Acid chemically bites the surface | Locks into 80-grit scratch profile mechanically |
| Corrosion protection | Minimal — porous structure | Maximum — waterproof, non-porous seal |
| Works with body filler? | No — causes delamination | Yes — the preferred base for all body work |
| Best use | Quick spot repairs, intricate tubing | Full restorations, complete bare-metal projects |
| Film build | Very thin | High build, fills minor surface flaws |
For any complete paint removal project, two-part epoxy primer is the right choice. Once cured, it creates a waterproof barrier that locks out moisture and oxygen completely. A properly sealed car can sit for months without developing rust beneath the primer.
Mix epoxy at a 4:1 ratio (resin to hardener) with up to 10% urethane reducer. Apply with a 1.3mm fluid tip, and allow 5–10 minutes of flash time between coats.
Self-etching primer has its place — small spot repairs and areas that can’t be sanded easily. But keep it away from polyester body filler. The acid chemistry interferes with the hardener and the filler won’t cure properly.
What the Law Says About Paint Stripping Waste
Lead Paint in Classic Cars
Vehicles built before the late 1970s often contain lead in their factory primers and pigments. When you sand or blast these layers, you create invisible toxic dust. Under the Resource Conservation and Recovery Act, this waste may be classified as hazardous depending on lead content.
The EPA uses a test called the Toxicity Characteristic Leaching Procedure to determine if paint debris can leach lead into groundwater. If the result hits 5.0 mg/L or higher, the waste is legally hazardous and requires specialized disposal.
For DIY homeowners, there’s good news. The EPA’s household waste exemption — confirmed and expanded in 2003 — allows residential paint debris to go into regular municipal waste as long as it’s sealed in heavy contractor bags. This applies whether the homeowner or a hired contractor does the work.
For commercial shops, the rules are much stricter. All lead-laden blasting media and paint sludge requires licensed hazardous waste haulers and certified disposal facilities. Dumping it in the dumpster is a federal violation.
Check your local municipality’s rules too — states and counties frequently impose stricter requirements than the federal baseline.
Solvent Waste Disposal
Spent lacquer thinner, chemical stripper residue, and solvent-soaked rags can’t go in regular trash. Commercial facilities must consolidate these into sealed 55-gallon drums, label them as hazardous waste, and arrange pickup through a certified waste hauler. Letting solvents evaporate into the atmosphere violates federal VOC regulations.
Protecting Yourself During Paint Removal
Respiratory Protection
A basic dust mask doesn’t cut it when you’re working with chemical strippers or spraying primer. You need a half-mask or full-face respirator fitted with organic vapor cartridges. If you’re sanding and stripping at the same time, add particulate pre-filters over the vapor cartridges to keep them from clogging with dust.
In enclosed blasting environments, supplied-air respirators are the legal standard — these pump clean air from outside the work area directly to your face.
Skin and Eye Protection
Automotive solvents absorb through skin. Thin latex gloves fail in seconds. Use thick industrial nitrile gloves at minimum — for aggressive strippers, butyl rubber or chemical laminate gloves offer real protection.
Add disposable coveralls to keep lead dust off your clothes and skin. This also stops you from tracking toxic material out of the work area. Wrap-around chemical splash goggles and hearing protection round out the essentials when running air tools or blasting equipment.

