Feeling that annoying clunk every time you accelerate? Your engine mounts might be crying for help. This guide walks you through exactly how to replace engine mounts safely — from spotting the warning signs to torquing the final bolts. Stick around to the end, and you’ll have everything you need to tackle this job confidently.
What Does an Engine Mount Actually Do?
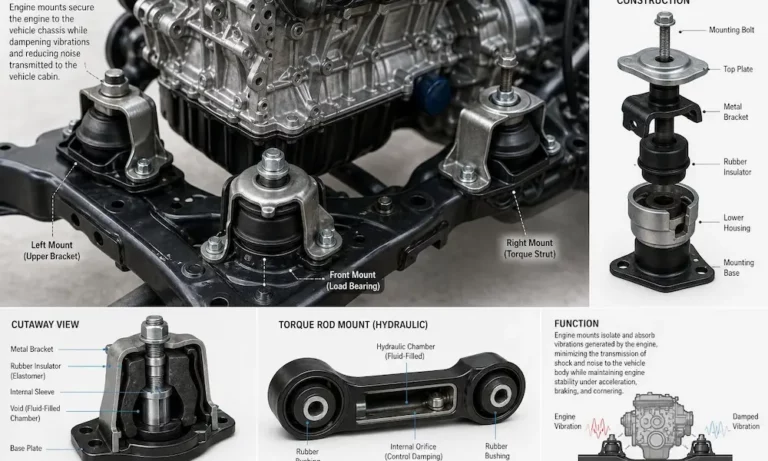
Engine mounts sit between your engine and the car’s frame. They do two jobs at once: hold the engine in place under hard acceleration and absorb vibrations so you don’t feel every pulse in your seat.
Modern mounts use rubber, hydraulic fluid, or a combination of both to manage these forces. When they fail, your engine starts moving too much — and everything connected to it suffers.
Types of Engine Mounts You Might Encounter
| Mount Type | Best For | Lifespan | Main Weakness |
|---|---|---|---|
| Solid Rubber | Economy cars, daily drivers | 80,000–120,000 miles | Hardens and cracks with age |
| Hydraulic (Fluid-Filled) | Luxury, diesel, high-torque vehicles | 100,000–150,000 miles | Seal failure causes fluid leak |
| Polyurethane/Performance | Racing, heavy towing | Very long, but harsh | Transmits heavy vibration to cabin |
Hydraulic mounts can reduce cabin vibration by 50–70% compared to solid rubber. They’re worth the extra cost on anything that sees daily commuting.
How to Tell If Your Engine Mounts Are Failing
Failing mounts rarely fail all at once. They give you plenty of warning first.
Vibration You Can Feel
The most common sign is increased vibration at idle. It travels through the steering column and seat. In automatic cars, it gets noticeably worse when you put it in Drive or Reverse with the brake applied.
Rubber mounts harden over time, losing their ability to absorb vibration. Once that rubber cracks or tears, the engine moves far more than it should.
Clunking and Banging Noises
A sharp clunk or bang during acceleration, engine braking, or hitting a pothole is a red flag. That noise is the engine shifting and metal components striking the chassis — usually the exhaust manifold or the mount’s internal safety catch.
The Power-Brake Test
You can confirm mount failure without disassembly. Here’s how:
- Park on a flat surface.
- Fully apply the parking brake and service brakes.
- Have someone watch the engine bay.
- Shift into Drive and gently press the accelerator for a second.
If the engine lifts or rotates more than 1–2 centimeters, or you hear a metallic clack, the mounts need replacing now.
What Happens If You Ignore It
Bad mounts don’t just cause noise — they damage other systems too:
- Radiator hoses get pulled and cracked by excessive engine movement
- Exhaust studs snap from constant rocking
- Wiring harnesses and vacuum lines stretch and break, triggering mysterious sensor faults
- CV joints wear out fast in front-wheel-drive cars when the axle angle goes extreme
Tools You’ll Need Before Starting
Don’t start this job without the right gear. Engine mounts involve supporting a heavy suspended mass — skipping safety equipment isn’t worth it.
| Tool | Purpose |
|---|---|
| Floor jack (3-ton minimum) | Lifting the engine safely |
| 4 jack stands | Supporting the vehicle chassis |
| 2×4 or 2×8 wood block | Distributing jack load across the oil pan |
| Calibrated torque wrench | Hitting factory torque specs precisely |
| Long extensions + universal joints | Reaching recessed bolts |
| Penetrating oil | Breaking loose corroded fasteners |
| Heavy-duty pry bar | Nudging the engine for bolt alignment |
Safety before anything else: work only on flat, reinforced concrete. Disconnect the negative battery terminal before touching anything. Wear safety glasses — rust and fluid drop down constantly. Wear gloves too, since the engine can shift unexpectedly.
How to Support the Engine While Replacing Mounts
This is the most critical step. Get it wrong, and the engine can shift, pinch you, or crush lines and hoses.
Option 1: Floor Jack With a Wood Block
This is the most accessible method for DIYers. Place a wood block flat against the bottom of the oil pan to spread the load. Never jack directly against the pan — most aluminum and stamped steel pans crack or dent easily under point load.
Raise the jack just enough to take the weight off the mount. You’re not trying to lift the engine high — just unload it.
Option 2: Engine Support Bar
An engine support bar spans the engine bay and hooks onto factory lifting points from above. It’s more stable than a floor jack, and it keeps the underside of the car clear so you can move freely.
This is the better choice for modern Ford and Volkswagen models with plastic oil pans, and it’s what professional shops recommend for BMW and Mercedes work.
| Method | Pros | Cons | Safety Rating |
|---|---|---|---|
| Floor Jack + Wood Block | Cheap, widely available | Risk of oil pan damage | Moderate |
| Engine Support Bar | Stable, clears work area | Costly equipment | High |
| Overhead Hoist | Lifts entire drivetrain | Needs ceiling clearance | Best |
How to Replace Engine Mounts: Step-by-Step
Step 1 — Raise the Vehicle and Clear Access
Lift the car on jack stands and get it to a comfortable working height. On front-wheel-drive cars like the Honda Civic or Ford Focus, you’ll often need to remove the front passenger wheel and inner fender liner to see and reach the side mounts.
Move any parts blocking access: air intake ducting, battery trays, wiring brackets. Set them safely aside.
Step 2 — Support the Engine
Get your floor jack with the wood block, or your support bar, in position. Apply just enough upward pressure to unload the mount. Watch the rubber insulator — when the engine weight is off it, the rubber will transition from compressed to neutral.
Step 3 — Remove the Old Mount
Soak corroded bolts with penetrating oil and let it sit for 10–15 minutes. Loosen the main center bolt first — it often takes a long breaker bar or impact wrench. Then remove the bolts securing the mount to the chassis or subframe.
With all bolts out, wiggle and pry the mount free. You may need to raise or lower the engine an inch to create clearance for the mount to clear surrounding parts.
Step 4 — Install the New Mount
Compare the old and new mounts side-by-side. Check that the bolt pattern and height match. If the new mount is taller because the old one was collapsed, raise the engine slightly to let the new mount seat properly.
Start all bolts by hand for several full turns before using any tools. This prevents cross-threading into aluminum engine block threads. Use a pry bar to nudge the engine into alignment if the holes don’t quite line up.
Step 5 — Let the Engine Settle, Then Torque
Lower the engine onto the new mounts and start it. Let it idle for a few minutes. Some technicians shift between Drive and Reverse several times on vehicles known for vibration issues — this helps seat the rubber and relieve built-in tension.
Once settled, torque all bolts to spec while the engine is cold.
Torque Specs: Don’t Skip This Part
Correctly torqued bolts are what keep the mount from failing again. Always check your vehicle’s service manual for exact specs. These are the general ranges by bolt size:
| Bolt Size | Metric Class 8.8 | Metric Class 10.9 | Imperial Grade 8 |
|---|---|---|---|
| M8 / 5/16″ | 19 ft-lbs | 26 ft-lbs | 18 ft-lbs |
| M10 / 3/8″ | 37 ft-lbs | 53 ft-lbs | 33 ft-lbs |
| M12 / 7/16″ | 65 ft-lbs | 92 ft-lbs | 52 ft-lbs |
| M14 / 1/2″ | 103 ft-lbs | 146 ft-lbs | 80 ft-lbs |
One critical detail: most manufacturer torque specs assume dry threads. If you use anti-seize or oil on the threads, multiply the torque value by 0.65–0.75. Using full torque value on lubricated threads over-clamps the bolt and can cause it to snap.
Real-World Torque Examples
- Honda Civic (2016–2021) rear mount — 69 ft-lbs chassis-side
- Toyota Corolla (2014–2019) right mount — 59 ft-lbs engine-side, 35 ft-lbs frame-side
- Ford Mustang V8 side mounts — 35–60 ft-lbs engine-side, 50–105 ft-lbs frame-side
- Mazda 3 (2010+) side mount — 47 ft-lbs engine-side, 69 ft-lbs frame-side
Vehicle-Specific Challenges to Know About
Front-Wheel-Drive Cars (Honda, Toyota, Mazda, Ford Focus)
These engines sit sideways. Most have three or four mounts: one passenger-side, one transmission-side, and one or two torque rods. The side mounts carry the most weight and are often hydraulic.
To reach them, you typically remove the front wheel and inner fender liner. The rear torque rod (dog-bone) is usually accessible from underneath and doesn’t require supporting the full engine weight if the other mounts are still solid.
Rear-Wheel-Drive Trucks and Muscle Cars (F-150, Mustang, Silverado)
These use two large V-style mounts on each side of the block plus a transmission mount at the rear. They’re often buried deep in the engine bay. Long extensions and universal joints are essential to reach the fasteners without removing the whole intake setup.
European Vehicles (BMW, Mercedes-Benz, Porsche)
These cars add extra complexity:
- Mercedes-Benz — Many models require lowering the subframe to access the large hydraulic mounts. Support the engine from the top first.
- BMW — Mounts sit inside aluminum reinforcement plates that use stretch bolts requiring replacement every time they’re removed.
- Porsche — Many models use a crossmember that carries both engine and suspension. Incorrect support while unbolting it can shift the engine and tear other mounts.
OEM vs. Aftermarket: Which Mount Should You Buy?
| Part Tier | Comfort Level | Expected Life | Notes |
|---|---|---|---|
| Genuine OEM | Factory feel | 80,000–120,000 miles | Most expensive; matches exact specs |
| Tier 1 Aftermarket | Near-factory | Moderate to high | Often made in the same factories as OEM |
| Economy Aftermarket | Poor — noticeable vibration | Often under 1 year | Hard rubber, no hydraulic damping |
| Performance Polyurethane | Very harsh | Very high | Better for track use than daily driving |
Economy mounts use hard solid rubber instead of hydraulic damping to cut costs. They hold the engine in place, but you’ll feel every vibration. Spend a bit more on Tier 1 aftermarket or OEM — it’s worth it.
Should You Replace All Mounts at Once?
Yes, and here’s why:
- When one mount fails, the others absorb its load and wear faster
- If the engine is already supported and the subframe is already lowered, the extra labor to swap the remaining mounts is minimal
Doing them all at once saves you from repeating this whole job in six months.
The Final Road Test
After everything is buttoned up, test across these four scenarios before calling it done:
- Stationary idle — AC on, transmission in gear, foot on brake
- Hard acceleration from a stop — listen for any clunking
- Engine braking — lift off throttle sharply at speed, test the torque rods
- Highway cruise — check for high-frequency resonance that could signal a defective mount or a bolt that wasn’t fully torqued
No clunks, no vibration, no sag — that’s a successful mount replacement.