Is your car blasting hot air when you want cool air? Hearing strange clicking sounds from your dashboard? Your blend door actuator might need a reset. This small but crucial component controls the temperature in your car’s HVAC system, and when it gets out of sync, your comfort takes a hit. The good news? You can often fix it yourself without an expensive trip to the mechanic.
What Is a Blend Door Actuator and Why Does It Need Resetting?
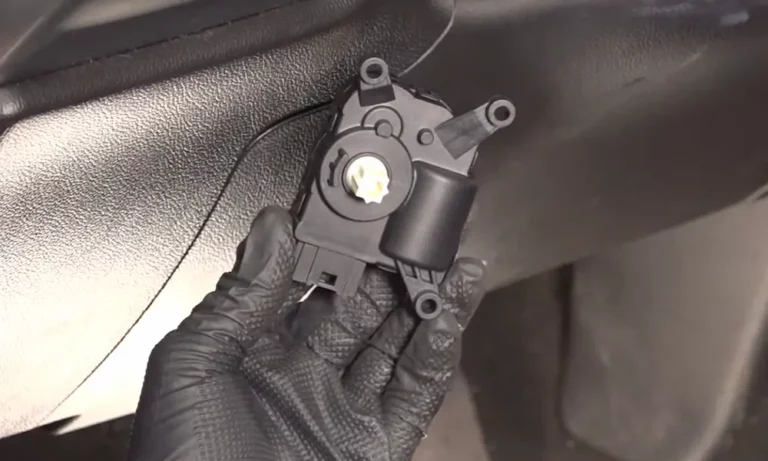
Your blend door actuator is essentially the gatekeeper of temperature control in your vehicle. It’s a small motor that moves flaps (blend doors) inside your dashboard to direct air through either the heating or cooling elements of your HVAC system.
When this component malfunctions, you’ll notice:
- Temperature inconsistencies (hot air when you want cold, or vice versa)
- Air coming from the wrong vents
- Annoying clicking or tapping sounds from your dashboard
These issues often pop up after battery disconnections, actuator replacements, or simply when the system loses its calibration over time. A reset essentially teaches the actuator where its proper positions should be.
Signs Your Blend Door Actuator Needs Attention
Before diving into reset procedures, make sure the symptoms match a blend door actuator problem:
Temperature Control Issues
When you set your climate control to cold but get warm air (or vice versa), your blend door actuator might be stuck or improperly calibrated. This happens because the doors aren’t moving to the correct positions to direct airflow properly.
Incorrect Airflow Direction
Set your vents to blow at your face but air comes from the floor vents instead? Your mode door actuator (a type of blend door actuator) likely needs resetting.
Clicking Noises
That persistent ticking or clicking sound from behind your dashboard isn’t your car’s clock—it’s typically the actuator motor trying to move a stuck blend door or searching for its proper position.
Method 1: Battery Disconnect Reset
This universal method works for most vehicles and is my go-to first attempt:
- Turn off your vehicle completely and remove the key
- Pop the hood and disconnect the battery (negative terminal first, then positive)
- Wait 10-15 minutes for the vehicle’s electronics to fully discharge
- Reconnect the battery (positive first, then negative)
- Turn the ignition to “RUN” position without starting the engine and wait 2-3 minutes
- Start the vehicle and let it idle while the HVAC system recalibrates
- Test by cycling through different temperature settings
The magic happens because your HVAC control module automatically performs a recalibration whenever power is restored after being disconnected. This method has roughly an 80-85% success rate across most vehicles.
Method 2: HVAC Fuse Removal
When the battery disconnect isn’t practical or doesn’t work, try this more targeted approach:
- Find your vehicle’s fuse box (typically under the hood or near the driver’s knee)
- Locate the HVAC fuse labeled “HVAC,” “AC,” “Climate Control,” or similar
- Remove the fuse using needle-nose pliers or the fuse puller tool
- Wait 1-2 minutes
- Reinstall the fuse securely
- Start the vehicle and turn on the climate control system
- Let the system self-calibrate (you’ll hear clicking as actuators find their positions)
Fuse locations vary by manufacturer:
- Ford: Often BCM fuse 46 under the glove box
- GM vehicles: Typically HVAC-B fuse in the engine compartment fuse box
Method 3: Control Panel Reset Sequences
Modern vehicles often have built-in reset sequences you can trigger through button combinations:
For GM Vehicles (Chevrolet, GMC, Cadillac):
- Turn ignition to “ON” without starting
- Make sure all HVAC controls are off
- Press and hold the “Auto” and “Recirculate” buttons simultaneously for 10 seconds
- Release when you hear a click or see the climate control light flash
- Let the system complete its calibration cycle (1-2 minutes)
For Dodge/Ram Vehicles:
- Start the engine and set fan to lowest setting
- Press and hold the “AC” and “Recirculate” buttons together for 10 seconds
- Release, then press and hold the recirculation button again until the light flashes
- Wait for the 20-second calibration to finish
For Ford Vehicles:
Ford procedures vary significantly by model. Some use a combination of “Defrost” and “Power” buttons, while others work better with the HVAC fuse removal method described earlier.
Method 4: Ignition Cycling Reset
This method works especially well after replacing an actuator:
- Make sure the actuator is properly installed with secure electrical connections
- Turn ignition to “ON” without starting and hold for 10 seconds
- Turn ignition “OFF” and wait 10 seconds
- Repeat this ON/OFF cycle three times
- Start the vehicle and set HVAC controls to a neutral position (around 72°F)
- Let the vehicle idle for 1-2 minutes without adjusting any settings
Using Diagnostic Tools for Precise Calibration
For professional-grade results, especially after actuator replacement, consider using bidirectional scan tools:
- Connect the scan tool to your vehicle’s OBD2 port
- Navigate to the HVAC control module in the menu
- Select “Actuator Calibration” or “Special Functions”
- Start the calibration sequence and monitor the actuator’s movement
- Verify completion by checking for diagnostic trouble codes
While professional-grade scan tools cost $300-800, many auto parts stores offer tool lending programs or can perform this service for a reasonable fee.
Troubleshooting When Resets Don’t Work
If multiple reset attempts fail, check these common culprits:
Inspect the AC Relay
A damaged or corroded AC relay can prevent proper actuator operation. Check the relay in your fuse panel and replace if it shows damage or corrosion.
Check Wiring Connections
Examine the wiring harness connected to the actuator for:
- Frayed wires
- Loose connectors
- Corrosion
Poor electrical connections will prevent successful calibration no matter how many resets you try.
Manual Actuator Positioning
If the actuator is severely out of position:
- Remove it from the HVAC housing
- Position the drive shaft to center position (usually between alignment marks)
- Reinstall and perform a standard reset procedure
Important Safety Tips
Always follow these guidelines when working on your blend door actuator:
- Disconnect the battery when handling electrical components
- Wait at least 10 minutes after disconnection to ensure capacitors discharge
- Never force actuator shafts—the plastic gears inside break easily
- Keep scan tools disconnected during manual calibration
Manufacturer-Specific Reset Notes
Ford Vehicles
Many Ford models work best with this combined approach:
- Remove the HVAC fuse
- Start the engine
- Run the AC system for about 2 minutes
- Turn off the engine
- Replace the fuse
General Motors
GM vehicles typically have reliable self-calibration systems. The battery disconnect method works well, and the system automatically recalibrates when power returns.
Chrysler/Dodge/Ram
These vehicles respond well to the recirculation button sequence, but timing matters:
- Engine should be running
- Fan should be set to low before attempting the button sequence
Preventing Future Blend Door Actuator Issues
Keep your HVAC system running smoothly with these preventive measures:
- Perform a reset procedure after any battery service or disconnection
- Address clicking noises promptly before gears become completely stripped
- Keep actuator connections clean and check for corrosion during maintenance
- Regularly test your HVAC through all temperature and vent settings
Understanding Your Vehicle’s Specific Needs
Different manufacturers have their own quirks when it comes to blend door actuator design and reset procedures.
| Vehicle Make | Most Effective Reset Method | Common Failure Points |
|---|---|---|
| Ford | HVAC fuse removal + engine run | Door actuator gears, wiring harness |
| Chevrolet/GM | Battery disconnect or button sequence | Actuator motor, calibration memory |
| Dodge/Ram | Recirculation button sequence | Plastic gears, door obstructions |
| Honda/Acura | Battery disconnect (30+ minutes) | Actuator motors, door alignment |
| Toyota | Fuse removal (climate control fuse) | Rare failures, usually wiring related |
Expert Tips for Successful Resets
-
Time matters: Allow the full recommended waiting period during battery disconnects (10-15 minutes minimum)
-
Complete cycles: When using button sequence methods, follow through the entire procedure without interruption
-
Listen for confirmation: Successful recalibration usually produces audible clicking as actuators move through their full range
-
Temperature test: After reset, test by setting to coldest setting for 2 minutes, then warmest for 2 minutes to verify full range of motion
-
Battery health: A weak battery can prevent proper recalibration—ensure yours is fully charged before attempting resets
Resetting your blend door actuator is often a simple fix that can save you hundreds in unnecessary repairs. Start with the battery disconnect method as it works for most vehicles, then try manufacturer-specific approaches if needed. With patience and the right technique, you’ll have your climate control system working properly again in no time.