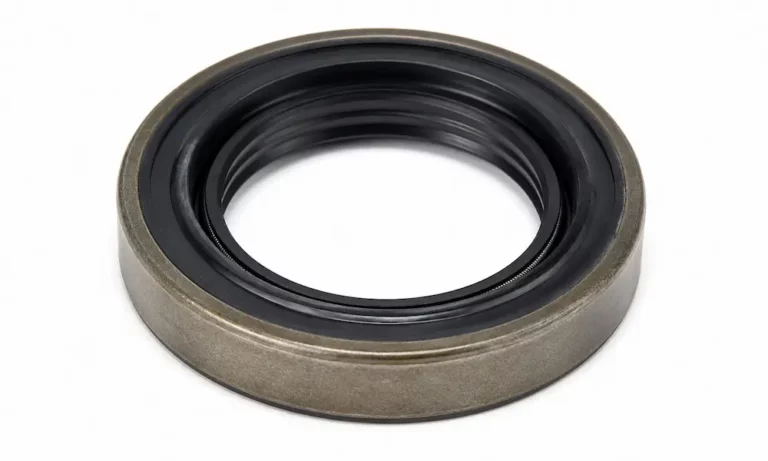
Got a mystery puddle under your truck? It might be your transfer case output shaft seal crying for help. This guide walks you through diagnosing the problem, replacing the seal yourself, and keeping it from happening again — so read on before that drip turns into a disaster.
What Is a Transfer Case Output Shaft Seal?
Your transfer case sits right behind the transmission. It splits engine power between your front and rear axles so your 4WD system can actually work. The output shaft seal is the small rubber-and-metal ring that keeps the fluid inside while blocking dirt and water from getting in.
It sounds simple, but this seal works hard. It presses against a spinning shaft, handles heat cycles, and deals with vibration every single mile. Over time, it wears out — and that’s when the trouble starts.
Signs Your Transfer Case Output Shaft Seal Is Failing
Catching a bad seal early saves you from a much bigger repair bill. Here’s what to watch for:
Fluid on the Ground
The most obvious sign is a reddish or dark brown fluid pooling under your truck. Most modern transfer cases use automatic transmission fluid (ATF), which starts red but turns brown as it ages.
Here’s the tricky part: the spinning shaft flings fluid outward in a spray pattern. You might not see a clean drip — just a greasy film across your undercarriage. By the time you notice it, the fluid level could already be dangerously low.
Noises From the Middle of the Vehicle
When the fluid drops too low, metal-to-metal contact begins. Whining usually means the output shaft bearings are starving for lubrication. Grinding suggests the drive chain or gears are running dry. Neither sound is one you want to ignore.
4WD Won’t Engage — or Stays Engaged
Low fluid throws off the internal pressure your transfer case needs to shift smoothly. You might feel resistance in the shift lever, or it might not move at all. In severe cases, the transfer case can jump out of 4WD unexpectedly — which is a serious safety concern on the trail or the highway.
How Much Does Transfer Case Output Shaft Seal Replacement Cost?
The seal itself is cheap — usually under $66. Labor is where the cost climbs. Here’s a realistic breakdown by vehicle type, based on RepairPal estimates:
| Vehicle Type | Part Cost | Labor Time | Total Estimate |
|---|---|---|---|
| Light-Duty Truck (e.g., Silverado 1500) | ~$66 | 1.5–2.5 hrs | $225–$267 |
| Mid-Size SUV (e.g., Ford Explorer) | ~$66 | 2.5–3.5 hrs | $423–$541 |
| Heavy-Duty Truck (e.g., Ram 2500) | ~$66 | 3.5–5.0 hrs | $586–$789 |
| Compact SUV (e.g., Jeep Grand Cherokee) | ~$66 | 3.0–4.5 hrs | $520–$723 |
DIY-ing this job cuts that labor cost to zero — but you need the right tools and a bit of patience.
What You’ll Need Before You Start
Don’t wing it. Gather everything before you slide under the truck.
Safety gear:
- Floor jack and quality jack stands
- Wheel chocks (critical — more on this in a second)
- Fluid catch pan
- Nitrile gloves
Tools:
- Socket set (metric and standard — American trucks use both)
- Breaker bar or impact wrench
- Seal removal tool or heavy-duty pry bar
- Seal driver set (or a large socket matching the seal’s outer diameter)
- Torque wrench
Supplies:
- New output shaft seal
- Correct transfer case fluid for your vehicle
- Brake cleaner and clean rags
- 400-grit emery cloth
- Oil-resistant silicone sealant
- White paint marker or paint pen
Critical Safety Step Before You Touch Anything
Here’s something many DIY guides skip: once you disconnect the driveshaft, the mechanical link between your transmission’s parking pawl and the drive wheels is broken. Your truck can roll even if it’s in Park.
Before you jack the vehicle up, apply the parking brake and chock all wheels still on the ground. This isn’t optional.
Step-by-Step Transfer Case Output Shaft Seal Replacement
Step 1: Mark the Driveshaft Before Removal
Driveshafts are factory-balanced as a complete assembly. If you bolt yours back in a different position, you’ll feel vibration through the seat all the way home.
Use a white paint marker to draw alignment lines across the driveshaft, the transfer case flange, and the differential pinion flange. Take a photo for backup. This five-second step prevents a very annoying problem later.
Step 2: Remove the Driveshaft
Place your catch pan under the transfer case output.
For slip yoke setups (common on rear-wheel-drive and 4WD trucks):
- Remove the U-joint strap bolts at the differential end
- Gently pry the U-joint free — wrap it with electrical tape so the needle bearing caps don’t fall off
- Slide the shaft forward to clear the differential, then pull it rearward to extract the slip yoke from the transfer case
For fixed yoke or flange setups (common on front outputs and heavy-duty rears):
- Unbolt the driveshaft from the flange
- Use a holding tool or pipe wrench to prevent the yoke from spinning while you break loose the central yoke nut
- Pull the yoke off the splined shaft — use a puller if it’s corroded on there
Step 3: Remove the Old Seal
Use a dedicated seal puller for clean extraction. If you don’t have one, a heel bar works too.
For a really stuck seal, drill a small pilot hole in the metal face, thread in a self-tapping screw, and use pliers or a slide hammer to pull it out.
Don’t pry against the aluminum housing. Even a small gouge creates a leak path behind the new seal. Direct any prying toward the center of the seal, not the housing wall.
After the seal is out, clean the bore with brake cleaner and a plastic scraper. Check the internal bushing — if the output shaft wobbles noticeably, the bushing is worn and needs replacement too. A worn bushing will destroy your new seal fast.
Step 4: Check the Shaft for Wear Grooves
Run your fingernail across the shaft surface where the seal lip contacts it. Feel a groove? That groove will eat through your new seal just like it ate through the old one.
The fix is a stainless steel repair sleeve — sometimes called a Speedi-Sleeve. Here’s how to install one:
- Polish the shaft with 400-grit emery cloth to remove rust and burrs
- Fill any deep grooves with powdered metal epoxy
- Measure the shaft diameter at an unworn spot to get the right sleeve size
- Drive the sleeve on with the included installation tool — keep it straight
- The sleeve’s surface is actually harder and smoother than the original shaft
Skip this step and you’ll be back doing this job in another 20,000 miles.
Step 5: Install the New Seal
Before the seal goes in, check the orientation. The garter spring (that small wire loop on the inner lip) faces the interior of the transfer case. This lets internal fluid pressure push the lip tighter against the shaft — which is exactly what you want.
Lubrication protocol:
- Coat the outer metal shell lightly with oil-resistant silicone sealant
- Lubricate the inner rubber lip with the same fluid your transfer case uses
That last step prevents a “dry start,” where friction burns or tears the fresh rubber lip before fluid reaches it.
Use your seal driver or matching socket to tap the seal in evenly. Drive it until it’s flush with the housing edge or just below the chamfered lead-in. If it goes in crooked, pull it and start over — a cocked seal leaks immediately.
Step 6: Reinstall the Driveshaft
Line up your paint marks exactly. Then torque everything to spec. Here’s a quick reference based on Spicer’s specifications:
| Fastener | Torque Range |
|---|---|
| U-joint strap bolts (1/4″–5/16″) | 14–30 lb-ft |
| Rear driveshaft flange bolts (10–12mm) | 55–65 lb-ft |
| Heavy-duty flange bolts (Spicer 1410 series) | 100–110 lb-ft |
| Transfer case output yoke nut | 90–150 lb-ft |
| Transfer case fill/drain plugs | 13–25 lb-ft |
Replace U-joint strap bolts with new ones if possible. These bolts often have a pre-applied dry thread-locking compound that’s good for one use. If you reuse them, clean off the old compound and apply fresh medium-strength threadlocker.
Refilling the Transfer Case
Most transfer cases don’t have a dipstick. You’ll use the fill-to-spill method to get the level right.
- Make sure the truck is on level ground
- Remove the upper fill plug first — always
- Remove the lower drain plug and let the old fluid drain completely
- Reinstall the drain plug to about 15 lb-ft
- Pump fresh fluid in through the fill hole until it starts running back out
- Once it slows to a drip, it’s full — reinstall the fill plug
- Wipe the whole case with brake cleaner so you can spot any future leaks easily
Use the right fluid for your truck. Using the wrong fluid is one of the most common DIY mistakes:
| Manufacturer | Recommended Fluid |
|---|---|
| Ford | Mercon LV or XL-12 |
| GM | AutoTrak II or Dexron VI |
| Ram/Dodge | Mopar ATF+4 |
| Older Gear-Driven Units (NP205, Dana 24) | SAE 50 or 80W-90 gear oil |
Test Drive and Final Check
Take the truck out and cycle through all drive modes — 2H, 4H, and 4L. Drive at low speed and highway speed. Any new vibration through the seat usually means the driveshaft was reinstalled out of alignment or a U-joint cap wasn’t seated properly.
Back at the shop, put the truck back on the lift and inspect the new seal with a flashlight. A small amount of assembly lube seepage is normal at first. A continuous drip or a spray pattern means the seal failed — usually from a cocked installation, a gouged housing, or a worn shaft that needed a repair sleeve.
If Your Truck Is Lifted, Read This
Suspension lifts change your drivetrain geometry significantly. In a slip yoke system, lifting the truck pulls the yoke further out of the transfer case, which reduces spline engagement and adds vibration stress right at the seal.
If your truck has a significant lift and you keep chewing through output shaft seals, a Slip Yoke Eliminator (SYE) kit is worth considering. It replaces the slip yoke with a fixed flange and moves the slip joint into a custom driveshaft. The transfer case seal then rides against a stationary flange — much more durable for lifted rigs.
Keep the Seal Alive Longer
Transfer case output shaft seal replacement isn’t fun to do twice. These habits add serious life to your work:
- Change the fluid every 30,000–60,000 miles under normal use — more often if you tow heavy or wheel off-road
- Inspect the seals at every oil change — a quick visual takes 30 seconds
- Check the breather vent — this small vent manages internal pressure changes. If it clogs with mud, pressure builds up and pushes fluid past even a healthy seal. Clear it every time you do a drivetrain service