Your car’s blowing freezing cold air in January — or roasting you alive in August. The fix might take you literally 10 seconds. This guide walks you through the 10-second blend door repair, plus every other method ranked by difficulty. Read to the end — there’s a permanent fix in here that doesn’t require tearing your dashboard apart.
What’s a Blend Door (and Why Does It Break)?
Your car’s HVAC system hides a small plastic door behind the dashboard. That’s the blend door. It swings back and forth to mix hot and cold air, giving you the temperature you want.
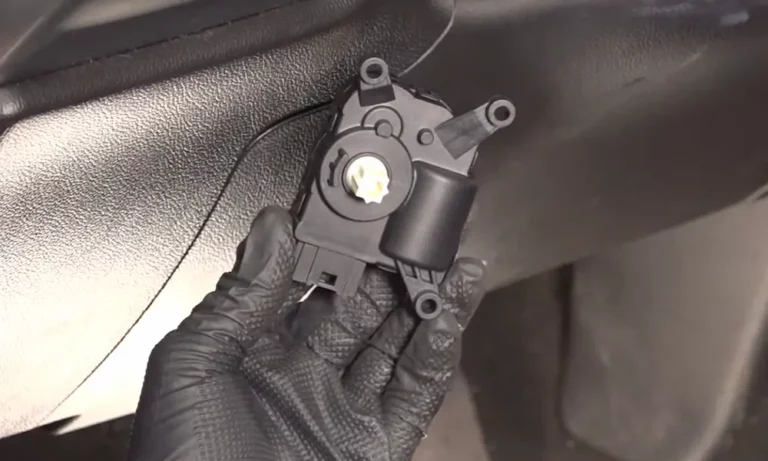
A tiny electric motor — called a blend door actuator — controls that door. It pushes the door against a plastic stop every 20 key cycles to recalibrate its position. Do that thousands of times, and the plastic cracks. Think of bending a coat hanger back and forth — eventually it snaps.
That’s why these systems fail. It’s not bad luck. It’s a design flaw baked into most OEM plastic components.
How Do You Know It’s the Blend Door?
Before you start, confirm you’re dealing with the right problem.
You likely have a blend door issue if:
- You hear a rhythmic clicking behind the dashboard when you start the car
- Your heat or AC is stuck at one extreme — full blast hot or full blast cold
- The temperature changes when you physically push something behind the glovebox
- One side of a dual-zone system blows hot while the other blows cold
It’s probably NOT the blend door if:
- No air comes out of the vents at all (that’s usually the blower motor)
- The AC blows warm but only when idling (check refrigerant charge first)
- You hear a hissing sound near the dashboard (could be a vacuum line)
On Dodge Ram trucks, low refrigerant can mimic a broken blend door — the passenger side stays warm while the driver side cools. Check your refrigerant before touching anything else.
The 10-Second Blend Door Repair: Step-by-Step
This is the manual bypass everyone’s searching for. No tools. No parts. No dashboard removal.
Here’s how it works:
- Open your glovebox fully
- Squeeze the plastic tabs on the sides (or unclip the dampening arm) so the glovebox drops all the way down
- Look behind the dashboard — find the white or black plastic heater housing
- Spot the blend door hinge — it’s a small plastic arm or gear-driven pivot on the side of that housing
- Push or pull that hinge to the position you need:
- Full toward heater core = maximum heat
- Full away from heater core = maximum AC
That’s it. You’ve just manually bypassed the failed actuator.
The catch: The door won’t stay put on its own. Vibration and airflow pressure can move it back. Wedge a small object into the hinge, or unplug the actuator’s electrical connector to stop the motor from fighting you.
This is a temporary fix. It buys you time — and keeps you comfortable — until you do a proper repair.
When the 10-Second Fix Works (and When It Doesn’t)
| Symptom | Will the 10-Second Fix Work? | What to Do |
|---|---|---|
| Rhythmic clicking noise | Yes | Manual override — bypass the stripped gears |
| Air stuck on one extreme | Yes | Rotate the blend door hinge manually |
| No airflow from vents | No | Check blower motor or mode door |
| Uneven dual-zone temps | Maybe | Try overriding the specific side’s actuator |
Try an Electronic Reset First (If It’s Silent)
If there’s no clicking noise and the system is just confused — not broken — an electronic reset might fix everything in 90 seconds.
This often happens after a battery swap or jump-start. The control module loses its calibration memory and doesn’t know where the door is anymore.
General reset procedure (works on many vehicles):
- Turn ignition to “On” — don’t start the engine
- Rotate the temperature knob from full cold to full hot slowly
- Pause one second at each extreme
- Leave everything alone for 60 seconds
- The system runs a self-sweep of all air doors and remaps its limits
If the clicking was caused by a calibration error, it’ll disappear. If the clicking continues, you have a mechanical failure — skip to the sections below.
Brand-Specific Resets That Actually Work
Ford EATC Systems
Ford vehicles with Electronic Automatic Temperature Control have a built-in diagnostic mode. This moves every door and spits out error codes on the display.
| Step | What to Do | Notes |
|---|---|---|
| 1 | Ignition On, engine Off | Don’t start the car |
| 2 | Press “Off” + “Floor,” then hit “Automatic” within 2 seconds | Triggers the self-test |
| 3 | Wait up to 60 seconds | Screen stays blank while doors cycle |
| 4 | Read 3-digit error codes | “888” means no faults found |
| 5 | Press “Defrost” to exit | Saves results |
Code 024 means a current mixing hatch fault. Code 025 means an intermittent fault — likely a gear starting to strip. Use these to confirm whether you need a mechanical fix or just a calibration reset.
Chevy Silverado and GMC Sierra
The Silverado commonly blows hot on one side and cold on the other after a battery disconnect. The HVAC module drifts out of calibration.
Here’s the fix:
- Turn the ignition off and remove the key
- Pull the HVAC/ECAS fuse (usually Fuse 15 or Fuse 42) from the interior or under-hood fuse panel
- Wait 10–60 seconds
- Reinstall the fuse
- Start the engine and let it idle 3–5 minutes — don’t touch the climate controls
That last step matters more than most people realize. If you adjust the knobs during auto-calibration, the module stores the wrong travel limits and the problem returns immediately.
Chrysler, Dodge, and Jeep (AZC Systems)
Jeep Grand Cherokees and Dodge Rams use a “clam shell” door design where upper and lower blend doors link together. When that plastic axle cracks, the system throws specific fault codes.
To enter diagnostic mode:
- Ignition On, climate system active
- Hold “AC” and “Recirculation” simultaneously
- Rotate the driver-side temp knob one click right
Watch for these codes:
| Code | What It Means |
|---|---|
| 15 / 47 | Left temperature door not responding |
| 22 / 54 | Left door travel too large — broken stop or axle |
| 24 / 56 | Right door travel too large — passenger-side door broken |
| 20 / 52 | Recirculation door travel too large |
Codes 22, 24, or 54 confirm physical damage. An electronic reset won’t help. You need a mechanical fix.
For a quick reset attempt, pull the IOD fuse from the engine bay Power Distribution Center. Wait a few minutes, reinstall it, then leave the system alone for 60 seconds after turning the ignition on.
Permanent Fixes That Don’t Require Removing the Dashboard
If the 10-second fix and electronic resets didn’t solve it, here are your best permanent options — none of them require an 8–14 hour dashboard teardown.
The Ford Explorer Nail Fix
This fix is specific to late-1990s through early-2000s Explorers where the plastic axle receiver splits. Remove the actuator motor — it’s three 8mm screws through the glovebox. Inspect the axle. If it’s cracked but still there, drill a small finishing nail through the actuator’s output shaft at an angle. When you reinstall the motor, the nail splints the crack. Full electronic function restored.
The Zip-Tie Manual Override
Loop a heavy-duty zip-tie around the blend door lever. Route the tail into the glovebox. Now you’ve got a manual pull cord — tug it for heat, release for cool. It sounds ridiculous. It works.
The Metal Replacement Kit (Best Long-Term Fix)
Companies like HeaterTreater make metal blend door replacement kits that solve the root problem — plastic doors that can’t handle the actuator’s torque.
Installation uses the “Dremel Method.” You cut a small access hole in the side of the plastic heater housing (hidden once the dash panel goes back on), remove the broken plastic door, and insert a metal replacement. Seal the cut with metal tape or epoxy. The metal door handles calibration cycles without cracking — permanently.
All Your Repair Options, Ranked
| Repair Method | Difficulty | Tools Needed | How Long It Lasts |
|---|---|---|---|
| 10-Second Manual Push | Minimal | None | Temporary |
| Electronic Reset | Minimal | None | Permanent (if electronic fault) |
| Actuator Replacement | Moderate | Socket set / Torx bits | Permanent |
| Nail Fix (Ford Explorer) | Moderate | Drill + finishing nail | Long-term |
| Metal Replacement Kit | High | Rotary tool / Dremel | Lifetime of vehicle |
Why Resets Fail (And What to Check)
A reset fails when the problem is physical, not electronic.
The most sneaky culprit? A foreign object jamming the door. A pen, a coin, or a receipt can slide through the defrost vents and into the heater box. The actuator hits the object during calibration, strips a gear, and the reset loop never completes correctly.
Also check your wiring harness. The actuator motor relies on voltage spikes to tell the computer where the door sits. High resistance in a corroded harness sends bad data. The computer thinks calibration failed even when the mechanical components are fine.
If you’ve tried three electronic resets and the problem keeps coming back, stop resetting and start inspecting. Something physical is going on inside that heater box.