Got a spongy clutch pedal that feels like you’re stepping on a marshmallow? Air in your hydraulic clutch system is probably the culprit. Bleeding your clutch master cylinder isn’t rocket science, and you don’t need a mechanic’s paycheck to get it done. This guide walks you through multiple methods so you can pick what works best for your setup and skill level.
What’s Actually Happening in Your Clutch System
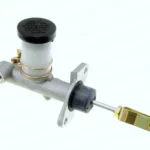
Your hydraulic clutch system works like a miniature plumbing network. The clutch master cylinder connects to a slave cylinder through hydraulic lines, using brake fluid as the transmission medium. When you press the pedal, the master cylinder creates pressure that travels through the line to engage or disengage the clutch.
Here’s the problem: air is compressible, but brake fluid isn’t. When air sneaks into your system, you lose that solid hydraulic connection. Instead of immediate clutch engagement, you get that mushy pedal feel that makes shifting gears feel like guesswork.
The system typically uses DOT 3 or DOT 4 brake fluid as the operating medium. Check your owner’s manual before adding fluid – mixing different types can cause problems.
Signs You Need to Bleed Your Clutch
Your car talks to you through symptoms. Listen up when you notice:
Spongy pedal feel – The clutch pedal feels soft or gives too much before engaging. That’s air bubbles acting like tiny springs in your hydraulic line.
Gear grinding or resistance – Shifting feels like you’re forcing gears together. The clutch isn’t fully disengaging because air pockets are preventing full hydraulic pressure.
Pedal hits the floor – The clutch pedal drops to the floorboard with little resistance. This screams air in the system.
Inconsistent catch point – One day the clutch engages near the floor, the next day it’s near the top. This wandering engagement point means air is moving around in your hydraulic lines.
Gather Your Tools First
Don’t start the job then realize you’re missing something critical. Here’s what you need:
Basic Equipment
- Fresh brake fluid (DOT 3 or DOT 4 per your manual)
- 8mm or 10mm box-end wrench
- Clear plastic tubing (1/4 inch works great)
- Drain container for old fluid
- Safety glasses and gloves
- Jack and jack stands
- Turkey baster for removing old fluid
Upgrade Options
Want to make life easier? Consider these:
Speed bleeders are replacement bleeder screws with built-in one-way valves. They cost around $15-20 but let you work solo.
Vacuum pump brake bleeders create suction to pull fluid through the system. Hand-operated models run $20-40.
Pressure bleeders push fluid from the reservoir downward. They’re pricier but super efficient for regular maintenance.
Method 1: Traditional Two-Person Bleeding
This is the tried-and-true method. It requires a helper but it’s the most reliable approach.
Setup Phase
Park on level ground and engage the parking brake. Pop the hood and locate your clutch master cylinder reservoir – it’s usually mounted near the brake master cylinder on the firewall. Follow the line down to your transmission to find the slave cylinder bleeder valve.
Top off the reservoir with fresh brake fluid and leave the cap off. Wipe everything clean around the bleeder valve before starting.
The Bleeding Dance
Attach your clear tubing to the bleeder valve. Drop the other end in a container with a bit of brake fluid in the bottom – this prevents air from being sucked back up the tube.
Here’s the rhythm you and your helper need to master:
- Helper presses clutch pedal to the floor and holds it there
- You crack open the bleeder valve with your wrench
- Fluid (and air bubbles) shoot out into your tube
- Close the valve while the pedal is still down
- Helper releases the pedal slowly
- Repeat
Call out each step so you’re synchronized. “Pedal down… opening… closing… release.” Like a really boring dance routine.
Watch that reservoir constantly. If it runs dry, you’ll suck air into the system and have to start over. Keep it topped off between every few pumps.
You’re done when no air bubbles appear in the tube – just solid, clear fluid. Usually takes 10-15 pump cycles.
Method 2: Gravity Bleeding (Solo Operation)
No helper? No problem. Gravity bleeding lets you work alone, though it’s slower.
Fill your reservoir to the brim. Attach clear tubing to the bleeder valve with the other end in your catch container. Open the bleeder valve about 1/4 turn and walk away.
Seriously. Gravity does the work.
Check back every 5 minutes to refill the reservoir. The fluid level drops as gravity pulls it through the system. You’ll see air bubbles flowing through your clear tube, getting smaller and less frequent.
After 15-20 minutes, you should see steady, bubble-free fluid. Close the valve, pump the pedal a few times, and check your work. The pedal should feel firm.
This method works great if you’re patient. Grab a beer, check your phone, refill the reservoir. Repeat.
Method 3: Vacuum Bleeding
A vacuum bleeder creates suction that pulls fluid through your system. It’s faster than gravity and doesn’t require a helper.
Attach the vacuum bleeder to the bleeder valve. Some systems attach to the reservoir instead. Build up 15-20 psi of vacuum using the hand pump, then crack open the bleeder valve.
The vacuum sucks fluid through the system. Watch for air bubbles in your collection chamber. When you see consistent, bubble-free fluid, close the valve and release the vacuum.
Pro tip: Some vacuum bleeders draw air past the bleeder valve threads, making it look like you’ve got air in the system when you don’t. A bit of Teflon tape on the threads fixes this.
Method 4: Bench Bleeding New Master Cylinders
Installing a new master cylinder? Bench bleed it first or you’ll fight air bubbles forever.
Secure the new cylinder in a bench vise by its mounting flange. Fill the reservoir and install short tubes from each outlet port back into the reservoir. This creates a closed loop.
Slowly stroke the piston using a wooden dowel or screwdriver handle. Short strokes, about 3/4 to 1 inch. You’ll see air bubbles flowing through the tubes into the reservoir.
Keep stroking until no bubbles appear – usually 20-30 strokes. Cap the outlets immediately, install the cylinder on your vehicle, and connect the lines. This eliminates most air before the system is even installed.
Advanced Technique: Speed Bleeders
Speed bleeders are replacement bleeder screws with built-in one-way check valves. They’re game-changers for solo bleeding.
The valve opens under pressure when you push the pedal, then closes automatically when you release it. Air and fluid go out, but nothing comes back in.
Install them like regular bleeder screws. Open 1/4 turn, pump the clutch pedal 5-6 times, and you’re done. No helper needed, no timing required.
They cost $15-20 per screw and eliminate the coordination dance completely. Best upgrade for DIY mechanics who work alone.
Reverse Bleeding for Stubborn Air
Got air that won’t budge? Reverse bleeding pushes fluid from the slave cylinder toward the master cylinder – opposite the normal flow.
Remove the bleeder screw completely. Press the slave cylinder pushrod firmly into the cylinder body. While holding it in, have your helper reinstall and tighten the bleeder screw.
Release the pushrod carefully, guiding it into position. This technique forces trapped air upward and can clear stubborn pockets that resist normal bleeding.
It’s a bit tricky and risks making a mess, but it works when traditional methods fail.
Troubleshooting Common Problems
Air bubbles won’t stop coming
Check for leaks at all connections. A tiny leak lets air in every time you release the pedal. Tighten fittings and inspect rubber lines for cracks.
The master cylinder might have internal seal damage. If fluid flows but bubbles never stop, the cylinder could be drawing air past worn seals.
No fluid flows at all
Confirm the reservoir actually has fluid in it (rookie mistake – we’ve all done it). Check for clogged reservoir outlets or kinked hydraulic lines.
Make sure the bleeder valve is actually opening. They can get corroded and stuck. If it won’t budge, don’t force it – you’ll snap it off. Use penetrating oil and let it soak.
Pedal still feels spongy after bleeding
Air might be trapped in the master cylinder body. Try bleeding it again with the cylinder at different angles, or bench bleed it if you can remove it.
Internal seal damage in the master or slave cylinder can also cause this. The seals leak pressure internally, giving you that spongy feel even with no air present.
Fluid level keeps dropping mysteriously
You’ve got a leak somewhere. Check the slave cylinder for wetness, inspect the hydraulic line for damage, and examine the master cylinder for fluid seeping past seals.
Safety Stuff You Can’t Ignore
Brake fluid is nasty stuff. It’s corrosive to paint, skin, and eyes. Wear gloves and safety glasses – getting brake fluid in your eye ruins your whole day.
Work in a ventilated area. Brake fluid vapors aren’t great to breathe for extended periods.
Use the correct fluid type. DOT 3 and DOT 4 are usually interchangeable, but check your manual. DOT 5 is silicone-based and NOT compatible with most clutch systems.
Never reuse old brake fluid. It’s hygroscopic, meaning it absorbs moisture from the air. Old fluid can have water content that lowers its boiling point and causes corrosion.
Dispose of brake fluid properly. It’s hazardous waste. Most auto parts stores and service stations accept used brake fluid for recycling.
Maintenance Schedule Reality Check
Most manufacturers recommend bleeding your clutch every 2-3 years or 30,000 miles. That’s a general guideline – your mileage (literally) may vary.
Live near the ocean or in humid climates? Brake fluid absorbs moisture faster, so consider bleeding annually. Track your car hard? Heat cycles break down fluid faster.
Here’s a simple test: if your clutch fluid looks dark brown or black, it’s way overdue. Fresh fluid is clear to light amber.
| Driving Condition | Recommended Interval |
|---|---|
| Normal street driving | Every 2-3 years |
| High humidity climate | Every 1-2 years |
| Performance/track use | Every year |
| After any clutch work | Immediately |
Quick Reference: Bleeding Methods Compared
Different methods work better for different situations. Here’s the breakdown:
| Method | Time Required | Helper Needed | Difficulty | Best For |
|---|---|---|---|---|
| Traditional two-person | 15-20 min | Yes | Easy | Most reliable results |
| Gravity bleeding | 30-45 min | No | Very easy | Solo work, patience required |
| Vacuum bleeding | 10-15 min | No | Moderate | Quick solo bleeding |
| Speed bleeders | 5-10 min | No | Easy | Regular maintenance |
| Bench bleeding | 10 min | No | Easy | New master cylinders |
Final Thoughts on Getting It Right
Bleeding a clutch master cylinder isn’t complicated, but it does require patience and attention to detail. The traditional two-person method remains the gold standard for reliability, while gravity bleeding offers a solid solo alternative.
Speed bleeders are worth every penny if you work on cars regularly. They transform a two-person job into a quick solo task.
The key to success? Keep that reservoir full, work methodically, and don’t rush. Air bubbles are sneaky – they hide in high points and resist being pushed out.
If you’ve tried everything and still can’t get a firm pedal, you might have internal component damage. Worn seals in the master or slave cylinder can mimic air in the system. At that point, replacement parts solve what bleeding can’t fix.
Now get out there and make that clutch pedal feel like new again. Your transmission will thank you with smooth, crisp shifts.