Water dripping from your sunroof is more than annoying — it can wreck your headliner, soak your carpet, and fry your car’s electrical system. The good news? Most sunroof leaks are fixable without a trip to the shop. This guide walks you through exactly how to find the leak and stop it for good.
Your Sunroof Isn’t Designed to Be Watertight
Surprised? Most people are. Modern sunroofs don’t create a perfect seal — they’re built around a managed drainage system. Here’s how it works:
- A rubber weatherstrip deflects most rain away from the opening
- A drainage tray beneath the glass catches whatever gets past the seal
- Four drain hoses route that water down through the pillars and out under the car
When any part of this system fails, water ends up inside your cabin instead of under your car. Understanding this drainage philosophy is the key to diagnosing any sunroof leak correctly.
Why Your Sunroof Is Leaking
Before you fix anything, you need to know what broke. There are three main culprits.
Clogged Drain Tubes
This is the big one. Roughly 90% of all sunroof leaks come from blocked drain tubes. Leaves, pine needles, pollen, and dirt wash into the tray when it rains. Over time, that debris packs into the hoses like a slow-growing plug.
In humid climates, algae and moss can actually grow inside the tubes. In dry or rural areas, mineral dust mixes with water and turns into heavy silt that settles in the bends of the hose.
A Worn or Cracked Weatherstrip
The rubber seal around your sunroof glass takes a beating. UV rays, heat cycles, and years of compression cause it to harden, shrink, and crack. Once the seal loses its flexibility, it can’t press tightly against the roof frame — and water sneaks through the gaps.
Here’s a common scenario: your drains work perfectly, but the worn seal dumps so much water into the tray that it overflows the interior lip and soaks your headliner. This an “overflow leak” — the drains aren’t the problem, the seal is.
Misaligned or Stuck Glass
If road vibration has loosened the mounting hardware, your sunroof glass might sit a few millimeters off-center. That tiny gap creates massive seal pressure differences around the perimeter. Debris stuck in the tracks can also keep the panel from closing completely — leaving it in a “micro-open” position that’s nearly invisible but lets in plenty of water.
How to Find the Exact Leak Source
Don’t start pulling things apart before you know where the water’s actually coming from. Read the clues your car is giving you first.
Read the Moisture Pattern
Where the water shows up tells you a lot:
- Wet sun visors or front footwells → front drain tubes are clogged or overflowing
- Water marks on the A-pillars → a drain hose has disconnected or split inside the pillar
- Wet rear seats or trunk → rear drain tubes are blocked or disconnected
- Musty smell with no visible water → moisture is trapped under your carpet or behind the headliner — mold may already be growing
Run a Water Test
Grab a helper and a garden hose. Do this in stages — this diagnostic approach saves you from chasing the wrong problem:
- Start low — wet the base of the pillars and door seals to rule out non-sunroof leaks
- Move up to the sunroof seal — if water appears inside, the seal or tray is failing
- Open the sunroof and pour water directly into the drain holes — if it doesn’t exit under the car within seconds, the tubes are blocked
Use UV Dye for Tricky Leaks
If the water takes a long, winding path behind interior panels before it appears in the cabin, a standard water test won’t pinpoint it. UV fluorescent dye detection solves this. Mix water-soluble dye with water, apply it at the suspected entry point, then scan with a UV lamp. The dye glows brightly wherever the water traveled — no guesswork, no unnecessary panel removal.
How to Fix a Sunroof Leak: Step-by-Step
Now for the actual repair. Work through these fixes in order — start with the easiest and most likely cause first.
Step 1: Clear the Clogged Drain Tubes
This fix costs almost nothing and solves most leaks. According to this step-by-step Instructables guide, here’s exactly how to do it:
- Grab a length of weed trimmer line (the thick stuff, around 0.095″ gauge works well)
- Slightly melt the tip with a lighter to round it off — this stops it from snagging inside the hose
- Feed the line into each drain hole using a gentle back-and-forth snaking motion
- Push until it exits at the bottom of the car
- Flush with warm water to confirm the tube is clear
Don’t use metal wire or coat hangers. The drain hoses are thin-walled plastic or rubber — a metal wire punches right through them. Replacing a hose hidden inside a pillar means major interior disassembly. Not worth it.
For stubborn algae-based clogs, pour a mild dish soap solution into the drain hole, let it sit for a few minutes, then flush with clean water. Skip harsh solvents — they’ll make the rubber brittle.
Here’s a quick comparison of clearing methods:
| Method | Best Tool | Pressure/Force | Risk Level |
|---|---|---|---|
| Manual snaking | Weed trimmer line | Gentle | Lowest — start here |
| Low-pressure air | Canned air duster | Low | Low — safe for most cars |
| Compressed air | Air compressor | Max 30 PSI | Higher — can pop hose connections |
If you use compressed air, never seal the nozzle tightly into the drain hole. Leave a small gap so back pressure can escape — otherwise you’ll blow the hose right off the tray fitting.
Step 2: Clean and Condition the Weatherstrip
Once the drains are clear, check the seal. We recommend this routine:
- Wipe down the entire rubber seal and the metal roof flange with a damp microfiber cloth and mild soap
- Rinse and dry completely
- Apply a silicone-based lubricant to the seal — work it in around the full perimeter
Silicone keeps rubber flexible and resistant to UV damage. It’s the right product for this job. Never use petroleum-based products like Vaseline or WD-40 on rubber seals — they cause swelling and accelerate breakdown.
Step 3: Seal Minor Cracks in the Weatherstrip
If the seal has small cracks but still holds its shape, you can extend its life without replacing it. We recommend this approach:
- Clean the cracked area with rubbing alcohol — remove all oil and residue
- Apply a thin bead of clear, flowable silicone sealant into the cracks
- Smooth it level with a gloved finger
- Let it cure fully before testing with water
This buys you time — potentially months or even a year or two — but it’s not permanent. A seal that’s gone hard or lost its profile shape needs replacement.
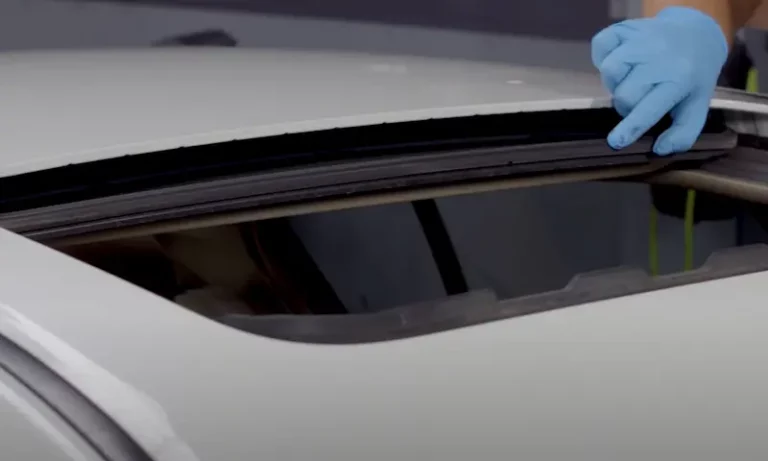
Step 4: Replace the Weatherstrip
When the seal is too far gone, replacement is the only real fix.
- Pull the old seal away from the glass — it’s usually held by friction or a small metal clip
- Clean the mounting channel completely
- Press the new seal onto the flange starting at one corner, working around the perimeter
- Don’t stretch the seal as you go — a stretched seal creates a gap right where the two ends meet
Step 5: Realign the Sunroof Glass
If the drains are clear and the seal is good but you’re still getting water, the glass is probably sitting crooked. This DIY car sunroof repair guide covers the alignment process:
- Put a strip of painter’s tape along the glass edge to mark the original position
- Remove the plastic side covers (sometimes you’ll need to partially lower the headliner)
- Loosen the mounting bolts — the elongated holes allow adjustment
- Shift the glass so the front edge sits slightly below the roofline and the rear edge is flush or just above
- Tighten bolts to the manufacturer’s torque spec
While you’re in there, clean the old grease out of the tracks with a cloth and apply fresh white lithium grease to the sliding components. Stiff tracks can stop the motor from closing the panel completely.
Where Your Drain Tubes Actually Go
Knowing this helps when you’re testing or chasing a disconnected hose:
| Drain Location | Routing Path | Exit Point |
|---|---|---|
| Front Left | Down the driver-side A-pillar | Behind front fender liner |
| Front Right | Down the passenger A-pillar | Behind front fender liner |
| Rear Left | Down B-pillar or C-pillar | Behind rear wheel well |
| Rear Right | Down B-pillar or C-pillar | Behind rear wheel well |
At each exit point, there’s often a small duckbill valve designed to keep bugs out. These valves trap fine debris and are frequently the first point of failure in the whole system.
Dry Out the Interior After a Sunroof Leak
Stopping the leak is only half the job. Standing water does serious damage if you ignore it.
For wet carpet:
- Use a wet/dry vacuum to pull out as much water as possible
- Lift the carpet and run fans underneath — this prevents mold and stops the floor pan from rusting
For a sagging headliner:
- Dry it quickly — once the adhesive fails, it sags permanently
- Mineral water stains can often be cleaned with an upholstery-safe cleaner
- If the backing board warped, replacement is the only fix
Mold can start growing in as little as 24-48 hours in wet carpet insulation. Don’t wait on drying out the interior.
Keep Your Sunroof Leak-Free Going Forward
The best fix is one you never need. We recommend these habits to keep the system working:
- Every 6 months: Open the sunroof, clean out the tracks, and pour water into the drain holes to confirm they’re flowing freely
- Once a year: Wipe down and re-condition the weatherstrip with silicone lubricant
- After parking under trees: Clear leaves and debris from the sunroof tray before they can wash into the drain holes
A few minutes twice a year is a lot cheaper than a new headliner.