
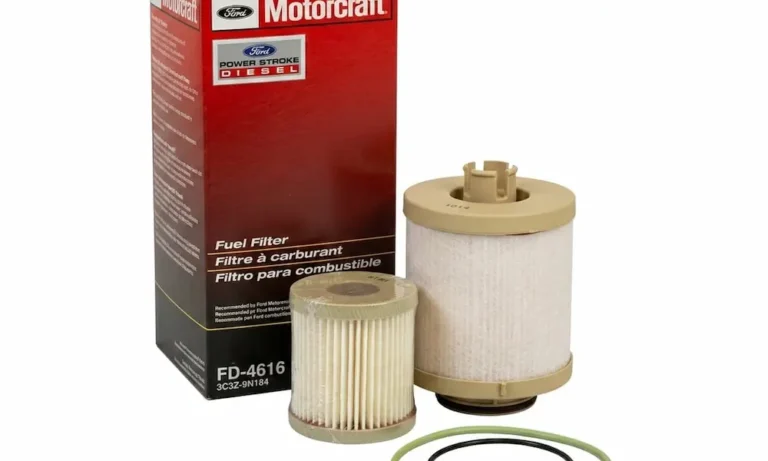
Your 6.0 Powerstroke fuel filter replacement isn’t just routine maintenance — it’s the single most important thing standing between your injectors and a catastrophic, wallet-destroying failure. Skip it, or do it wrong, and you’re looking at thousands in repairs. This guide walks you through everything you need to know, from tools to torque specs, so you get it right the first time.
Why the 6.0 Powerstroke Fuel System Is So Unforgiving
The 6.0 Powerstroke uses a Hydraulic Electronic Unit Injector system. Instead of a traditional injection pump, high-pressure engine oil fires the injectors mechanically. Diesel fuel doesn’t just combust — it also cushions the injector plunger on every stroke.
Here’s why that matters: if fuel pressure drops below 45 PSI, that cushion disappears. The plunger slams metal-to-metal. You get scoring, stiction, and eventually a dead injector — sometimes all six at once. A set of replacement injectors runs well over $3,000 installed.
Replacing the fuel filters on schedule keeps pressure where it needs to be and keeps your injectors alive.
Understanding the Dual-Filter Setup
The 6.0 Powerstroke runs two filters in sequence, not one.
Stage 1 — The Horizontal Fuel Conditioning Module (HFCM): This aluminum manifold mounts on your frame rail. It houses the electric lift pump, a 10-micron primary filter, a water separator, and a water-in-fuel sensor. It catches the big stuff and strips out moisture before fuel ever reaches the engine.
Stage 2 — Engine-Mounted Secondary Filter: This finer 4-micron filter sits in the engine valley next to the oil filter. It polishes the fuel of anything that slipped past stage one. It also houses the fuel pressure regulator and a self-purging air bleed orifice that vents trapped air back to the tank automatically.
Both filters work together. Skip one, and you compromise the whole system.
Where Is the HFCM on Your Truck?
The HFCM location varies by cab and bed configuration. Here’s the breakdown:
| Vehicle Configuration | Box / Tank Type | HFCM Location |
|---|---|---|
| Regular Cab Pick-up | 8 ft bed | Left side of fuel tank |
| SuperCab Pick-up | 6.75 ft or 8 ft bed | In front of fuel tank |
| Super Crew Cab | 6.75 ft or 8 ft bed | Left side of fuel tank |
| Chassis Cab | Single midship tank | Right side of fuel tank |
| Chassis Cab | Aft-axle and midship tanks | Right side of midship tank |
| Chassis Cab | Single aft-axle tank | Front of fuel tank |
How Often Should You Replace the Filters?
The answer depends on how hard you work the truck.
| Service Item | Normal Conditions | Severe Duty |
|---|---|---|
| Primary + Secondary Fuel Filters | Every 15,000 miles | Every 10,000 miles or 6 months |
| HFCM Water Drain | Monthly | Monthly or when WIF light illuminates |
| Engine Oil + Filter | 7,500 miles or 6 months | 5,000 miles or 6 months |
If you tow regularly, idle a lot, operate in dusty environments, or run biodiesel blends above 5%, treat your truck as severe duty. Err on the shorter interval every time.
Which Filters Should You Buy?
This is where most people make an expensive mistake. The Motorcraft FD-4616 is the correct filter kit for 2003–2007 6.0 Powerstroke trucks and vans. The FD-4604 covers E-Series applications. The OEM supplier equivalent is the Racor PFF4616.
Here’s the full approved cross-reference list:
| Brand | Part Number | What’s Included |
|---|---|---|
| Motorcraft (Ford) | FD-4616 | Primary filter, secondary filter, two O-rings |
| Racor (OEM Supplier) | PFF4616 | Primary filter, secondary filter, two O-rings |
| Navistar International | 1847170C94 | Primary filter, secondary filter, two O-rings |
| Motorcraft (Van/E-Series) | FD-4604 | Primary filter, secondary filter, two O-rings |
Why You Should Avoid Aftermarket Filters
Generic aftermarket filters might look fine on the shelf. They’re not.
Many aftermarket brands fuse the filter media directly to a disposable plastic cap. This integrated design causes two serious problems. First, when you go back to an OEM filter, your reusable factory cap is gone — you’ll need to buy a new housing cover. Second, and far more dangerous, these undersized aftermarket cartridges often fail to depress the bypass standpipe valve inside the secondary filter bowl. When that valve stays open, completely unfiltered diesel bypasses the 4-micron media and flows straight into your injectors. The damage is fast and permanent.
Stick with Motorcraft or Racor. It’s not worth the gamble.
Tools You Need Before You Start
Don’t improvise with the wrong tools here. The filter caps are plastic, and the housings are aluminum. It’s easy to crack one if you use too much force.
Required tools:
- 3/8-inch drive ratchet — not a 1/2-inch, not an impact wrench
- Low-profile reversible socket with 24mm and 36mm ends — the dual-sided design saves a lot of trouble on 4WD trucks where the driveshaft blocks access
- 6mm hex wrench for the water drain plug
- Torque wrench
- Clean shop towels or brake cleaner spray
- Transparent drain container
- Flashlight
Step-by-Step: 6.0 Powerstroke Fuel Filter Replacement
Step 1: Drain the HFCM Water Separator
Park on a level surface. Turn the ignition off. Place your clear drain container under the HFCM on the driver-side frame rail.
Use your 6mm hex wrench to turn the drain plug counterclockwise and open the valve. Watch what drains out carefully:
- Amber or pale green, mostly clear — normal, healthy fuel
- Milky white or heavily emulsified — serious water contamination; the tank may need cleaning
- Grey paste, silver flakes, or rust-colored silt — tank delamination or lift pump failure; stop and diagnose before continuing
Once it stops draining, reinstall the plug snugly. Don’t exceed 7 foot-pounds — hand-tight is enough.
Step 2: Replace the Primary Filter (Frame-Mounted)
Wipe down the outside of the HFCM with brake cleaner to keep debris out of the open system. Using your 36mm socket and 3/8-inch ratchet, turn the primary filter cap counterclockwise to remove it.
Pull the cap out, then pull the old filter cartridge straight off the cap to release the locking clasp. Use your flashlight to inspect the inside of the housing for any metallic debris or sludge before proceeding.
Remove the old O-ring from the cap and toss it. Install the new O-ring from your kit into the cap groove. Lightly coat both the cap O-ring and the small O-ring on the base of the new filter with clean engine oil or fresh diesel. Never install these seals dry — a dry O-ring twists and tears during installation, introducing air into the fuel circuit and killing your fuel pressure.
Snap the new filter firmly onto the cap until the clasp clicks. Thread the assembly back in by hand first to avoid cross-threading. Torque to 19 ft-lbs (25 Nm).
Step 3: Replace the Secondary Filter (Engine-Mounted)
Move to the engine bay and locate the secondary filter housing next to the oil filter in the valley. Use your 24mm socket to unscrew the cap counterclockwise. Pull the old cartridge straight up and out.
Swap the O-ring on the 24mm cap for the new lubricated one from your kit. Unlike the primary filter, the secondary cartridge does not snap into the cap first. Drop the new filter directly into the aluminum housing, O-ring side down, and press it firmly onto the central standpipe. Then place the cap over the filter and hand-thread it clockwise until snug.
Torque to 10 ft-lbs (14 Nm).
| Component | Socket Size | Torque Spec |
|---|---|---|
| Primary filter cap (frame) | 36mm | 19 ft-lbs (25 Nm) |
| Secondary filter cap (engine) | 24mm | 10 ft-lbs (14 Nm) |
| HFCM water drain plug | 6mm hex | Hand snug — max 7 ft-lbs |
| Engine oil filter cap | 36mm | 18 ft-lbs (24 Nm) |
| Engine oil pan drain plug | 19mm | 18 ft-lbs (24 Nm) |
The Most Important Step: Priming the System
Both filter housings are now full of air. If you crank the engine right now, the injectors fire completely dry — no fluid cushion, instant plunger damage. Don’t skip this step.
The 6.0 Powerstroke primes itself with the key. Follow this sequence:
- Turn the key to ON — don’t crank. Listen for the electric lift pump hum from the HFCM (about 20–30 seconds).
- Turn the key back to OFF.
- Repeat this cycle 3 to 6 times.
Each cycle floods the primary housing, pushes fuel to the secondary housing, and vents the trapped air through the bleed orifice back to the tank. After your final cycle, you’re safe to start the engine. If it stumbles or idles rough at startup, turn it off immediately and run two more key cycles to clear residual air from the head rails.
Two Upgrades Worth Doing While You’re In There
Upgrade the HFCM Drain Plug
The factory 6mm hex drain plug corrodes and strips constantly. Road salt and constant exposure to moisture seize the plug inside the aluminum manifold. When it strips out, extracting it risks destroying the housing threads.
The fix is simple: replace it with the upgraded knurled brass drain plug (Ford part number 6E7Z-9C082-A). It has no internal hex to strip. You twist it by hand. It also channels draining fluid straight down, away from your driveshaft and wiring. Do this once, and you’ll never fight that drain plug again.
Install the Blue Spring Fuel Pressure Regulator Kit
This is the most important preventive mod for any 6.0 Powerstroke. The factory regulator spring loses tension over time, causing fuel pressure to sag well below the 45 PSI minimum. The symptoms look exactly like dirty filters: rough idle, sluggish power, hard starts.
Ford’s fix is the Blue Spring upgrade kit (part number 3C3Z-9T517-AG). It contains a higher-tension spring, an updated brass plunger, and fresh Viton O-rings. Installation takes about 30 minutes alongside your secondary filter change. It reliably raises system pressure by 10–15 PSI, bringing it back to a healthy 55–65 PSI. You’ll notice smoother idle, better throttle response, and faster turbo spool immediately.
Warning Signs That Indicate Bigger Problems
Clean filters don’t always fix a sick fuel system. Watch for these red flags:
Filters clogging within hundreds of miles — Your steel fuel tank may be delaminating. This primarily affects F-350, F-450, and F-550 Chassis Cab models with factory steel tanks from 1999–2008. Ultra-low sulfur diesel and biodiesel react with the internal polymer coating, causing it to peel off in sheets. The result is plastic flakes and rust silt pouring through your lift pump. New filters won’t fix this — you need a new polyethylene or aluminized steel replacement tank.
No-start only when the engine is hot — This is almost never a fuel issue. Hot oil thins out and bleeds past worn O-rings on the high-pressure oil standpipes, dropping HPOP pressure below the 500 PSI needed to fire the injectors. The engine cranks but won’t start until the oil cools and thickens. The fix is the updated standpipe and dummy plug kit (Ford part number 6E7Z-9A332-B), torqued to 60 ft-lbs each.
Fuel pressure dropping under hard acceleration — Install a mechanical gauge at the M12x1.5 test port on the secondary housing and do a wide-open throttle test. Pressure must hold above 45 PSI under load. If it doesn’t, the Blue Spring kit and lift pump amperage testing are your next diagnostic steps.
Frequently Asked Questions
Why does the engine crank forever after a fuel filter replacement?
Both housings are full of air after a filter change. Air compresses; fuel doesn’t. The lift pump can’t build pressure until the air is purged. Cycle the key to ON without cranking, 3 to 6 times, letting the pump run each time before you try to start the engine. This lets the air bleed out through the return line back to the tank.
Are aftermarket fuel filters okay if I’m on a budget?
No. Generic filters frequently lack AquaBloc water-stripping media and are manufactured with tolerances too loose to properly close the secondary bowl’s bypass valve. When that valve stays open, raw, unfiltered diesel goes straight into your injectors. The injector damage that follows costs far more than the few dollars you saved on filters. Use Motorcraft FD-4616 or Racor PFF4616. Period.
What does the 6mm hex plug on the bottom of the HFCM do?
That’s your water separator drain. Water is heavier than diesel, so it settles at the bottom of the manifold. You need to drain it monthly using the 6mm drain plug to clear the accumulated water and sediment before they cause internal corrosion. Because this plug corrodes and strips easily, replace it with the upgraded knurled brass plug (part number 6E7Z-9C082-A) while you’re there.
Does the Blue Spring kit void any warranties or damage the engine?
No. The Blue Spring kit is an official Ford and Navistar factory update specifically designed to fix a known design flaw in the original regulator spring. The increased pressure it provides — 55 to 65 PSI at the injectors — is exactly what the system needs to protect injector plungers under load. It extends injector life, improves idle quality, and sharpens throttle response.
How do I know if my fuel tank is delaminating?
If you open the primary filter housing and find grey paste, silver metallic flakes, or rust-colored silt in the bowl, the factory steel tank’s interior coating has failed. This mainly affects F-350 through F-550 Chassis Cab trucks with steel tanks. Repeated rapid filter clogging is the other telltale sign. The only real fix is replacing the defective steel tank with a non-metallic aftermarket unit that won’t corrode or delaminate.













