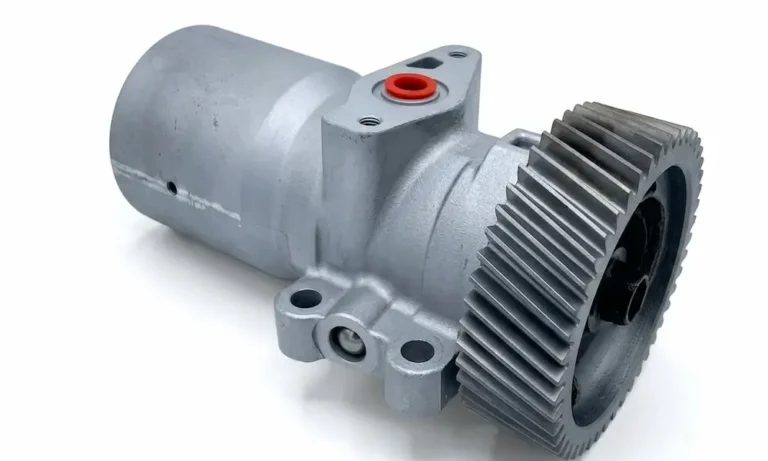
Replacing the 6.0 Powerstroke HPOP isn’t just swapping a part—it’s a deep-dive repair that can go sideways fast if you skip steps. This guide covers everything: how the system works, how to diagnose it properly, what to replace while you’re in there, and how to actually get the pump out. Read to the end before you touch a wrench.
What the HPOP Actually Does (And Why It Matters So Much)
The 6.0 Power Stroke doesn’t use a traditional fuel pump setup. Instead, it runs a Hydraulic Electronic Unit Injection system that pressurizes engine oil—not fuel—to fire the injectors.
Here’s the short version of how it works:
- The HPOP builds oil pressure up to 3,000 psi under load
- That pressurized oil travels through internal passages into the cylinder heads
- Inside each injector, the oil acts on a piston that multiplies the force roughly 7-to-1
- The result is diesel fuel injected at up to 28,000 psi
The engine needs a minimum of 500 psi of high-pressure oil just to start. No pressure, no start—it’s that simple.
Early vs. Late Pump: Know Which One You Have
This is the first thing you need to figure out before ordering anything.
2003–Early 2004: Aluminum Swash-Plate Pump
The early pump is round, aluminum-bodied, and uses a rotating angled plate to drive internal plungers. It works fine when new, but it’s the known weak link in the system.
As the pump wears internally, it loses volumetric efficiency. Cold, thick oil masks the problem. Hot, thin oil slips right past the worn internals—and the engine won’t start. That’s the classic hot no-start on early 6.0s.
Also watch the Injection Control Pressure (ICP) sensor on these engines. It sits at the rear of the pump cover, right next to the turbo and exhaust pipes. Heat kills it fast, and when it fails, it can push oil straight into the wiring harness.
Late 2004–2010: Cast-Iron V4 Pump
The updated pump is square, cast-iron, and nearly indestructible internally. But it introduced a new headache: the Snap-to-Connect (STC) fitting.
This two-piece quick-connect links the pump outlet to the main branch tube. Constant vibration and 3,000 psi of pulsing pressure eventually blow the internal snap-ring apart. When the fitting separates, all your high-pressure oil dumps back into the crankcase. The engine stalls immediately and won’t restart until the fitting is fixed.
Good news: on late-model trucks, the ICP sensor moved to the front of the passenger-side valve cover—away from the heat.
Diagnose First. Replace Second.
A failed pump, a blown STC fitting, and leaking standpipe O-rings all look identical from the outside. Don’t guess.
Read the Scan Tool Data
Pull live data from the PCM during a crank event and watch two numbers:
- Injection Control Pressure (ICP): Should climb toward 500+ psi
- IPR duty cycle: Normally 15–30% at idle; if it’s pegged at 85% during crank with ICP barely moving, you’ve got a massive leak or a dead pump
Also check base oil pressure. The low-pressure pump needs to supply at least 12 psi to feed the HPOP. No base pressure means your problem starts lower in the system.
Quick trick: unplug the ICP sensor. If the engine fires with it disconnected, the pump is fine—the sensor or harness is the issue.
Run an Air Test
This is the industry-standard diagnostic step before condemning any pump. Thread an air test adapter into the IPR port and pressurize the system with 100–150 psi shop air.
Then listen. Gurgling from the oil fill cap or crankcase vents? Massive internal leak. Pull the valve covers and pinpoint exactly where the air escapes—standpipe, dummy plug, injector seal, or the pump housing itself.
Only replace the HPOP if everything else holds air. Skipping this step and guessing costs you a four-figure pump when a $10 O-ring was the problem.
What to Replace While You’re In There
You’re spending 8+ hours getting to this pump. Don’t put it back together with failing parts still in place.
Standpipes and Dummy Plugs
On 2004.5+ engines, the wavy oil rails use standpipes on one end and dummy plugs to seal the other. The factory O-rings on both flatten and blow out under heat and pressure. Replace them with Ford’s updated kit (part number 6E7Z-9A332-B), which uses D-rings and PTFE backup washers.
Oil Cooler and Reservoir Screen
The oil cooler sits right upstream of the HPOP. Casting sand from the factory blocks its internal passages, causing the oil to overheat and wrecking the pump. If your Engine Oil Temp runs 15°F+ hotter than coolant temp at highway speeds, the cooler is clogged—replace it.
The nylon reservoir screen under the cooler disintegrates over time and sends debris straight into the pump. Upgrade to the stainless-steel version (part number 3C3Z-6C683-AB).
IPR Valve and Screen
The Injection Pressure Regulator valve gets hit by the same debris that destroys the pump. At minimum, swap the tip screen to Ford’s stamped stainless-steel version (part number 3C3Z-9H529-A). If the pump failed due to contamination, replace the whole valve.
Essential OEM Update Parts
| Component | Part Number | What It Does |
|---|---|---|
| STC Fitting Update Kit | 4C3Z-9B246-F | Replaces snap fitting with solid bracket on 05–07 |
| IPR Valve Screen Kit | 3C3Z-9H529-A | Stainless steel replaces fragile brass mesh |
| Standpipe & Dummy Plug Kit | 6E7Z-9A332-B | D-rings and PTFE backups replace stock O-rings |
| Oil Cooler Reservoir Screen | 3C3Z-6C683-AB | Stainless mesh replaces nylon cloth |
How to Actually Get the Pump Out
The HPOP sits at the very rear of the engine valley, tucked under the cowl. It’s not accessible without serious disassembly.
Top-End Teardown
Start by disconnecting both batteries. Then pull the turbocharger—charge air piping, downpipe, Y-pipe, oil feed line, oil drain tube, and variable geometry actuator connector all need to come off. The turbo lifts out once the mounting bolts are removed.
Cover the intake ports and exhaust pipes immediately. A dropped bolt in the gear train means pulling the engine to retrieve it.
Most experienced techs also remove the intake manifold and EGR cooler. It adds time upfront but gives you clean, unobstructed access to the pump cover and cuts the risk of dropping hardware.
Getting the Pump Cover Off
This is where most techs hit a wall. The pump cover sits behind the turbo, with almost no clearance to reach the two rear bolts.
Three approaches exist:
- Flex-wrench method — Use ratcheting extensions or wobble sockets through the tight gap. Some techs route extensions all the way through the wheel well.
- Shield-bending method — Prying the Y-pipe back and yanking the cover out. This bends the heat shield permanently and makes reinstallation a nightmare. Skip it.
- Exhaust loosening method — Loosen the Y-pipe from the exhaust manifolds, rock it toward the firewall a few inches, and lift the cover out cleanly. This is the professional approach.
When breaking the cover’s silicone seal, don’t pry against the aluminum block. Use a thin gasket scraper or plastic wedge. An old turbo drain tube inserted into the cover port also works perfectly as a safe pry point.
Pump Extraction and Valley Prep
Once the cover is off, unclip the IPR connector, disconnect the discharge tube, remove the pump bolts, and lift the pump out.
Then clean everything. Vacuum the valley, wipe with lint-free towels, and degrease both mating surfaces completely. Any leftover silicone or debris will cause a leak at startup.
Torque Specs You Can’t Afford to Get Wrong
Over-tighten and you strip aluminum threads. Under-tighten and pressurized oil finds every gap. Use a calibrated torque wrench, not feel.
High-Pressure Oil System Fasteners
| Component | Torque Value | Notes |
|---|---|---|
| HPOP Mounting Bolts | 18 ft-lbs | Some service bulletins update to 26 ft-lbs |
| HPOP Drive Gear Bolt | 95 ft-lbs | Connects pump shaft to rear gear train |
| HPOP Cover Bolts | 96 in-lbs | Crisscross pattern; tighten gradually |
| Discharge Tube / Branch Tube Bolts | 124 in-lbs | Secures STC bracket or J-tube |
| IPR Valve | 37 ft-lbs | Use slotted socket only |
| STC Fitting Jam Nut | 49 ft-lbs | Updated bracket kit only |
| Oil Rail Bolts | 120 in-lbs | Secures wavy rails to cylinder heads |
| Standpipe & Dummy Plugs | 60 ft-lbs | Updated 12mm hex-head parts only |
| Ball Tube Retaining Nut | 100 ft-lbs | Requires proprietary socket and centering guide |
| Injector Hold-Down Clamp Bolts | 24–25.8 ft-lbs | Varies by early vs. updated engine |
Using Torque Adapters in Tight Spaces
When you can’t fit a standard torque wrench on a bolt, you’ll reach for a crowfoot or offset adapter. Here’s the catch: adding length to the wrench changes the effective lever arm, which changes the actual torque applied at the bolt.
You need to reduce the dial setting to compensate. The formula: Adjusted Setting = (Target Torque × Wrench Length) ÷ (Wrench Length + Adapter Length)
One exception: if you drop a straight extension vertically onto a bolt without extending the horizontal handle length, the torque value doesn’t change.
Remanufactured OEM vs. Aftermarket Billet Pump
A quality remanufactured pump from Motorcraft or Bostech handles daily driving and light towing just fine. For most owners, it’s the right call.
But if you’re running larger injectors, doing heavy commercial towing, or dealing with repeated early-pump failures, consider an aftermarket billet option. Companies like DieselSite make pumps from solid billet aluminum with roller bearings instead of friction bushings. They eliminate casting porosity and housing flex, and their higher volumetric output supports injectors up to 300cc while improving throttle response on stock setups too.
The E-Series Van: Same Engine, Harder Job
The 6.0 Power Stroke ran in Ford E-350 and E-450 vans through 2010—three years longer than the F-Series trucks. Same pump, same specs, same failure modes.
The difference is access. The van’s engine tucks deep under the firewall. Most of the top-end teardown happens from inside the cab after removing the interior doghouse cover. Budget extra time and patience.
Frequently Asked Questions
Why does my 6.0 only struggle to start when fully warmed up?
Cold oil is thick—it bridges worn pump internals and small seal gaps well enough to build the 500 psi needed to start. Hot oil thins out and bleeds right past those gaps. The pump can’t keep up with the leak, so the injectors never fire. Let it cool down and it starts again. That’s the textbook hot no-start pattern.
Can I replace just the STC fitting without replacing the whole pump?
Yes. The cast-iron V4 pump itself rarely fails internally. If the air test proves the leak is only at the STC fitting, install the updated solid-bracket kit (part number 4C3Z-9B246-F) and leave the pump alone.
What exactly is an air test and why do I need it?
It’s the step that tells you where the leak actually is. You pressurize the oil system with shop air through the IPR port and listen for escaping air. A standpipe, dummy plug, injector seal, and a dead pump all throw the same codes. Skipping the air test means you might replace a $1,000+ pump when a torn O-ring was the actual problem.
Why should I replace the oil cooler at the same time as the HPOP?
The oil cooler sits directly upstream of the pump. A clogged cooler superheats the oil, which destroys the reservoir screen and then the pump itself. Installing a new pump behind a failed cooler is wasted money—the debris and heat will kill the new unit fast.
Should I use RTV sealant or a gasket on the pump cover?
Depends on your engine year. The 2003–early 2004 aluminum pump uses a rubber or stamped metal gasket. Late 2004 and newer cast-iron pump designs use a precise bead of RTV silicone on the machined mating surfaces. Use the wrong method and you’ll be chasing an oil leak down the back of the block.