Dealerships charge up to $170 for a job that takes 10 minutes and costs $15 in parts. Sound familiar? This guide walks you through everything you need to know about Toyota cabin air filter replacement — from spotting the warning signs to nailing the tricky arrow direction that confuses everyone. Stick around, because that arrow detail alone could save your filter from working backwards.
Why Your Toyota’s Cabin Air Filter Actually Matters
Your Toyota pulls outside air through the base of the windshield before it hits your face vents. Every breath of that air passes through one small rectangular filter tucked behind your glove box.
That filter catches:
- Pollen, mold spores, and tree debris
- Brake dust, tire particles, and exhaust soot
- Road dust, sand, and silica
- Odors and volatile organic compounds (in carbon filters)
Skip the replacement, and you’re not just breathing dirty air. You’re also straining your blower motor, freezing your evaporator core, and killing your AC’s cooling power.
Signs You Need a Replacement Right Now
Your dashboard won’t flash a warning light when the filter clogs. Toyota’s HVAC system has no pressure sensors behind the filter, so you’re flying blind on mileage and symptoms alone.
Watch for these red flags:
- Weak airflow even with the fan maxed out
- Musty or moldy smell when you flip the AC on
- AC struggles to cool the cabin in summer heat
- Windshield fogs up slowly and won’t clear fast
- Fine dust settling on your dashboard plastics
That last one is a dead giveaway. When dust pushes through the filter and into your cabin, the medium has completely failed.
How Often Should You Replace It?
The standard interval is every 10,000–15,000 miles, roughly once a year for average drivers. But your environment changes everything.
| Driving Environment | Recommended Interval |
|---|---|
| Suburban, mostly paved roads | Every 12,000–15,000 miles |
| Heavy urban traffic, stop-and-go | Every 8,000–10,000 miles |
| Unpaved roads, agricultural areas | Every 5,000–8,000 miles |
| High pollen regions (spring/fall) | Before allergy season annually |
Pro tip: Replace it in late winter or early spring. You’ll enter pollen season with a fresh filter instead of one already loaded with winter road grime and damp leaves.
DIY vs. Dealership: The Cost Breakdown
Here’s the honest math on Toyota cabin air filter replacement costs:
| Service Option | Part Cost | Labor/Fees | Total Cost | Time |
|---|---|---|---|---|
| Authorized Dealership | $40–$80 | $40–$90 | $80–$170 | Variable wait |
| Quick-Lube Franchise | $30–$50 | $20–$50 | $50–$100 | 15–30 min |
| DIY with OEM Filter | $20–$35 | $0 | $20–$35 | 5–10 min |
| DIY with Aftermarket Filter | $10–$20 | $0 | $10–$20 | 5–10 min |
Dealerships charge disproportionate labor fees for a completely toolless job. Some bundle the cabin filter with the engine air filter, pushing invoices past $150. The Federal Magnuson-Moss Warranty Act protects you — doing this yourself won’t void your warranty.
What You’ll Need
- Your replacement filter (OEM or quality aftermarket)
- A damp microfiber cloth
- Your hands — no tools required
Toyota engineers designed this replacement to be entirely toolless. The access procedure is nearly identical across the Camry, Corolla, RAV4, Prius, and Sienna.
Step-by-Step: How to Replace Your Toyota Cabin Air Filter
Step 1: Clear the Glove Box
Open the glove compartment fully and empty everything out. Don’t skip this — a loaded glove box stresses the plastic hinges badly when you drop it down in the next step.
Step 2: Disconnect the Damper Arm
Look at the right exterior side of the open glove box. You’ll see a small black rod (the damper arm) clipped to a peg on the box wall. Slide it off the peg by pulling it gently outward. It keeps the box from crashing open — now it just retracts into the dash.
Step 3: Squeeze Past the Stopper Pegs
The glove box sits locked in place by two plastic stopper pegs on the upper corners. Push both sides of the glove box firmly inward toward the center. The plastic flexes just enough to pop those pegs past the dashboard frame. The whole box drops down toward the floorboard, well past its normal open position.
On some Toyota models, the bottom hinges unhook completely. If it detaches, no panic — it lines right back up during reassembly.
Step 4: Open the Filter Housing Door
With the glove box dropped down, you’ll see the blower motor housing directly in front of you. There’s a horizontal plastic door covering the filter slot. Pinch the tabs on both ends toward the center and pull the cover straight toward you. It unclips and comes free.
Step 5: Pull Out the Old Filter
Grasp the filter’s exposed edge and slide it straight out — slowly. The top surface carries a season’s worth of leaves, pine needles, dust, and who-knows-what. Tilt it too fast and that debris falls straight into the blower motor fan below. Wipe the empty housing slot clean with a damp microfiber cloth before installing the new one.
Step 6: Install the New Filter (Arrow Direction Below)
Slide the new filter in fully until the front edge sits flush. Get the arrow direction right before it goes in — this is the step that trips most people up.
Step 7: Snap Everything Back Together
Push the cover door back onto the housing until both tabs click. Lift the glove box, hook the hinges back if they came off, and squeeze the sides inward again so the stopper pegs snap back into their tracks. Reattach the damper arm to the peg on the box side. Reload your glove box and close it up.
The whole job: under 10 minutes.
The Arrow Direction Problem (And How to Solve It)
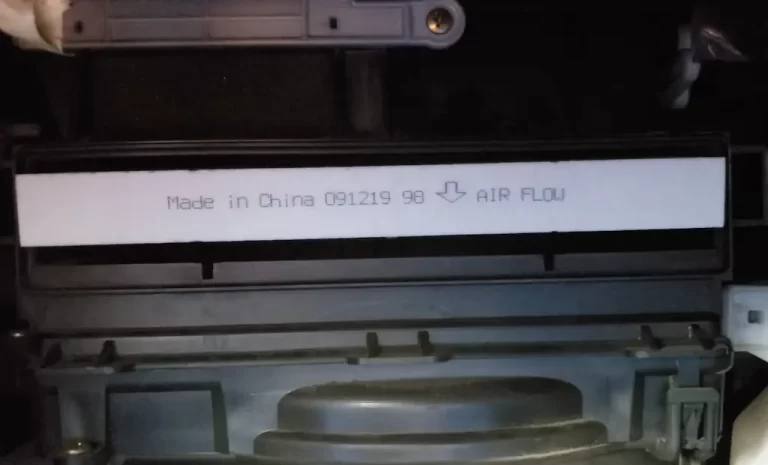
This confuses nearly everyone doing their first replacement. The issue comes down to a mismatch between OEM and aftermarket labeling conventions.
Here’s what’s actually happening: air enters your Toyota through the cowl at the base of the windshield and flows downward through the filter into the blower motor beneath it. Top to bottom. Always.
| Filter Type | Printed Label | Install Direction | Why |
|---|---|---|---|
| Genuine Toyota OEM | “UP” with arrow | Arrow points toward roof | Marks gravity orientation for factory assembly |
| Aftermarket Brand | “AIR FLOW” with arrow | Arrow points toward floor | Marks direction of air movement |
| Toyota Plastic Housing | “UP” with arrow | Arrow points toward roof | Spatial orientation marker |
The OEM arrow pointing up doesn’t mean air flows up. It tells the assembly-line worker which way to hold the part. Aftermarket filters mark the actual airflow direction — downward into the blower.
Still unsure? Pull the filter out entirely, turn the fan to low, and hold a dry leaf or tissue near the empty slot. The blower’s suction pulls it downward, confirming the top-to-bottom flow. No guessing required.
Choosing the Right Replacement Filter
Standard synthetic (OEM-style): Works perfectly for most drivers. Catches pollen, dust, and road debris without restricting airflow. Toyota’s OEM filter handles everything the average driver encounters daily.
Activated carbon filter: Worth the slight price bump if you sit in heavy traffic regularly. The charcoal layer scrubs exhaust odors and volatile organic compounds that standard filters can’t touch.
Washable oiled filters: Skip these entirely for cabin use. The oil transfers onto your evaporator core’s aluminum fins, permanently cementing dust into insulating sludge that destroys AC efficiency. Dry, disposable filters are the right call every time.
HEPA filters: Technically more effective at trapping tiny particles, but the dense media creates serious airflow restriction. Your blower motor wasn’t designed for it, and you’ll notice weaker vent output and increased electrical strain.
Watch Out for Rodents in Your Filter Housing
This is more common than you’d think. Mice and squirrels enter through the exterior cowl vents and travel straight to the cabin filter. The warm, sheltered space makes a perfect nesting spot — and they’ll shred your filter to build it.
Signs you’ve got a nest:
- Zero airflow despite the fan running
- Overwhelming stench when the HVAC turns on
- Visible debris, shredded material, or droppings in the housing
A rodent-contaminated filter is a biohazard. Aerosolized urine and feces go straight into the cabin when you run the blower. Use an enzymatic cleaner to disinfect the housing thoroughly before installing a new filter.
Prevention: Cut a piece of galvanized steel mesh and secure it over the fresh air intake opening under the windshield cowl. Air flows through freely. Rodents don’t.
FAQs
Does replacing the cabin air filter independently void my Toyota warranty?
No. The Magnuson-Moss Warranty Act explicitly prevents manufacturers from requiring dealer-only service for consumable maintenance items. Your warranty stays intact as long as the replacement part meets OEM specs. A manufacturer can only deny a claim if they prove the independent installation directly caused specific damage.
How do I spot a counterfeit cabin air filter online?
Check for rigid, evenly spaced pleats and a solid cardboard border that doesn’t flex under light pressure. Counterfeits use thin paper media, flimsy edges, and sometimes show uneven gluing or misspelled packaging. Buy from established automotive retailers or direct from a Toyota parts counter to be safe.
Can I throw a used cabin filter in regular trash?
Yes, standard municipal landfill disposal is the correct method. These filters are composite materials — synthetic fibers, plastic framing, adhesives, and sometimes carbon layers — that can’t go into standard recycling streams. The filter also holds a year of trapped brake dust, exhaust soot, and heavy metal particulates, which makes proper disposal worth doing carefully.
Will a clogged cabin filter trigger a warning light?
No. Standard Toyota vehicles have no pressure sensors behind the cabin filter. A completely blocked filter won’t trigger any dashboard alert. You’re relying entirely on mileage intervals and physical symptoms — reduced airflow, poor cooling, musty smells — to judge when it’s time.
Is a HEPA cabin filter worth installing in a standard Toyota?
For most drivers, no. The extreme filtration density creates significant airflow restriction the blower motor wasn’t built to handle. You’ll get noticeably weaker vent output and put extra strain on the HVAC system. Unless you have severe respiratory sensitivities and accept the trade-off, a quality activated carbon filter delivers much better real-world balance.