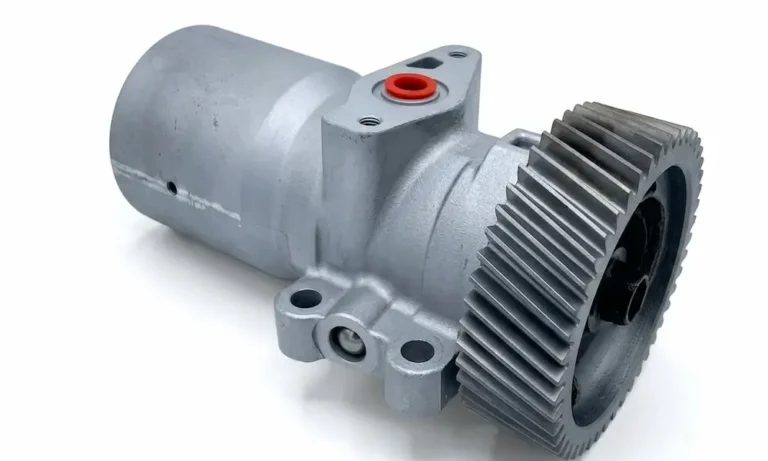
Your 7.3 Powerstroke won’t start when it’s hot, or it’s leaving an oil puddle in the engine valley. Both problems point straight at the high-pressure oil pump. This guide walks you through exactly how the system works, how to confirm the pump is actually the problem, and how to replace it without making expensive mistakes. Read to the end — the air purging steps alone can save you hours of head-scratching.
What the High-Pressure Oil Pump Actually Does
The 7.3 Powerstroke uses a HEUI fuel system — Hydraulic Electronic Unit Injection. Instead of a traditional mechanical fuel pump, pressurized engine oil physically fires the fuel injectors.
Here’s how it works:
- The high-pressure oil pump (HPOP) draws oil from a reservoir in the engine valley
- It pressurizes that oil to 500 psi at idle and up to 3,000 psi at wide-open throttle
- That pressurized oil slams into an intensifier piston inside each injector
- The intensifier piston multiplies pressure 7:1, hitting the fuel nozzle at 21,000 psi
- That intense pressure atomizes diesel perfectly for clean, powerful combustion
No pressure, no injection. No injection, no start. It’s that straightforward.
The pump itself sits in the front engine valley beneath the fuel filter bowl. It’s gear-driven directly off the camshaft and contains seven pistons pressing against an angled swash plate. That swash plate angle is the key spec you need to know before buying a replacement.
15-Degree vs 17-Degree: Which Pump Does Your Truck Need?
This is where most buyers get tripped up. The 7.3 Powerstroke ran through two distinct generations, and they don’t share the same pump spec.
| Component | Early 1999 & Older | Late 1999–2003 |
|---|---|---|
| HPOP Swash Plate Angle | 15 degrees | 17 degrees |
| Pump Displacement | 6.8 cc/rev | 7.2 cc/rev |
| Fuel Injectors | 130 cc AB Code | 140 cc AD Code |
| Intake Heater | Not equipped | Factory installed |
| Glow Plug Relay | Single relay | Two relays |
| Fender Badge Location | Front fender | Vehicle doors |
The 17-degree pump produces roughly 20–30% more oil volume per revolution. Both pumps share identical external dimensions and bolt right into either generation truck. That means owners of older models can drop in the 17-degree pump as a mild performance upgrade when it’s replacement time.
The tricky year is 1999. Navistar split production around December 7, 1998. If your truck was built before that date, you’ve got an early-body truck. Check your intake boots — early trucks use tapered 3-to-4-inch boots, while late trucks run uniform 4-inch boots throughout.
Symptoms of a Failing 7.3 Powerstroke HPOP
The Hot No-Start: The Classic Tell
This is the most common symptom of internal pump wear. The truck starts perfectly cold every morning. But after it warms up and you shut it off, it won’t restart.
Here’s the science behind it: Cold 15W-40 oil is thick. A worn pump can still push thick oil hard enough to hit 500 psi. Once the engine reaches operating temperature, the oil thins out. Now it slips right past the worn piston bores without building pressure. The starter cranks and cranks, but the injectors never see enough pressure to fire.
If the truck always restarts after cooling down for 30 minutes, the pump is telling you it’s done.
Aerated Oil and Power Loss
If the oil pickup tube cracks or the oil level drops, the low-pressure pump ingests air. Aerated oil is compressible — and a compressible hydraulic fluid is useless for firing injectors. You’ll feel it as surging, bucking at light throttle, and a sharp drop in power under load. The engine control module often won’t throw a code until the condition gets severe.
External Oil Leaks in the Engine Valley
Oil pooling under the fuel filter bowl, or running down the back of the block (often misdiagnosed as a rear main seal leak), usually traces back to three failure points:
- The rear plug: A non-serviceable plug on the pump’s rear cover. The internal seal hardens and blows out over time.
- Discharge port fittings: The quick-connect fittings on late-model pumps use internal elastomeric seals that degrade from heat cycling and pressure.
- IPR valve O-rings: The Injection Pressure Regulator threads into the back of the pump. Its high-pressure O-rings extrude or tear, causing both external leakage and pressure loss simultaneously.
Diagnostic Trouble Codes
The PCM watches injection pressure constantly. When commanded pressure doesn’t match actual pressure, it logs codes. The main ones to look for:
- P1211 — ICP higher or lower than desired
- P1212 — Pressure low
- P1280 — ICP circuit low
- P1281 — ICP circuit high
Diagnosing the Problem Before You Buy a Pump
Replacing the HPOP is a several-hour job. Before you pull the trigger, eliminate the cheaper parts that mimic pump failure.
Test the ICP Sensor First
The Injection Control Pressure sensor sits on the driver-side head near the front lifting bracket. It reports hydraulic pressure to the PCM as an analog voltage signal.
Quick field test: Unplug the ICP sensor connector. When the circuit opens, the PCM defaults to a preset pressure value and keeps the engine running. If the truck starts and idles smoothly with the sensor unplugged, the sensor failed — not the pump. Replace the sensor for around $30 and move on.
Also check the connector housing itself. If you find engine oil pooled inside the connector, the sensor’s internal diaphragm has ruptured.
Here’s the voltage-to-pressure reference for a properly functioning pump:
| ICP Sensor Voltage | System Pressure (psi) | What It Means |
|---|---|---|
| 0.2V | 0 | Engine off |
| 0.8–1.0V | 500–580 | Minimum to start |
| 1.2V | 800 | Normal warm idle |
| 2.3V | 1,800 | Cruising load |
| 3.0–3.8V | 2,400–3,000 | Wide-open throttle — healthy pump |
Inspect the IPR Valve Before Condemning the Pump
The Injection Pressure Regulator valve bleeds off excess pressure back to the timing cover. At warm idle, it should run a duty cycle of 10–15%. Under heavy load, it climbs to around 50%.
If a scan tool shows the duty cycle pegged at 65% while actual pressure stays critically low, the PCM is begging the valve to close completely but getting nothing back. That looks like a dead pump — but first, check two things:
- The tin spacer nut: It secures the electromagnetic coil to the valve shaft. Engine vibration backs it off constantly. A loose coil can’t actuate the valve. Torque it to 35–53 inch-pounds.
- The micro-mesh screen: A torn or debris-clogged screen lets the pilot valve stick open, dumping all pressure back to the pan. Clean or replace it before pulling the pump.
Check the Oil Reservoir Level
Remove the 3/16-inch hex plug on the top of the reservoir access plate. Oil should sit about one inch below the threads. If it’s bone dry after an overnight park, the anti-drainback check ball in the engine block has failed. The pump isn’t broken — it’s starving.
Don’t Overlook Fuse 30
This one catches everyone off guard. The fuel bowl heater and the PCM share the same 30-amp fuse. When the heater element shorts against the bowl housing — which it does regularly with age — it blows Fuse 30 and kills the computer entirely.
The truck cranks hard but won’t start. No scan tool communication. It looks exactly like catastrophic pump failure.
Fix: Unplug the electrical connector on the back of the fuel bowl. Replace the blown 30-amp fuse. Turn the key. If it fires right up, you found your problem for under $5.
Deadhead Pressure Test
If electronics rule out the sensor and valve, cap one discharge port and attach a 3,000-psi hydraulic gauge to the other. Crank the engine. A healthy pump pins the gauge past 3,000 psi instantly. If it struggles to hit 1,000 psi against a closed system, the internal bores are worn out and the pump must be replaced.
Step-by-Step 7.3 Powerstroke HPOP Replacement
Keep the engine valley spotless throughout this job. A single piece of grit introduced into the high-pressure oil galleries can destroy injector spool valves and cost thousands to fix.
Phase 1: Preparation
- Disconnect both negative battery cables
- Remove the plastic “Powerstroke” engine cover (13mm deep socket)
- Drain the fuel bowl completely through the metal drain tube on the passenger side — diesel in the engine valley is a fire hazard
- Pull the 3/16-inch hex plug from the reservoir and extract about half a quart of oil with a syringe — this dramatically cuts the mess when unbolting the pump
Phase 2: Remove Peripheral Components
- Use a 9/16 and 5/8-inch wrench combination to loosen the four rigid steel fuel lines at the bowl — always back up the brass fittings to prevent twisting the lines
- Disconnect the fuel bowl heater connector and water-in-fuel sensor, remove the two 13mm mounting bolts, and lift the bowl out
- Unplug the IPR valve connector (flip the bail wire, slide off the connector)
- Disconnect the exhaust back pressure sensor and tube with 9/16 and 5/8-inch wrenches
- Use the snap-to-connect release tool to pop the high-pressure lines off both discharge fittings — listen for the click confirming the locking ring released
Phase 3: Extract the Pump
- Remove the two 8mm bolts from the teardrop-shaped access plate on the front timing cover — pry it gently and keep debris out of the timing case
- Break loose the 18mm drive gear bolt through the access window — hold the crankshaft stationary via the harmonic balancer bolt if needed. Use a telescopic magnet to hold the retaining washer so it doesn’t drop into the timing cover
- Remove the two 10mm rear pump mounting bolts
- Grasp the pump body and slide it straight back toward the firewall — this disengages the splined shaft from the gear cleanly, leaving the gear sitting inside the cover
- Lift the pump out of the valley carefully
Phase 4: Prepare and Install the New Pump
- Transfer the IPR valve to the new pump using a 1-1/8-inch deep socket — install new Viton O-rings lubricated with clean engine oil, torque to 53 inch-pounds
- Fit a new mounting gasket to the front cover mating surface
- Coat the drive shaft and front mounting O-ring heavily with fresh 15W-40
- Lower the new pump into the valley, sliding the splined shaft forward into the drive gear
- Hand-thread the two 10mm rear mounting bolts — don’t fully tighten yet
- Verify the gear seats flush against the pump shaft shoulder through the access window
- Apply thread locker to the 18mm gear bolt, carefully insert it with the washer using the magnet tool, and torque to 95 foot-pounds
- Return to the rear 10mm bolts and torque to 18 foot-pounds
Phase 5: Reassemble and Seal
- Push the high-pressure hoses firmly straight into the discharge fittings until you hear and feel the snap — pull back hard to confirm they’re locked
- Clean all old silicone from the access plate and cover mating surface, apply a fresh bead of oil-resistant RTV, install the plate, torque the 8mm bolts to 8–10 foot-pounds
- Replace the four Vibra-Lok rubber sealing sleeves on the steel fuel lines — remove them with a 90-degree brass pick and don’t scratch the lines
- Set the fuel bowl back in place, torque the 13mm mounting bolts to 18 foot-pounds, then thread the four fuel line nuts in by hand before snugging with a wrench
- Reconnect all electrical connectors, close the yellow drain lever, reconnect both battery cables
Critical Torque Specifications
Getting these wrong either strips aluminum threads or blows high-pressure seals. Pay close attention to the difference between foot-pounds and inch-pounds — confusing the two on sensors will destroy them.
| Component | Tool Size | Torque |
|---|---|---|
| HPOP Drive Gear Bolt | 18mm | 95 ft-lbs |
| HPOP Mounting Bolts | 10mm | 18 ft-lbs |
| Fuel Bowl Mounting Bolts | 13mm | 18 ft-lbs |
| Access Cover Bolts | 8mm | 8–10 ft-lbs |
| IPR Valve Body | 1-1/8″ deep socket | 53 in-lbs |
| IPR Solenoid Tin Nut | 3/4″ wrench | 35–53 in-lbs |
| ICP Sensor | 1″ wrench | 22 ft-lbs |
| High-Pressure Line Connectors | 19mm | 19 ft-lbs |
| Harmonic Balancer Bolt | 24mm | 212 ft-lbs |
Priming the System After Installation
Don’t skip this — it’s what separates a smooth start from an hour of panicked re-diagnosis.
The pump, reservoir, and oil galleries were all open to air during the job. Air is compressible. Oil isn’t. Until that air purges out, the injectors fire erratically.
Before cranking the engine:
- Fill the reservoir through the hex plug port until oil sits one inch below the threads — reinstall the plug
- Cycle the ignition key to ON for 30 seconds without cranking — repeat three times to let the fuel lift pump refill the bowl and purge air from the fuel rails
When you first crank it:
- Expect 15–20 seconds of cranking before it fires
- Once running, it will sound harsh and metallic — that’s air pockets passing through the injector valves
- Let it idle to full operating temperature while you watch for leaks at every fitting
The 50-mile drive cycle:
Idling in the driveway won’t fully clear the system. You need highway driving with several wide-open-throttle pulls to push the pump to maximum pressure and drive microscopic air bubbles out of the head galleries. Industry consensus is 50 miles of varied, hard driving. After that, idle quality and cold-start crank times return to normal.
FAQs
Does the HPOP reservoir need separate oil changes?
No. This is a persistent myth. The low-pressure oil pump on the crankshaft continuously cycles fresh, filtered oil from the pan through the reservoir and pump. Normal 5,000-mile engine oil changes refresh the entire high-pressure system automatically.
What happens if the anti-drainback check ball fails?
The reservoir drains dry overnight. The next morning, the low-pressure pump has to completely refill the upper reservoir before the HPOP can build any pressure. You’ll get extremely long cold-start crank times that look and feel exactly like a failing pump — but the pump itself is fine.
Can you rebuild the HPOP instead of replacing it?
External leaks — rear plug blowout, discharge fitting seals, IPR O-rings — are all fixable with a Viton O-ring reseal kit. Internal mechanical wear from a hot no-start condition is not fixable with a seal kit. The piston bores and swash plate wear to tolerances far beyond what new rubber can compensate for. That pump needs replacement.
Why do performance injectors require an upgraded pump?
Factory pumps are volumetrically matched to factory injectors. When you install larger injectors — say, 160 cc or 238 cc units — they demand more oil volume per cycle to stroke the larger intensifier pistons. The stock pump can’t keep up under load, and pressure collapses. Upgraded pumps use modified swash plate geometry and improved porting to deliver up to two additional gallons per minute.
Can a blown Fuse 30 really look like HPOP failure?
Yes, and it causes misdiagnosis constantly. The fuel bowl heater and the PCM share Fuse 30. A shorted heater kills the computer completely. The engine cranks with zero start, and your scan tool won’t connect. Unplug the fuel bowl heater connector, replace the 30-amp fuse, and try again before assuming the pump is dead.