Staring at a rear axle in a junkyard or under a classic muscle car, wondering what you’re actually looking at? You’re in the right place. This guide walks you through every method to identify a Ford 9 inch rear end — from a quick socket test to decoding the factory tag. Stick around to the end, because the spin test section alone could save you hours of guesswork.
What Makes the Ford 9 Inch Rear End Special
Before diving into identification, it helps to know why this axle matters. Ford introduced the 9 inch rear end for the 1957 model year and built it until 1986 at the Ford Sterling Axle Plant in Sterling Heights, Michigan.
Three engineering features set it apart from everything else:
- Removable third member (drop-out carrier): The entire differential assembly unbolts from the front of the housing. You do the gear setup on a workbench, not on your back under the car.
- Massive 2.25-inch hypoid offset: This pushes the pinion gear low on the ring gear, creating a huge contact patch that handles brutal torque loads.
- Straddle-mounted pinion: A pilot bearing captures the pinion from the front and rear, eliminating deflection under shock loads.
Ford eventually replaced it with the lighter 8.8-inch axle to meet fuel economy mandates — not because the 9 inch failed. That says everything about its durability.
The First Visual Clue: No Rear Cover
Walk up to any rear axle. The very first thing you do is look at the back of the housing.
A Chevy 10-bolt, 12-bolt, or Ford 8.8 inch all have a removable rear inspection cover — a stamped or cast plate bolted to the back of the housing. Pull that cover to service the gears.
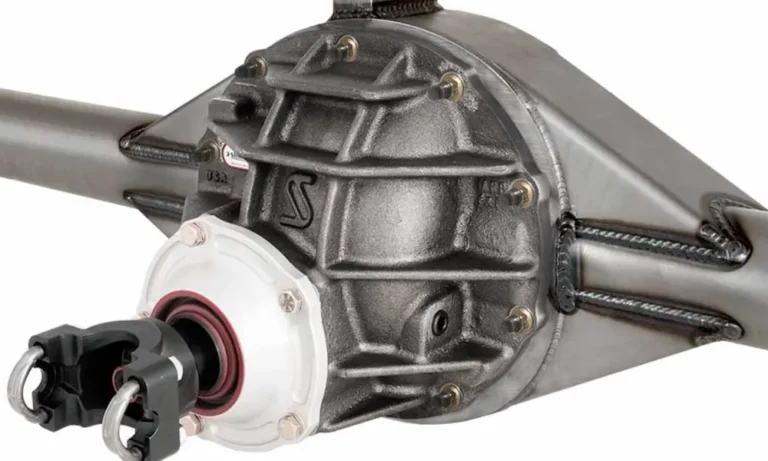
The Ford 9 inch has no rear cover at all. The back of the housing is a smooth, welded dome of stamped sheet metal. That dome tells you the carrier drops out from the front. If you see no rear cover, you’re almost certainly looking at a Ford 9 inch — or its lighter sibling, the Ford 8 inch.
That’s where the next test comes in.
The Definitive Socket Test: 9 Inch vs. 8 Inch
The Ford 8 inch axle uses the same Hotchkiss removable carrier design. From a quick glance, the two housings look nearly identical. Here’s how you tell them apart in about 30 seconds.
Grab a deep socket and a ratchet. Walk around to the front of the housing where the third member bolts in. You’ll see a ring of retaining nuts around the circular mounting flange.
Try placing your deep socket on the two bottom nuts — the ones at roughly the 6 o’clock and 7 o’clock positions.
- If the socket drops cleanly onto both lower nuts, you have a Ford 8 inch. The smaller center section casting clears those fasteners without any obstruction.
- If the socket physically can’t reach the lower nuts, you have a Ford 9 inch rear end. The massive pinion support housing — needed to handle that 2.25-inch hypoid offset — protrudes directly in the way. You’d need an open-end wrench to access those bottom fasteners.
That physical obstruction is your definitive confirmation. No measuring, no guessing.
Reading the Rear Dome: Generational Housing Changes
Once you’ve confirmed it’s a 9 inch, the rear dome of the housing tells you when it was built. Ford changed the stamping design several times over the axle’s 30-year production run.
| Production Era | Rear Dome Characteristics |
|---|---|
| 1957 | Completely smooth dome, no dimples. Features a flat center band and a factory oil drain plug at the bottom. |
| 1958–1959 | Two circular dimples stamped into the back cover, flat center band retained. Some units kept the drain holes. |
| 1960–1967 | Two dimples, flat center band, oil filler hole added directly in the back cover. |
| Post-1966 | A pronounced raised “hump” stamped into the center of the rear dome replaces the flat or smooth center design. |
The raised hump on later housings is especially useful in a salvage yard. The Ford 8 inch housing stayed relatively flat across the center, so that distinct hump immediately points to a 9 inch.
Axle Tube Taper: Spotting the Era
The tubes extending from the center housing out to the brake flanges also changed over the years. Knowing the era matters when you’re sourcing replacement axle shafts or matching track width.
- Pre-1967: Tubes taper noticeably as they move outward. These are common under first-gen Mustangs and Shelby vehicles.
- 1967 and later (C7ZZ prefix): The taper is much shallower. Tubes appear straighter and thicker along their length.
- 1969 and later heavy-duty applications: Full-size Galaxies, Lincolns, and late trucks used massive 3.25-inch constant-diameter tubes all the way to the backing plate flanges.
Also worth noting: a 1971 Mustang housing is roughly four inches wider overall than a 1965 Mustang housing. Axle shaft lengths are different. Always measure both sides independently before ordering shafts.
The 9-3/8 Inch Variant: The Rare Heavy-Duty Cousin
There’s one specialized variant worth knowing about — the 9-3/8 inch axle, built for heavy luxury vehicles from 1963 to 1977, including the Lincoln Continental, Ford LTD, and Ford Thunderbird.
You can spot the 9-3/8 inch third member by:
- A single, distinct curved structural rib at the front top of the differential housing
- Two widely spaced vertical ribs on the casting face
- Factory cutaways machined into the gasket surface to clear the larger ring gear
Here’s the critical catch: no aftermarket ring and pinion sets exist for the 9-3/8 inch. You can’t gear it for performance. However, the housing itself is desirable — a standard 9 inch third member with 31-spline axles bolts directly into the 9-3/8 housing without modification, giving you the heavy-duty shell with full aftermarket gear support.
Decoding the Factory ID Tag
The small stamped metal tag secured under one of the third-member retaining nuts is your primary source of factory data. Clean it carefully with a brass brush and degreaser before reading it. It carries two rows of alphanumeric information.
Top Line: Build Date and Model Code
The top line starts with a model code, followed by a dash, then a revision suffix. Different revision letters under the same model code are generally interchangeable. At the far right sits the date code:
- First character: Last digit of the manufacturing year (cross-reference with the vehicle or model prefix to identify the correct decade)
- Second character: Month of manufacture, A = January through M = December — the letters I and O are skipped to avoid confusion with 1 and 0
- Final characters: Day of the month, or A through E representing the first through fifth week
Bottom Line: Gear Ratio and Differential Type
The bottom row gives you the mechanical specs without cracking open the housing:
- Plain number sequence (e.g., “3 50”) = 3.50:1 ratio, open differential
- “L” in the middle of the sequence (e.g., “3L50”) = 3.50:1 ratio with Limited Slip / Traction-Lok
- Middle number “9” = confirms a standard 9 inch ring gear
- Middle number “8.7” = 8.75 inch ring gear in a 9 inch housing — a factory hybrid that appeared sporadically until around 1969
The Door Jamb Sticker: When the Tag Is Gone
If the metal tag is missing — and it often is after decades of maintenance and corrosion — check inside the vehicle. The Safety Compliance Certification Label on the driver’s side door jamb contains an “AXLE” data box with a two-digit code.
| Door Jamb Code | Gear Ratio | Differential Type |
|---|---|---|
| 19 | 3.55:1 | Open |
| H9 | 3.55:1 | Limited Slip (Traction-Lok) |
| 26 | 3.73:1 | Open |
| B6 | 3.73:1 | Limited Slip (Traction-Lok) |
| 27 | 3.31:1 | Open |
| 45 | 3.55:1 | Open (Heavy Truck) |
A letter prefix on the code consistently signals a limited-slip differential. A plain number indicates an open diff.
The Rotational Spin Test: No Tags, No Problem
When every tag is missing and the door sticker is unreadable, the spin test determines both the differential type and the gear ratio through direct physical testing. Here’s exactly how to do it:
Setup:
- Chock the front wheels securely
- Lift the rear of the vehicle and support it on jack stands
- Put the transmission in neutral
Determine differential type first:
Spin one rear tire by hand. If the opposite tire rotates in the same direction, you have a limited-slip or locked differential. If it rotates in the opposite direction, you have an open differential.
Calculate the gear ratio:
- Mark the driveshaft with chalk, aligned with the axle housing
- Mark the inner sidewall of one rear tire
- Limited-slip axle: Rotate the marked tire one full revolution while counting driveshaft rotations
- Open differential: Hold the opposite wheel stationary and rotate the free tire two full revolutions
Match your driveshaft count to the ratio:
- Just over 3 full rotations = 3.08:1
- Exactly 3.5 rotations = 3.55:1
- Almost 3.75 rotations = 3.73:1
- Slightly over 4 rotations = 4.10:1
Identifying the Housing Ends: Small Bearing vs. Big Bearing
The outer ends of the axle tubes dictate which brake hardware, axle bearings, and retaining plates fit your housing. Getting this wrong means your brake kit won’t bolt on.
| Housing End Style | Bearing O.D. | Bolt Size | Bolt Pattern |
|---|---|---|---|
| Small Bearing | 2.834 inches | 3/8 inch | 3.375 x 2.000 inches |
| Early Big Ford (Old Style) | 3.150 inches | 1/2 inch | 3.500 x 2.375 inches |
| Late Big Ford / Torino | 3.150 inches | 3/8 inch | 3.562 x 2.000 inches |
The Torino-style Late Big Bearing end has become the dominant aftermarket standard. Nearly every modern disc brake conversion kit targets the Torino’s 3.562 x 2.000-inch bolt spacing. If you’re building a custom housing, Torino ends are the smart choice for maximum parts availability.
Spotting the “N” Case: The Holy Grail of Third Members
If you’re evaluating a used third member, look at the external webbing just above the pinion support area. A large letter “N” cast directly into the metal identifies a nodular iron center section — the strongest factory Ford ever produced.
Ford reserved “N” cases for the 406 Galaxies, 427 Fairlanes, Drag Pack Cobra Jet Mustangs, and Boss 429 applications. The nodular iron’s rounded graphite microstructure absorbs shock loads that would crack a standard gray iron case outright.
Watch out for WAR, WAA, and WAB cases — they have similar external ribbing to the “N” case but lack the “N” stamp and use standard gray cast iron. Stronger than a plain case, but not in the same league as genuine nodular iron.
Axle Spline Count: 28 vs. 31 Spline
Factory 9 inch axles came in two primary spline configurations:
- 28-spline shafts: Standard light-duty passenger applications. The shaft tapers toward the wheel hub. These cannot be cut and re-splined for custom narrowed housings.
- 31-spline shafts: Heavy-duty applications only. These carry a 35% higher torsional strength rating than 28-spline units and feature a uniform shaft diameter, allowing chassis builders to cut and re-spline them for custom widths.
One more quirk to remember: the 9 inch’s offset pinion means the third member sits slightly off-center in the housing. Your driver-side and passenger-side axles are always two different lengths. Measure both sides independently from the outer flange to the pinion centerline before ordering custom shafts.
Quick Reference: Ford 9 Inch Identification Checklist
Use this as your field checklist whenever you’re evaluating an axle:
- ✅ No rear inspection cover — confirms removable carrier design
- ✅ Socket blocked at lower retaining nuts — confirms 9 inch over 8 inch
- ✅ Rear dome shape — smooth (1957), two dimples (1958–1967), or raised hump (post-1966)
- ✅ Factory ID tag under retaining nut — gear ratio, limited-slip code, build date
- ✅ Door jamb axle code — backup identification when tag is missing
- ✅ Spin test — physical confirmation of ratio and differential type
- ✅ Housing end bolt pattern — small bearing vs. Torino big bearing
- ✅ “N” cast into third member webbing — nodular iron confirmation
- ✅ Axle shaft taper — indicates 28-spline (tapered) or 31-spline (uniform)
The Ford 9 inch rear end earned its legendary status through decades of real-world punishment — in muscle cars, race trucks, and strip-ready hot rods alike. Now that you know exactly how to identify a Ford 9 inch rear end using every method from a simple socket test to a full factory tag decode, you’ll never misidentify one again.