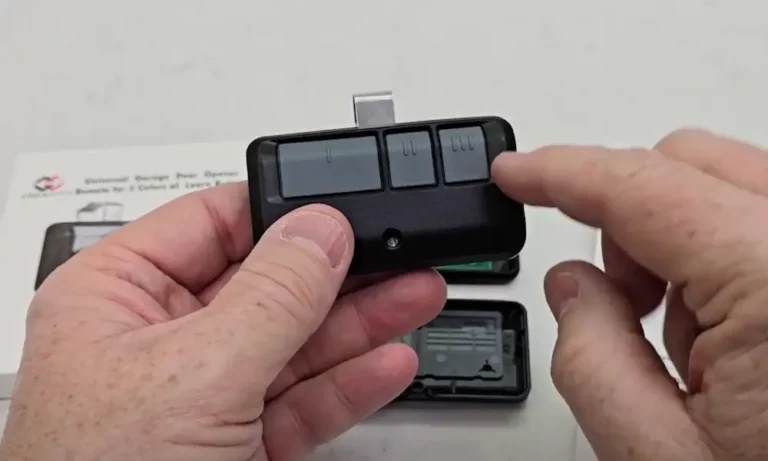
Ever stared at your new universal garage door opener wondering if you need an engineering degree to make it work? You’re about to discover it’s simpler than it looks. This guide breaks down everything from finding those mysterious “learn” buttons to troubleshooting common issues.
What Is a Universal Garage Door Opener?
A universal garage door opener is a device designed to work with multiple garage door brands and models. Unlike manufacturer-specific remotes, these versatile controllers can operate doors from Chamberlain, LiftMaster, Genie, Craftsman, and many others.
They’re perfect for replacing lost remotes or consolidating multiple remotes into one convenient device. Most universal openers are compatible with systems manufactured after 1993, though some older models with DIP switches require special configuration.
Before You Start Programming
Before jumping into programming, take these essential preparation steps:
Check Compatibility
Not all universal remotes work with every opener brand. Most universal remotes work with:
- Chamberlain
- LiftMaster
- Genie
- Craftsman
- Stanley
- Wayne Dalton
Check your opener’s brand and manufacturing date against the remote’s compatibility list found in the product manual or the manufacturer’s website.
Identify Your Opener Type
Garage door openers use two main programming methods:
- Learn Button Systems (most openers after 1993)
- Feature a colored button labeled “LEARN,” “CODE,” or “RADIO SET”
- Use rolling code technology for better security
- DIP Switch Systems (older models)
- Contain 8-12 small switches you must manually align
- Often found behind a panel on older units
Gather What You’ll Need
- Your universal remote
- Step ladder (for ceiling-mounted openers)
- Screwdriver (potentially needed for battery compartment)
- New batteries for the remote
- Opener’s manual (if available)
Programming Modern Openers with Learn Buttons
Modern garage door openers use a “learn” button system that makes programming relatively straightforward. Here’s how to do it:
Finding the Learn Button
The learn button is typically located on the motor unit of your garage door opener. Its location and color vary by brand:
| Brand | Button Color | Typical Location |
|---|---|---|
| Chamberlain/LiftMaster | Yellow, Purple, Red, Orange | Under the light lens or on back panel |
| Genie | Red or Black | Near the hanging antenna wire |
| Craftsman | Green, Red, Orange, Purple | Under light cover or near terminal screws |
| Stanley | Red | On the back of motor unit |
You’ll need a ladder to reach ceiling-mounted openers safely. Don’t rush this step—finding the correct button is crucial.
Programming Steps for Learn Button Openers
- Position yourself safely near the motor unit with your universal remote in hand.
- Press and hold the learn button on your garage door opener until the indicator light turns on (usually 2-3 seconds).
- Within 30 seconds, press the button on your universal remote that you want to program. Hold for about 3 seconds.
- Watch for confirmation – the opener’s light will blink or the LED will flash to indicate successful pairing.
- Test the remote by standing at least 5 feet away from the opener and pressing the programmed button. The door should activate.
For Chamberlain universal remotes, you might need to:
- Press and hold the bottom button for 15 seconds until the LED turns solid blue
- Press the opener’s learn button
- Press the remote button you wish to program within 60 seconds
Color-Specific Programming Notes
The color of your learn button might require slightly different programming steps:
- Yellow Button: Press the remote button once
- Purple Button: Press the remote button twice
- Red/Orange Button: Press the remote button once, but may require holding longer
- Green Button: Press remote button once, wait for light to blink
Programming Older Openers with DIP Switches
If your garage door opener was manufactured before 1993, it likely uses DIP switches instead of a learn button.
Locating the DIP Switches
Look for a small panel on:
- The back of your garage door opener unit
- Inside the remote control battery compartment
- Behind a cover on the motor housing
You’ll see a series of small switches (usually 8-12) that can be toggled up or down to create a unique binary code.
Programming Steps for DIP Switch Openers
- Open both the opener and remote to expose the DIP switches.
- Note the pattern of the switches on your opener (which ones are up/down).
- Match the switches on your universal remote to exactly mirror the pattern on the opener. Use a small screwdriver or pen to move the tiny switches.
- Replace batteries and covers on both devices.
- Test the remote to confirm it’s working properly.
Precision is crucial with DIP switches—if even one switch is in the wrong position, the remote won’t work.
Programming Multiple Doors
Many universal remotes can control multiple garage doors. To program additional doors:
- Choose a different button on your remote for the second door.
- Follow the same programming steps as above, but this time using the opener for the second door and your chosen second button.
- Repeat for each additional door you want to control (up to the number of buttons on your remote).
This feature is especially useful for homes with multiple garages or for controlling both home and work garage doors with one device.
Troubleshooting Common Programming Issues
Even with careful following of instructions, you might encounter some issues. Here are solutions to common problems:
Remote Won’t Program
- Check battery: Install a fresh battery in the remote.
- Verify compatibility: Confirm your universal remote works with your opener brand.
- Reset the opener: Disconnect power to the opener for 30 seconds, then try again.
- Check distance: Stand closer to the opener when programming.
- LED interference: Some LED bulbs in your opener can cause signal interference. Try removing them during programming.
Remote Works Inconsistently
- Battery issues: Low batteries cause intermittent operation. Replace with fresh ones.
- Signal interference: Nearby electronics or metal objects can block signals. Try standing in different positions.
- Antenna problems: Make sure the antenna wire on your opener is hanging down straight.
- Range issues: Most remotes work best within 50 feet. Environmental factors can reduce this range.
Forget All Programmed Remotes
If you need to clear all programmed remotes (like when moving into a new home):
- Press and hold the learn button on the opener for about 10-15 seconds.
- The indicator light will turn off, signaling all codes have been erased.
- Reprogram any remotes you wish to use.
Advanced Programming Features
For tech-savvy users, some universal remotes offer advanced capabilities:
Smart Home Integration
Many newer universal remotes can integrate with smart home systems. You can:
- Connect to Wi-Fi networks for app control
- Link with voice assistants like Alexa or Google Home
- Set up automation routines (like closing the door at specific times)
For DIY enthusiasts, retrofit solutions using relays and microcontrollers can add smart features to older openers.
Security Features
Modern universal remotes often include security enhancements:
- Rolling code technology: Changes the access code each time you use the remote
- Encryption: Protects against code grabbers and unauthorized access
- Activity logs: Some smart models track when your garage door opens and closes
Maintaining Your Universal Garage Door Opener
To ensure reliable operation over time:
- Replace batteries annually or when you notice decreased range.
- Clean the remote occasionally with a slightly damp cloth (no harsh chemicals).
- Test safety features monthly by placing an object in the door’s path to verify auto-reverse.
- Update firmware if your remote connects to Wi-Fi or other networks.
- Keep a backup remote programmed and stored in a safe place.
Understanding Different Universal Remote Types
Universal garage door openers come in several formats to suit different needs:
Keychain Remotes
Small enough to attach to your keys, these compact remotes typically have 1-4 buttons and are perfect for everyday use. They’re powered by watch-style batteries that last 1-2 years with normal use.
Wall Consoles
These mount inside your garage and provide a stationary control point. Many include additional features like vacation mode, light controls, or motion sensors. They’re typically hardwired or use larger batteries.
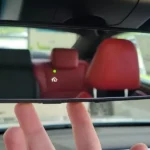
In-Vehicle Remotes
Many modern vehicles include built-in universal garage door controls, usually located on the sun visor or rearview mirror. These vehicle-integrated systems require special programming sequences detailed in your car’s manual.
Keypad Entry Systems
These weatherproof, wall-mounted keypads let you open your garage by entering a PIN code. They provide access without needing a physical remote—perfect for family members, trusted visitors, or emergency access.
Programming Brand-Specific Universal Remotes
Different brands may have slight variations in their programming procedures:
LiftMaster/Chamberlain
The Chamberlain universal remote requires:
- Pressing the bottom button until the LED turns blue
- Pressing the opener’s learn button
- Quickly pressing your chosen remote button
Genie Universal Remotes
Genie remotes often require:
- Pressing the learn button on the opener
- Immediately pressing and releasing the remote button
- Pressing the same button again to confirm
Overhead Door Universal Remotes
These typically need:
- Press the program button until the LED flashes
- Press the opener’s learn button
- Press the remote button you wish to program
Upgrading to a Universal Remote: Is It Worth It?
If you’re considering switching to a universal remote, weigh these benefits:
Advantages
- Consolidation: Replace multiple remotes with one device
- Replacement solution: Ideal when original remotes are lost or broken
- Flexibility: Work across different brands and models
- Future-proofing: Many work with both older and newer systems
- Cost-effective: Usually cheaper than brand-specific replacements
Limitations
- Compatibility issues: Not guaranteed to work with all systems, particularly very old or proprietary ones
- Reduced range: Some universal remotes have shorter range than original equipment
- Feature limitations: May lack advanced features of brand-specific remotes
- Programming complexity: Can require more setup than original remotes
For most homeowners, the convenience and cost savings of a universal remote outweigh these potential drawbacks.
Final Testing and Safety Check
After programming your universal garage door opener:
- Test from multiple distances: Try the remote from your driveway, street, and inside your vehicle.
- Check all programmed buttons: If you’ve set up multiple doors, verify each works correctly.
- Verify safety features: Test the auto-reverse sensor by placing a block of wood in the door’s path.
- Check manual operation: Ensure you can still operate the door manually by pulling the emergency release cord.
By following these detailed steps, you’ll successfully program your universal garage door opener for reliable, convenient access to your garage. Remember that patience during the programming process pays off with years of trouble-free operation.