Having trouble with your garage door sensors not lighting up? You’re facing one of the most frustrating garage door problems that can leave you wondering if you need an expensive repair. This guide walks you through the exact steps to diagnose and fix the issue yourself, potentially saving you hundreds in service calls. Stick around to learn how to get those sensor lights back on and your garage door working properly again.
What Are Garage Door Safety Sensors and Why Do They Matter?
Garage door sensors aren’t just annoying gadgets that occasionally malfunction—they’re critical safety devices that have been mandatory on all automatic garage doors manufactured since 1993. These photoelectric eyes prevent crushing accidents by stopping your door from closing when they detect an obstruction.
A properly functioning sensor system includes:
- Two sensors mounted on either side of your garage door, about 3-4 inches from the floor
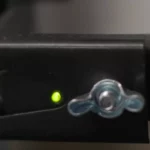
- One sending unit (typically with an amber light)
- One receiving unit (typically with a green light)
- A beam of infrared light that passes between them
When both sensors stop lighting up completely, you’re likely dealing with a power or wiring issue rather than simple misalignment (which usually results in one sensor still showing light).
Why Both Sensors Might Not Be Lighting Up
Power Supply Problems
When both sensors go completely dark, the most common culprit is a power-related issue:
- Complete power interruption: Your sensors aren’t getting any electricity from the garage door opener system
- Voltage fluctuations: Power surges or dips in your home’s electrical system can affect sensitive sensor components
- Blown fuse: A power surge may have blown an internal fuse in your garage door opener
- Dead batteries: If your system uses battery backup during outages, depleted batteries could be the issue
Wiring Issues
The thin wires connecting your sensors to the opener are vulnerable to several problems:
- Disconnected wires: Connections can work loose at either the sensor end or the opener end
- Damaged wiring: Wires can be cut, crushed, or chewed by rodents
- Corrosion: Wire connections can corrode over time, especially in humid environments
- Poor splicing: If you’ve extended sensor wires, bad connections at splice points can interrupt power
- Short circuits: A short anywhere in the wiring can prevent both sensors from receiving power
Physical Sensor Damage
Sometimes the problem lies within the sensors themselves:
- Water damage: Rain, flooding, or even high humidity can damage sensitive electrical components
- Impact damage: Sensors can be bumped by vehicles, lawnmowers, or kicked accidentally
- Age-related failure: Like any electronic device, sensors can simply wear out over time
- Sun damage: Direct sunlight can sometimes interfere with sensor function
Step-by-Step Troubleshooting Process
Step 1: Verify Power to the Entire System
Before diving into complex repairs, make sure the problem isn’t a simple power issue:
- Check if your garage door opener’s main light turns on
- Verify the wall-mounted door control panel is lit and responsive
- Test other electrical outlets in your garage to rule out a circuit breaker issue
- If you recently had a power outage, the opener might need to be reset
If the opener itself has power but the sensors don’t, you’re dealing with a more specific issue with the sensor circuit.
Step 2: Inspect the Sensor Wiring Path
Follow these steps to check for wiring problems:
- Trace the wire path from each sensor up to where they connect to the garage door opener
- Look for any visible signs of:
- Frayed or cut wires
- Wires pulled loose from connections
- Rodent damage (chewed insulation)
- Wires pinched under brackets or other hardware
According to Reddit user experiences, wiring damage is one of the most common but overlooked problems with garage door sensors.
Step 3: Check Terminal Connections at the Opener
The wiring connections at the garage door opener itself are common failure points:
- Locate the terminal block on your garage door opener (usually on the back or under a cover panel)
- Verify that sensor wires are securely connected to the proper terminals:
- White wires typically connect to the white terminal
- White/black striped wires typically connect to the gray terminal
- Gently tug on each wire to ensure it’s securely fastened
- If terminals have screws, make sure they’re tight
Step 4: Inspect Sensor Connections
The point where wires connect to the sensors themselves is another frequent problem area:
- Examine the back of each sensor where the wires attach
- Look for loose wire nuts or push-in connectors
- If you see disconnected wires, reconnect them by:
- Removing the wire cap
- Twisting the matching wires together firmly
- Replacing the wire cap securely
Reports from homeowners indicate that loose sensor connections are often the culprit, particularly in garages subject to vibration from door operation.
Step 5: Test for Continuity in the Wiring
If visual inspection doesn’t reveal the problem, you can use a multimeter to check for breaks:
- Disconnect the sensor wires from the opener terminals
- Set a multimeter to the continuity or resistance setting
- Connect the multimeter leads to the same wire at both ends
- If there’s no continuity (infinite resistance), you have a break in that wire
- Repeat for each wire in the sensor system
Step 6: Try Bypassing Suspect Sections
To isolate the problem, you can try this temporary test:
- Disconnect the sensors from their mounting brackets
- Bring both sensors near the opener, keeping them aligned
- Connect them directly to the opener with short test wires
- If the sensors light up now, you know the problem is in your existing wiring
Common Fixes for Non-Lighting Sensors
Rewiring the Sensor Circuit
If you’ve found damaged wires, you have two options:
- Repair the damaged section:
- Cut out the damaged portion
- Strip the ends of the good wire
- Join with wire nuts and electrical tape
- Secure to prevent future damage
- Replace the entire wire run (often easier):
- Purchase 22-gauge 2-conductor low-voltage wire
- Run new wire from the opener to each sensor
- Secure with insulated staples (don’t pierce the wire!)
- Connect to terminals at both ends
Replacing Faulty Sensors
If the sensors themselves are damaged:
- Purchase compatible replacement sensors (check your opener model first)
- Remove the old sensors from their brackets
- Install new sensors in the same position
- Connect wiring to the same terminals
- Test for proper operation
Replacement sensor pairs typically cost $20-40, making this a cost-effective DIY repair compared to service calls that can exceed $100.
Advanced Troubleshooting Techniques
Testing Power Output at the Opener
To verify if your opener is sending power to the sensors:
- Use a voltage detector or multimeter set to AC voltage
- Check the sensor terminals on the opener
- You should read approximately 12V AC
- If no voltage is present, the opener’s circuit board may be failing
Checking for Interference
Sometimes external factors can cause sensor problems:
- Check for direct sunlight hitting sensors (can overwhelm the infrared receiver)
- Look for new light sources in your garage that might create interference
- Clean both sensor lenses with a soft cloth
- Make sure nothing is stored near the sensors that could block them
Temporary Workarounds
While troubleshooting, you might need to use your garage door. Here are two ways to operate it temporarily:
- Override the sensors: On most models, you can hold down the wall-mounted button continuously until the door closes completely
- Disengage the opener: Pull the emergency release cord (usually red) to allow manual operation of the door
Remember that these workarounds bypass important safety features, so use them with caution and only temporarily.
Maintaining Your Sensors to Prevent Future Problems
Once you’ve got your sensors working again, these prevention tips will help avoid future issues:
- Clean sensor lenses monthly with a soft cloth
- Check wire connections twice yearly
- Keep the sensor area clear of debris and stored items
- Consider running sensor wires through protective conduit
- Install sensors slightly recessed to prevent accidental impacts
- Redirect sprinklers away from garage door area
Comparison of Common Sensor Problems and Solutions
| Problem | Symptoms | Common Causes | DIY Solution |
|---|---|---|---|
| No lights on either sensor | Both sensors completely dark | Power interruption, wiring damage | Check connections, inspect wiring, test power |
| One sensor light out | One sensor lit, one dark | Misalignment, individual sensor failure | Realign sensors, check individual wiring |
| Blinking sensor lights | Lights flash instead of staying solid | Misalignment, intermittent connection | Adjust sensor position, secure loose connections |
| Sensors lit but door won’t close | Both sensors show correct lights but door reverses | Misalignment, obstruction in path, bad logic board | Clear path, realign, check operational patterns |
Sensor Compatibility Guide
If you need to replace your sensors, use this compatibility reference:
| Opener Brand | Compatible Sensor Models | Typical Wire Color Code | Average Cost |
|---|---|---|---|
| Chamberlain/LiftMaster | 41A5034, 41A4373A | White & White/Black | $25-35 |
| Genie | 36450A, 34879A | White & Black | $20-30 |
| Craftsman | 41A5034 | White & White/Black | $25-35 |
| Overhead Door | 37220R | White & Black | $30-40 |
| Wayne Dalton | 307380 | Red & White | $35-45 |
Remember that most modern sensors can be interchangeable if you connect the wires correctly, regardless of the brand name on the sensor itself.
By following this troubleshooting guide, you’ll be able to diagnose and fix most cases where your garage door sensors aren’t lighting up. This not only saves you money on service calls but also gives you a better understanding of how these important safety devices work.