Is pressing your garage door button like talking to a brick wall? You’re not getting the response you need, and now you’re stuck manually lifting that heavy door. Let’s fix that. This guide walks through every reason your garage door button might be failing you and how to get it working again—most fixes take just minutes and basic tools.
Common Reasons Your Garage Door Button Isn’t Working
When that wall-mounted button stops responding, several culprits could be responsible. Understanding these potential problems helps narrow down your troubleshooting efforts.
Power Issues
Your garage door opener is an electrical device, so naturally, power problems are the first thing to check.
Start with your circuit breaker. Even if the lights in your garage work, the opener might be on a separate circuit that’s tripped. Head to your electrical panel and look for any switches that aren’t fully in the “on” position.
Many garage door openers connect to GFCI outlets (those outlets with the “test” and “reset” buttons). These can trip without affecting your main circuit breaker. Check any GFCI outlets in your garage—if you find one with a red light or that feels “popped out,” press the reset button.
Not sure if power is flowing? Try this quick test: unplug your garage door opener and plug in something simple like a phone charger or lamp. If that works, power is flowing to the outlet. If not, you’ve found your problem.
Locked Wall Control
Modern wall buttons sometimes include a lock function to prevent unauthorized use. If your wall control has multiple buttons or features, you might have accidentally engaged the lock mode.
Look for a flashing light on your wall button—that’s often a sign the control is locked. For many LiftMaster and Chamberlain models, you can unlock the button by pressing and holding the “Lock” button until the light stops flashing.
Faulty Button Mechanism
Wall buttons are mechanical devices that wear out over time. The internal components can break or become less responsive after years of use.
Here’s a simple test: remove the wall button with a screwdriver (after unplugging the opener for safety) and touch the two wires together. If your garage door activates when you touch the wires but not when you press the button, you’ve found your culprit—the button itself is defective.
Damaged Wiring
The thin, low-voltage wires connecting your wall button to the opener unit can easily get damaged, especially in busy garages.
Look for any visible signs of damage along the wire path. Common problems include:
- Pinched wires (caught in door hinges or stapled too tightly)
- Frayed or cut sections (often from nearby tools or equipment)
- Loose connections at either the button or opener terminals
Logic Board Problems
If all else fails, your opener’s main control board (logic board) might be the issue. This is typically the most complex and expensive problem to fix.
Signs of a logic board problem include:
- No response when touching wall button wires together
- Complete system failure (no lights or response from any controls)
- Inconsistent operation (works sometimes but not others)
Step-by-Step Troubleshooting Process
Let’s solve your garage door button problem with this methodical approach:
Step 1: Check the Power Supply
- Look at your opener unit—is there any sign of power? Many units have small LED lights that indicate power status.
- Check if your remote controls work. If they do, you have power to the opener itself, narrowing your problem to the wall button or its wiring.
- Verify the circuit breaker is on and hasn’t tripped. Reset it if necessary.
- If your garage has GFCI outlets, check if any have tripped and need resetting.
- Test the outlet by plugging in another device to confirm it’s receiving power.
Step 2: Inspect the Wall Button
- Look at the wall button for any visible damage or stuck buttons.
- If the button has an LED light, check if it’s on, off, or flashing. A flashing light often indicates a lock mode is activated.
- For buttons with lock features, press and hold the lock button for several seconds until any flashing lights stop.
- Remove the button from the wall (after disconnecting power) and check for corrosion, damage, or loose wire connections.
Step 3: Test the Button Functionality
- Disconnect power to the opener unit by unplugging it.
- Remove the wall button by loosening the mounting screws.
- Carefully disconnect the two wires from the button.
- Reconnect power to the opener.
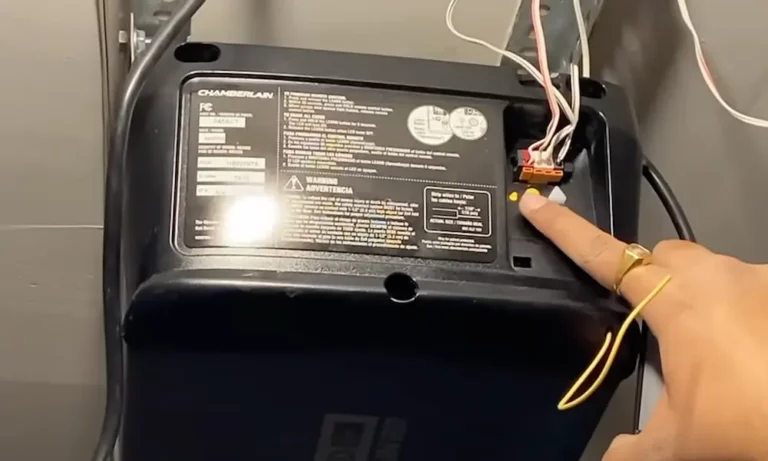
- Touch the two wires together briefly (except for LiftMaster models with yellow learn buttons). If the garage door activates, your button is defective and needs replacement.
Step 4: Check the Wiring
- With power disconnected, visually inspect the entire wire path from the opener to the button.
- Look for any cuts, breaks, or areas where the wire might be pinched or damaged.
- Check the wire terminals at both the button and the opener for secure connections.
- If you suspect damaged wiring in the walls, create a temporary “jumper wire” by running a new wire from the opener directly to the wall button location. If this works, you’ll need to replace the in-wall wiring.
Step 5: Reset the System
Sometimes electronic devices just need a reset:
- Unplug the garage door opener from power.
- Wait 1-2 minutes.
- Plug it back in and test the wall button.
This simple power cycle can resolve minor electronic glitches in the system.
How to Replace a Defective Wall Button
If your troubleshooting indicates a faulty button, here’s how to replace it:
Tools and Materials Needed:
- New wall button (compatible with your opener)
- Phillips or flathead screwdriver
- Wire strippers (if needed)
Replacement Steps:
- Disconnect power to the garage door opener by unplugging it or turning off the circuit breaker.
- Remove the current wall button by unscrewing it from the wall.
- Carefully disconnect the wires, noting which wire connects to which terminal (take a photo if needed).
- Connect the wires to your new button:
- For most standard buttons, connect the white wire to the white terminal and the red/striped wire to the red terminal
- For smart controls, follow the manufacturer’s instructions
- Mount the new button to the wall using the existing screw holes.
- Reconnect power to the opener and test the new button.
Most wall buttons cost between $15-40 and are available at home improvement stores. Many are universal and will work with any brand of opener, though smart controls usually need to match your opener’s brand.
Fixing Wiring Problems
If your troubleshooting points to a wiring issue, here’s how to address it:
For Loose Connections:
- Disconnect power to the opener.
- Check the wire terminals at both the wall button and the opener.
- Make sure the wires are securely fastened in their terminals.
- If the wire ends look frayed or damaged, cut them back slightly and strip a fresh section (¼ inch) of insulation.
- Reconnect the wires firmly to their terminals.
For Damaged Wiring:
- Determine where the damage is located. If it’s visible, you can repair just that section.
- For damage inside walls, you’ll need to run new wire.
- Purchase bell wire or 18-22 gauge two-conductor wire from a hardware store.
- Run the new wire from the opener to the button location, securing it along the way.
- Connect the new wire to the button and opener terminals.
Advanced Troubleshooting for Logic Board Issues
If all previous steps fail, your opener’s logic board might be the problem. This is the “brain” of your garage door opener.
Signs of a Logic Board Failure:
- No response from any controls (wall button or remotes)
- Strange behavior like partial door movement
- Clicking sounds from the opener but no movement
- Lights on the opener working but no motor response
Testing the Logic Board:
- With power disconnected, open the opener’s housing to access the logic board.
- Look for visible signs of damage like burned components or bulging capacitors.
- Check for loose wire connections on the board.
- If you’re comfortable with electronics, use a multimeter to test for proper voltage on key components.
Replacing the Logic Board:
This is typically a job for professionals, but if you’re technically inclined:
- Purchase a replacement board specific to your opener model.
- Carefully document all wire connections on the old board (photos help).
- Disconnect all wires from the old board.
- Remove the old board and install the new one.
- Reconnect all wires in their original positions.
- Test the system thoroughly.
Preventative Maintenance
Prevent future button failures with these simple maintenance tips:
- Keep it clean: Dust and debris can get inside the button mechanism. Periodically clean around your wall button with a dry cloth.
- Check connections yearly: Once a year, tighten all wire connections at both the button and opener.
- Protect wiring: When doing garage projects, be aware of where button wires run to avoid accidentally damaging them.
- Update old hardware: If your wall button is more than 10 years old, consider proactively replacing it before it fails.
- Protect from moisture: In humid climates, moisture can corrode button contacts. Consider a button with a protective cover.
Smart Wall Control Alternatives
If you’re replacing your wall button, consider upgrading to a smart wall control that offers advanced features:
Standard vs. Smart Wall Controls
| Feature | Standard Button | Smart Wall Control |
|---|---|---|
| Door operation | Basic open/close | Open/close plus status monitoring |
| Lighting control | None or basic | Control opener lights and additional lights |
| Security features | None | Lock mode with PIN protection |
| Programming access | None | Program remotes and accessories |
| Display | No display | LCD screen with diagnostic information |
| Connectivity | None | Wi-Fi options for smartphone control |
| Price range | $15-25 | $40-100+ |
Modern smart wall controls can also integrate with home automation systems, allowing you to check if your garage door is open from anywhere and control it remotely.
Fixing Brand-Specific Issues
Different garage door opener brands have their quirks. Here are some brand-specific troubleshooting tips:
LiftMaster/Chamberlain
- Flashing light on wall control often indicates lock mode
- Press and hold the lock button for 5 seconds to disable
- For Security+ 2.0 models, check the “Learn” button on the opener when troubleshooting
Genie
- Many models have a vacation/lock mode that can be accidentally engaged
- Press and hold the vacation mode button until the LED stops flashing
- Check for Genie’s “Safe-T-Beam” system obstruction which can prevent operation
Craftsman
- Many use a dual-function wall control where you must press the top portion for door operation
- Check if the light button works but not the door button, indicating a door-specific issue
- Older models may require synchronization between the wall button and opener
Safety Considerations When Working with Garage Door Openers
While troubleshooting your wall button, keep these safety tips in mind:
- Always disconnect power before working on any electrical component.
- The wall button uses low-voltage wiring (usually 12-24V), which is generally safe to handle, but the opener itself connects to household voltage (120V), which can be dangerous.
- Never override safety features like auto-reverse sensors in your troubleshooting.
- If you’re uncomfortable working with any part of the system, contact a professional.
- After repairs, always test all safety features, including the auto-reverse mechanism.
By following this systematic approach to troubleshooting, you’ll likely solve your garage door button problems without needing professional help. Most issues stem from simple power, button, or wiring problems that are easy to fix with basic tools and minimal expense.