Ever walked into your garage, fumbled for your remote control, and thought “there must be a better way?” If you own a RAM vehicle equipped with HomeLink® technology, there is. You can ditch those bulky remotes and control your garage door directly from your vehicle’s built-in system. I’ll show you exactly how to set this up, even if you’re not particularly tech-savvy.
What is HomeLink® in RAM Vehicles?
HomeLink® is a universal transceiver system integrated into your RAM truck or SUV. It allows you to replace up to three separate remote controls with buttons conveniently located in your vehicle’s overhead console or sun visor. This system works with most garage door openers made after 1995 and can also control gates, home lighting, and security systems.
The beauty of HomeLink® is that once programmed, it’s always ready. No more searching for remotes or dealing with dead batteries. Just press a button, and your garage door opens or closes as you arrive or leave.
Before You Start Programming
Gather What You Need
Before diving into programming, make sure you have:
- Your original garage door remote control
- Access to your garage door motor unit
- Your RAM vehicle with HomeLink® system
- 5-10 minutes of uninterrupted time
Clear Existing Codes From HomeLink®
It’s always best to start with a clean slate:
- Turn your vehicle ignition to “On” without starting the engine
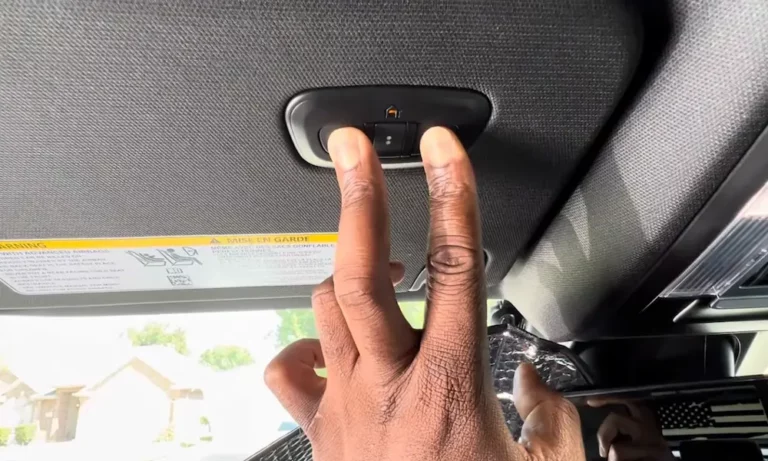
- Press and hold the two outer HomeLink® buttons (usually buttons 1 and 3)
- Continue holding until the indicator light begins flashing (this may take up to 20 seconds)
- Release both buttons when the light flashes rapidly
- All stored codes are now erased
This step ensures no previous programming interferes with your new setup.
Identify Your Garage Door Opener Type
Before programming, you need to determine whether your garage door opener uses “rolling code” technology or an older fixed code system. This affects the programming process.
How to Check:
Look at your garage door motor unit (the box mounted on your garage ceiling). If you see a “Learn” or “Smart” button on the unit, typically near where the antenna wire connects, you have a rolling code system. If there’s no such button, you likely have an older fixed code system.
Rolling code systems change their access code each time the door is operated, providing better security. Most modern openers (post-1995) use this technology.
Programming a Fixed Code Garage Door Opener
For older garage door systems without rolling code technology:
- Turn your vehicle ignition to “On” (don’t start the engine)
- Hold your original garage door remote 1-3 inches from the HomeLink® button you want to program
- Simultaneously press and hold both:
- The HomeLink® button you’re programming
- The button on your original remote
- Hold both until the HomeLink® indicator light changes from slowly blinking to rapidly blinking (usually takes 30 seconds)
- Release both buttons once the light blinks rapidly
- Press the programmed HomeLink® button for 2 seconds
- If your garage door moves, programming is complete
- If not, try pressing the button again
This process transfers the code from your original remote to your vehicle’s HomeLink® system.
Programming a Rolling Code Garage Door Opener
Modern garage door openers with rolling code technology require an extra synchronization step:
Step 1: Program the HomeLink® Button
- Turn your vehicle ignition to “On” position
- Hold your original remote 1-3 inches from the HomeLink® button you want to program
- Simultaneously press and hold both:
- The HomeLink® button you’re programming
- The button on your original remote
- Hold until the HomeLink® indicator changes from slowly blinking to rapidly blinking
- Release both buttons when the light blinks rapidly
Step 2: Synchronize with the Garage Door Motor
- Locate the “Learn” or “Smart” button on your garage door motor unit
- Press and release this button (the motor’s indicator light will start blinking)
- Within 30 seconds, return to your vehicle
- Press the programmed HomeLink® button twice, holding each press for 2 seconds
- Your garage door should activate, indicating successful programming
- If the door doesn’t move, press the HomeLink® button a third time
This two-part process is crucial for rolling code systems. The first step programs the button, while the second synchronizes the security codes between your vehicle and the garage door opener.
Troubleshooting Common Programming Issues
Door Doesn’t Move After Programming
- Verify your garage door opener is plugged in and has power
- Try reprogramming following the steps exactly
- Check if your original remote works properly
- Position your vehicle closer to the garage door during programming
- Replace the batteries in your original remote
Inconsistent Operation
If the door opens sometimes but not others:
- Park your vehicle within 10 feet of the garage door
- Repeat the programming steps for your specific opener type
- Metal objects or radio interference can disrupt the signal, so test from different positions
Programming Won’t Complete
If the HomeLink® indicator doesn’t change from slow to rapid blinking:
- Hold the remote closer to the HomeLink® button (1-2 inches away)
- Try different angles when pointing the remote
- Replace the batteries in your original remote
- For very old garage door openers (pre-1995), you may need a compatibility bridge from HomeLink
Programming HomeLink® for Multiple Garage Doors
Have more than one garage door? No problem. HomeLink® can handle up to three different doors:
- Clear all codes following the reset procedure above
- Program each HomeLink® button separately using the steps for your opener type
- Label each button internally (you can remember which is which based on position)
Each button maintains its own memory, so your primary garage door can be button 1, a second garage door can be button 2, and a gate or lighting system can be button 3.
Safety Considerations When Using HomeLink®
While HomeLink® offers convenience, safety remains paramount:
- Always maintain visual contact with the door during operation
- Never let children operate the HomeLink® buttons unsupervised
- Ensure your garage door has functional safety sensors that prevent closing when obstructed
- Periodically test your door’s safety reversing mechanism as required by the National Highway Traffic Safety Administration
Maintaining Your HomeLink® System
Once programmed, your HomeLink® system requires minimal maintenance:
- No battery replacement needed (it draws power from your vehicle)
- Programming remains even if your vehicle battery is disconnected
- If you replace your garage door opener, you’ll need to reprogram the system
- Check for HomeLink® firmware updates through your RAM dealership during regular service
The Advantages of Using HomeLink® vs. Traditional Remotes
| Feature | HomeLink® | Traditional Remote |
|---|---|---|
| Battery Replacement | Never needed | Typically annual |
| Weather Resistance | Protected inside vehicle | Exposed to elements |
| Theft Risk | Integrated into vehicle | Can be stolen if left visible |
| Multiple Door Control | Up to 3 devices | One per remote |
| Convenience | Always available | Must be carried/stored |
Creative Uses for Your HomeLink® System
Beyond garage doors, consider programming HomeLink® to control:
- Front gates or community entrance barriers
- Home lighting systems compatible with RF technology
- Security systems with remote arming/disarming capabilities
- Outdoor lighting around your driveway
Final Tips for Successful Programming
- Perform the initial programming away from your garage to prevent accidental door activation
- Consider having a helper watch the garage door motor during the programming process
- For persistent issues, contact HomeLink® support at 1-800-355-3515
- Check your RAM owner’s manual for vehicle-specific instructions or variations
Programming your RAM’s garage door opener system transforms your daily routine, eliminating the need for separate remotes while adding convenience to your coming and going. The one-time setup process pays dividends in convenience for years to come.