Breathing recycled dust, pollen, and exhaust fumes every commute? Your Toyota RAV4 cabin air filter might be the problem. This guide covers everything — filter types, replacement schedules, and a foolproof step-by-step replacement process. Stick around, and you’ll never overpay a dealership for this five-minute job again.
Why Your RAV4 Cabin Air Filter Actually Matters
Most RAV4 owners ignore the cabin air filter until something smells wrong. That’s a costly mistake.
Every time you run your climate control system, thousands of cubic feet of outside air pass through this single filter before reaching your lungs. Without it working properly, road dust, brake particles, industrial soot, and pollen flow directly into your breathing space.
But here’s what really gets expensive — a clogged filter doesn’t just affect air quality. It silently destroys your climate control system from the inside out.
When airflow gets choked, the blower motor overheats. The wet evaporator core collects mud and breeds mold. You end up with weak airflow, sour smells, and a repair bill that makes a $15 filter look like the deal of the century.
So yes, this small rectangle of pleated material pulls serious weight.
What Filter Type Does Your RAV4 Actually Need?
Not all cabin air filters work the same way. Here’s a quick breakdown:
Standard Particulate Filters catch dust, pollen, and mold spores using dense synthetic fibers. Many use an electrostatic charge to pull in microscopic particles. These are your baseline option — reliable and affordable.
Activated Carbon Filters do everything a particulate filter does, plus they trap exhaust gases, odors, and volatile organic compounds through a process called adsorption. If you drive in heavy traffic or near industrial areas, these are worth every extra dollar. The Toyota OEM version carries part number 87139-58010.
HEPA Filters capture 99.97% of particles at 0.3 microns — laboratory-grade filtration for allergy and asthma sufferers. The tradeoff? Slightly reduced airflow due to the denser media.
Washable Filters (K&N VF2054) skip the replacement cycle entirely. You clean and reinstall them. Good for eco-conscious owners, though they require regular maintenance.
Filter Comparison Table
| Brand | Part Number | Filter Type | Best For |
|---|---|---|---|
| Toyota OEM | 87139-0R030 | Particulate | Standard daily driving |
| Toyota OEM | 87139-58010 | Activated Carbon | Urban commuters, odor control |
| Mahle LAK 1369 | 146668-02079786 | Activated Carbon | Premium aftermarket option |
| Fram CF12157 | CF12157 | Carbon + Baking Soda | Heavy odor neutralization |
| WIX | 13763CFBQ | Particulate or Carbon | Enthusiast-grade build quality |
| K&N | VF2054 | Washable Synthetic | Eco-friendly, reusable |
| Bosch | 6092C | Particulate or Carbon | Reliable mid-tier option |
One important note on aftermarket filters: Some budget brands have manufacturing tolerances that are slightly off. If the filter’s perimeter flange is even a fraction too thick, the housing door won’t latch properly. This creates a gap that lets unfiltered air bypass the system entirely — and produces a whistling noise you’ll hear every time you run the fan.
How Often Should You Replace the RAV4 Cabin Air Filter?
Toyota recommends replacing the cabin air filter every 15,000 to 30,000 miles under normal driving conditions. But “normal” covers a lot of ground.
Toyota RAV4 Maintenance Schedule — Cabin Filter Milestones
| Mileage | Time | Cabin Filter Action |
|---|---|---|
| 10,000 miles | 12 months | Optional replacement heading into allergy season |
| 15,000 miles | 18 months | Primary inspection and replacement milestone |
| 30,000 miles | 36 months | Full replacement alongside engine air filter |
| 60,000 miles | 72 months | Replacement continues with major service interval |
| 100,000 miles | 120 months | Regular replacement alongside coolant flush |
If you drive in severe conditions — unpaved roads, heavy city traffic, frequent towing — drop that interval to every 10,000 to 12,000 miles. That’s roughly once per year.
Signs Your Filter Needs Replacing Now
Don’t wait for a scheduled service if you notice these:
- Weak airflow even on the highest fan setting
- Musty or sour smell when the AC kicks on
- Persistent interior window fogging in cold weather
- Visible debris, leaves, or dark discoloration on the filter surface
- Any sign of rodent activity or nesting near the cowl area
Where Your RAV4 Lives Affects How Fast It Gets Dirty
Geography matters more than most owners realize.
Southwest desert states (Arizona, Nevada, Utah): Fine silica dust and sand destroy filters fast. Expect to replace yours well ahead of the standard schedule.
Dense urban corridors (LA, Chicago, Northeast Megalopolis): Exhaust gases and tire microplastics dominate. An activated carbon filter isn’t optional here — it’s essential. Keep in mind that carbon filters saturate from gases before they look visually clogged, so don’t judge them by appearance alone.
Pacific Northwest and Eastern Seaboard forests: Heavy pollen seasons and damp organic debris are your enemies. Wet leaves trapped inside a dark filter housing grow mold fast — and that mold smell goes straight into the cabin.
Step-by-Step: Toyota RAV4 Cabin Air Filter Replacement
This procedure works across the third generation (2006–2012), fourth generation (2013–2018), and fifth generation (2019–2025). The whole job takes about five minutes. No tools required.
Step 1: Empty the Glove Box
Open the glove box and remove everything inside. A heavy, loaded glove box puts stress on the plastic hinges when you lower it. Clear it out completely before touching anything else.
Step 2: Disconnect the Damper Arm
Look at the right exterior side of the glove box. You’ll spot a small shock absorber — the damper — connected to a plastic pin on the glove box sidewall. Pull the damper arm straight outward until it slips off the post. It takes minimal force. Once disconnected, it’ll retract out of your way.
Step 3: Lower the Glove Box
Two plastic stopper pins sit on the upper left and right corners of the glove box, preventing it from dropping too far. Squeeze both sides of the glove box inward firmly. As the plastic flexes, the stopper pins clear the dashboard frame. Then let the glove box pivot gently downward toward the passenger footwell. Don’t force it straight down — work with the flex of the plastic.
Step 4: Remove the Access Cover
With the glove box lowered, you’ll see a rectangular black plastic cover. Pinch the flexible locking tabs on the right side inward, then pull the cover straight back toward the passenger seat. It detaches completely.
Step 5: Slide Out the Old Filter
Grab the exposed edges of the old filter and slide it out slowly and horizontally. Pulling it out at an angle dumps debris directly into the blower motor below. Once it’s out, shine a flashlight into the cavity. Vacuum out any leaves, dust, or debris before installing the new filter.
Step 6: Orient the New Filter CORRECTLY
This is where most people go wrong — and it causes real damage.
Air in the RAV4 flows downward through the filter, from top to bottom.
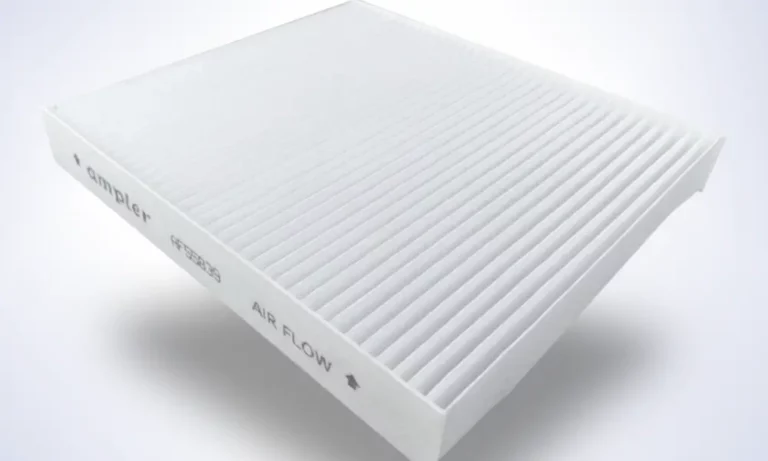
- Toyota OEM filters print an arrow labeled UP. Install the filter with that arrow pointing toward the car’s roof.
- Aftermarket filters typically print an AIRFLOW arrow. Because air flows downward in the RAV4, install these with the airflow arrow pointing toward the floor.
Getting this direction wrong causes the filter media to buckle, collapses the pleats, and creates a loud fluttering noise when the fan runs. It also compromises the filter’s structural integrity entirely.
Step 7: Seat and Secure the Filter
Slide the new filter fully into the tray, making sure all edges tuck under the retaining tabs. Insert the access cover left side first, then swing the right side closed until you hear a definitive click. If it doesn’t click, the filter isn’t seated properly.
Step 8: Reassemble and Test
Lift the glove box back up, squeeze the sides inward to clear the stopper pins, and let them lock into position. Snap the damper arm back onto its post. Turn the ignition to accessory mode, run the fan on maximum, and check for strong airflow and zero whistling. If you hear any unusual noise, the access door hasn’t sealed correctly.
The $80+ Dealership Markup You Don’t Need to Pay
Here’s the uncomfortable truth about dealership pricing for this service.
A professional shop charges between $75 and $119 to replace your cabin air filter. The filter itself costs $20 to $30. The labor takes a trained technician under five minutes. The rest is pure markup — applied to customers who don’t know how simple this job actually is.
Buying the filter yourself from an auto parts store or online drops your total cost to $10 to $20. Over 150,000 miles of ownership, the DIY approach saves several hundred dollars — and takes less time than waiting in a dealership lounge.
RAV4 Hybrid Owners: Don’t Forget the Second Filter
If you drive a RAV4 Hybrid or RAV4 Prime, there’s a second filter that most people completely miss.
The high-voltage traction battery uses ambient cabin air for cooling. A dedicated intake vent — usually built into the trim beneath the rear seats — houses the Traction Battery Cooling Filter (OEM part number G92DH-42010).
If this filter clogs, the battery can’t cool itself. The software kicks in to limit performance and protects against thermal runaway. Warning lights appear on the dashboard. It’s a bigger problem than it sounds.
Toyota recommends inspecting this filter every 5,000 miles and cleaning surface debris as needed. Don’t skip it.
FAQs
Does an uninstalled cabin air filter expire sitting in a box?
A standard particulate filter lasts indefinitely in a dry, temperature-controlled space. Activated carbon filters are different — the moment you open the sealed packaging, the carbon starts adsorbing moisture and gases from the room air. Keep carbon filters sealed until you’re ready to install them immediately. An unsealed carbon filter left sitting for weeks loses filtration capacity before it ever goes in the car.
Can you spray air freshener or essential oils directly on the filter?
Don’t do it. Oils clog the microscopic pores in the filter media, which drops airflow efficiency immediately. Worse, petroleum-based fragrances break down the adhesive bonding the filter media to its frame. If that adhesive fails, the filter can collapse and get pulled directly into the blower motor. Use a vent clip or standalone air freshener instead.
Does a clogged cabin filter cause window fogging?
Yes, and this connection surprises most drivers. The climate control system depends on high-volume airflow to sweep moisture off interior glass surfaces. When a clogged filter starves the system of air, humidity builds up inside the cabin with nowhere to go. The result is stubborn interior fog — especially on cold mornings — that takes forever to clear and reduces visibility dangerously.
Does opening windows bypass the cabin filter entirely?
Completely. The climate control system is designed to pressurize the cabin slightly, which prevents unfiltered air from sneaking through door seal gaps. The moment you open a window, that positive pressure disappears. Raw outside air floods the cabin, and the filter only cleans the small stream passing through the dashboard vents. If you’re driving through heavy traffic or near industrial areas, keep the windows up and run the system on recirculate.
Can car wash water get into the filter housing?
Under normal conditions, the cowl plenum drains water away through internal baffles and rubber tubes. But if those drain tubes clog with leaves, mud, or pine needles — which happens often on vehicles parked under trees — water backs up and overflows into the air intake. A soaked cabin filter grows mold quickly, and water reaching the blower motor below can cause electrical shorts. Clearing debris from the exterior wiper cowl area is just as important as changing the filter itself.